background image

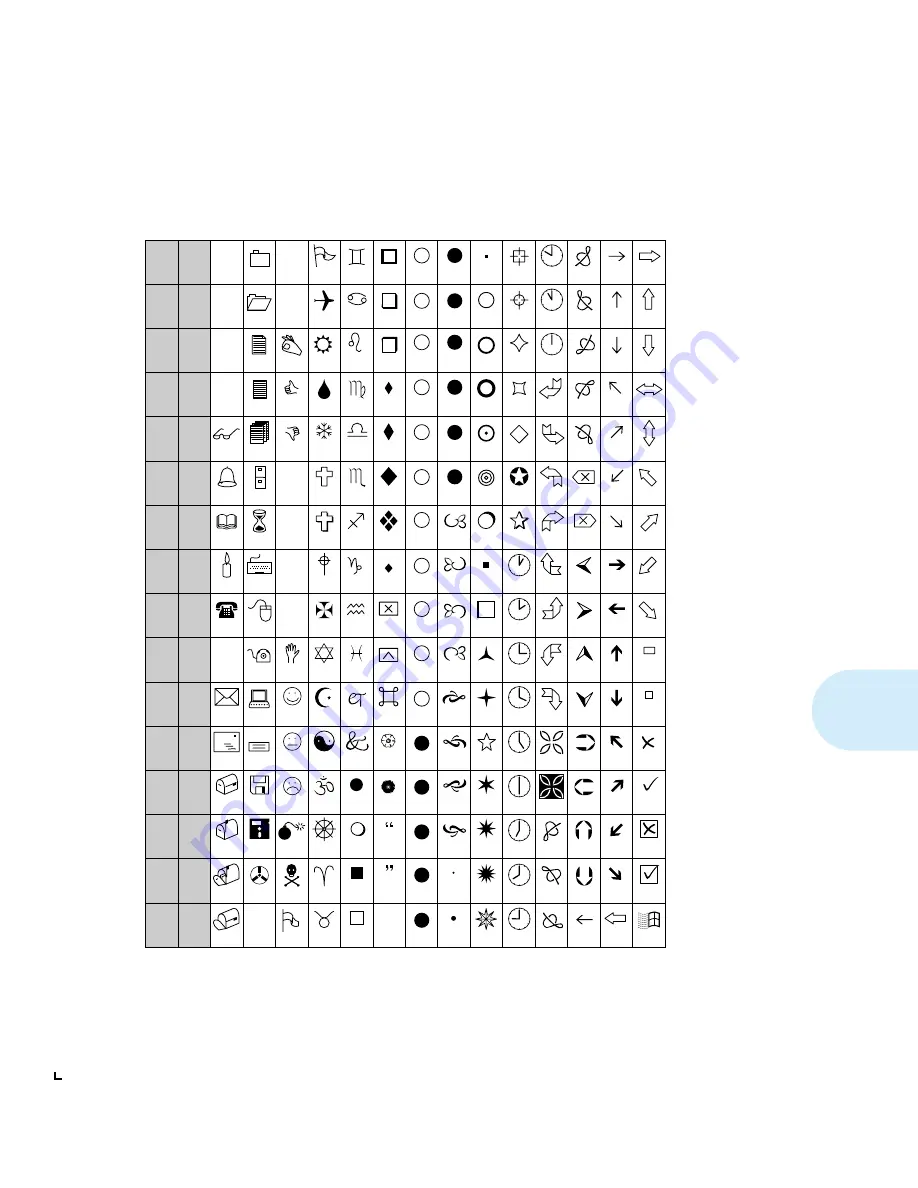
S y m b o l   S e t   T a b l e

A p p e n d i x E :   S y m b o l   S e t   T a b l e  

  E-27

579L Wingdings Font (L$)

0

1

2

3

4

5

6

7

8

9

10

11

12

13

14

15

16

17

18

19

20

21

22

23

24

25

26

27

28

29

30

31

32

33

34

35

36

37

38

39

40

41

42

43

44

45

46

47

48

49

50

51

52

53

54

55

56

57

58

59

60

61

62

63

64

65

66

67

68

69

70

71

72

73

74

75

76

77

78

79

80

81

82

83

84

85

86

87

88

89

90

91

92

93

94

95

96

97

98

99

100

101

102

103

104

105

106

107

108

109

110

111

112

113

114

115

116

117

118

119

120

121

122

123

124

125

126

127

160

161

162

163

164

165

166

167

168

169

170

171

172

173

174

175

176

177

178

179

180

181

182

183

184

185

186

187

188

189

190

191

192

193

194

195

196

197

198

199

200

201

202

203

204

205

206

207

208

209

210

211

212

213

214

215

216

217

218

219

220

221

222

223

224

225

226

227

228

229

230

231

232

233

234

235

236

237

238

239

240

241

242

243

244

245

246

247

248

249

250

251

252

253

254

255

NUL

SOH

STX

ETX

EOT

ENQ

ACK

BEL

BS

HT

LF

VT

FF

CR

SO

SI

DLE

DC1

DC2

DC3

DC4

NAK

SYN

ETB

CAN

EM

SUB

ESC

FS

GS

RS

US

0

1

2

3

4

5

6

7

8

9

A

B

C

D

E

F

0

1

2

3

4

5

6

7

8

9

A

B

C

D

E

F

128

129

130

131

132

133

134

135

136

137

138

139

140

141

142

143

144

145

146

147

148

149

150

151

152

153

154

155

156

157

158

159

SP

?

5

6

7

8

9

10

0

1

2

3

4

5

6

7

8

9

10

0

1

2

3

4

Содержание DocuPrint 4512

Страница 1: ...The Xerox DocuPrint 4512 4512N Network Laser Printer Setting Up Guide...

Страница 2: ...osoft Windows Microsoft Word MS and MS DOS are trademarks of Microsoft Corporation Intellifont is a registered trademark of Miles Inc MicroType is a trademark of Bayer Corporation Agfa Division Times...

Страница 3: ...Selecting a Printer Location 3 Unpacking the Printer 4 Getting to Know the Printer 5 Assembling the Printer 6 Testing the Printer 12 Installing Printer Options 13 Connecting to the Host 14 Xerox Font...

Страница 4: ...depending on which printer options you install Follow all instructions in this guide to complete printer setup 1 Selecting a Printer Location page 3 2 Unpacking the Printer page 4 3 Getting to Know th...

Страница 5: ...accessible for viewing and use Is there enough clearance above and around the printer to replace consumables Is there enough clearance above the printer to add the optional High Capacity Feeder It ad...

Страница 6: ...of the parts as shown in Figure 2 are present If they are not contact your dealer or Xerox Rank Xerox Figure 2 Printer parts 1 Power Cord 2 Photoconductor Drum 3 Toner Cartridge 4 Tray Extension 5 Pr...

Страница 7: ...components Front View 1 Fuser Cover 2 Control Panel Display 3 Front Cover 4 Manual Feed Slot 5 Manual Feed Guide 6 Upper Paper Tray 7 Lower Paper Tray 8 Paper Output Tray 9 Top Cover 10 Tray Release...

Страница 8: ...low the instructions below to assemble the printer Caution Do not expose the Photoconductor Drum to direct sunlight or artificial light for more than 15 minutes Overexposure will permanently damage th...

Страница 9: ...u i d e 7 3 Hold the Toner Cartridge by its handle and gently lower it into the printer The cartridge does not click into place The arrows on the cartridge and printer should line up 4 Hold the Toner...

Страница 10: ...s interior The photosensitive drum is easily damaged Do not touch it or expose it to direct light 6 Pivot the Photoconductor Drum down toward the back of the printer until it falls into place horizon...

Страница 11: ...slot Close the front cover and the top cover 10 Press the tray release button on the right side of the upper paper tray then remove the tray from the printer 11 Remove the stopper that protects the tr...

Страница 12: ...inside front corners of the tray Do not overload the tray The side of paper facing up gets printed 14 If the paper does not fit within the preset paper guides adjust the guides so that they rest again...

Страница 13: ...ray The Tray Extension supports printed sheets of paper as they come out of the printer You may find it convenient to leave it permanently in place 17 Check that the power switch is in the OFF O posit...

Страница 14: ...ay 2 Press On Line The On Line light goes off The display reads Printing Menu 3 Press Menu until The display reads Test Menu 4 Press Item until The display reads Config Sheet 5 Press Enter The Data li...

Страница 15: ...ace Board pre installed on the 4512N Token Ring Interface Board Paper handling options include High Capacity Feeder Envelope Tray If you have purchased any of these options install them now Refer to A...

Страница 16: ...te interface cable s to connect the printer to the host s Refer to Table 1 on page 15 for specifications If the printer has the Ethernet NIC option preinstalled refer to the NIC card installation manu...

Страница 17: ...rt Type Cable Type s Connection Type Maximum Length Parallel P1284 IEEE P1284 B Compliant Parallel Cable Standard Centronics 36 pin male 6 feet 2 meters Serial option 9 to 25 pin M F RS 232 DB 25 9 fe...

Страница 18: ...ression technology designed for high throughput of all type styles with uncompromised type rendering The Xerox Font Manager also includes a number of productivity enhancements such as double clicking...

Страница 19: ...instructions on installing a new printer driver Contact your dealer or Xerox Rank Xerox for any drivers you need beyond those supplied with the printer Table 2 DocuPrint 4512 PCL 5e emulation printer...

Страница 20: ...Windows NT 3 5 OnPAGE PS2 Printer Driver for Microsoft Windows NT 3 5 IBM OS 2 OS 2 Ver 2 1 Xerox DocuPrint 4512 PS2 Printer Driver for IBM OS 2 Ver 2 1 OS 2 WARP Xerox DocuPrint 4512 PS2 Printer Driv...

Страница 21: ...12N Network Laser Printer If you have any questions or need to set optional parameters for printing the DocuPrint 4512 4512N User Guide is a complete reference guide to all the printer s features and...

Страница 22: ...W h a t t o D o N e x t 20 S e t t i n g U p G u i d e...

Страница 23: ...Guide 1 2 Printer Components 1 3 Special Features 1 4 Duplex Printing 1 4 Multiple Paper Trays and Increased Paper Handling 1 4 Automatic Emulation Input Switching 1 4 State Saving 1 4 Printer Generat...

Страница 24: ...may occasionally need to refer to this User Guide as a reference for the following Learning about special printer features Special Features page 1 4 Paper specifications loading paper and duplex prin...

Страница 25: ...Display 3 Front Cover 4 Manual Feed Slot 5 Manual Feed Guide 6 Upper Paper Tray 7 Lower Paper Tray 8 Paper Output Tray 9 Top Cover 10 Tray Release Buttons Rear View 1 Top Cover Release Lever 2 Tray Ex...

Страница 26: ...to the lower tray and feeds from there first effectively giving you a 500 sheet capacity You can also install the optional 1000 sheet High Capacity Feeder to further extend your printing capacity For...

Страница 27: ...a sample of the printer s capabilities and lists the printer s key features The PCL 5e Font List shows which PCL fonts are currently available The list includes resident fonts and downloaded fonts Whe...

Страница 28: ...printing scanned photographs or computer graphic images with graded fills Power Saving After 30 minutes of inactivity the printer automatically turns off internal components to reduce the amount of e...

Страница 29: ...uses available printer memory If you plan to print highly complex jobs or need features like state saving and page protection you may need to add printer memory Table 1 1 lists memory requirements wh...

Страница 30: ...1 8 D o c u P r i n t 4 5 1 2 4 5 1 2 N U s e r G u i d e...

Страница 31: ...5 Loading Paper for Simplex One Sided Printing 2 6 Loading Paper for Duplex Two Sided Printing 2 7 Loading Envelopes in the Envelope Tray 2 7 Manual Feed Guide Loading 2 9 Fitting and Adjusting the Ma...

Страница 32: ...P a p e r H a n d l i n g 2 2 D o c u P r i n t 4 5 1 2 4 5 1 2 N U s e r G u i d e Paper Output 2 14 Using the Tray Extension 2 14 Automatic Tray Switching 2 15 Bind Options for Duplex Printing 2 16...

Страница 33: ...x11 216x279mm 16 24lb 60 90 g m2 16 24lb 60 90 g m2 16 36lb 60 136 g m2 Folio Legal 13 8 5x13 216x330mm 16 24lb 60 90 g m2 16 24lb 60 90 g m2 16 36lb 60 136 g m2 Legal Legal 14 8 5x14 216x356mm 16 24l...

Страница 34: ...hen paper and other print media are properly stored Proper storage ensures optimum print quality and trouble free printer options Store the paper on a flat surface in a relatively low humidity environ...

Страница 35: ...gh Capacity Feeder holds 1 000 sheets of 20 lb 75 g m2 paper An optional Envelope Tray holds up to 20 envelopes and replaces the upper paper tray for automatic envelope loading Adjusting Trays for Pap...

Страница 36: ...u P r i n t 4 5 1 2 4 5 1 2 N U s e r G u i d e Loading Paper for Simplex One Sided Printing Figure 2 2 shows the proper orientation when loading paper for simplex one sided printing Figure 2 2 Proper...

Страница 37: ...d Printing Figure 2 3 shows the proper orientation when loading paper for duplex two sided printing Loading Envelopes in the Envelope Tray Figure 2 4 shows how to adjust the Envelope Tray for differen...

Страница 38: ...8 D o c u P r i n t 4 5 1 2 4 5 1 2 N U s e r G u i d e Figure 2 5 shows how envelopes are loaded flap down for printing Use the software application for proper orientation Figure 2 5 Proper envelope...

Страница 39: ...manual feed guide is not attached to the manual feed slot on the front of the printer start with Step 1 below Otherwise skip to Step 2 Proper orientation of media in the manual feed guide is discussed...

Страница 40: ...6 shows the proper orientation for feeding paper for simplex one sided printing Feeding Paper for Two Sided Printing Figure 2 7 shows the proper orientation for feeding paper for duplex two sided pri...

Страница 41: ...nting Envelopes Figure 2 8 shows how envelopes are fed flap up Use the software application for proper orientation Printing Labels and Transparencies Figure 2 9 shows the correct orientation for feedi...

Страница 42: ...g transparencies Figure 2 10 Manual feed transparency orientation Note If you get poor results when you change from normal printing on paper to printing on transparency film of the type used for overh...

Страница 43: ...Cartridge sooner You can conserve toner by reducing density when doing draft printing There is a dial for adjusting the density of toner at the rear of the printer between the fan outlet and the paral...

Страница 44: ...s to neatly stack large volumes of output Using the Tray Extension The Tray Extension is inserted into the slots on the back of the printer as shown in Figure 2 12 It may have already been installed a...

Страница 45: ...ut of paper the printer automatically switches to the next tray in the sequence provided the paper in the next tray is the same size as that in the current tray Searching for the correct paper size If...

Страница 46: ...in the proper orientation set the Bind item in the Control Panel s Printing menu to the appropriate settings see Figure 2 13 Figure 2 13 Duplex binding orientation and Control Panel menu settings Por...

Страница 47: ...B i n d O p t i o n s f o r D u p l e x P r i n t i n g C h a p t e r 2 P a p e r H a n d l i n g 2 17...

Страница 48: ...B i n d O p t i o n s f o r D u p l e x P r i n t i n g 2 18 D o c u P r i n t 4 5 1 2 4 5 1 2 N U s e r G u i d e...

Страница 49: ...B i n d O p t i o n s f o r D u p l e x P r i n t i n g C h a p t e r 2 P a p e r H a n d l i n g 2 19...

Страница 50: ...B i n d O p t i o n s f o r D u p l e x P r i n t i n g 2 20 D o c u P r i n t 4 5 1 2 4 5 1 2 N U s e r G u i d e...

Страница 51: ...Panel Features 3 2 Indicator Lights 3 3 Display Panel Messages 3 3 Control Keys 3 4 The Menu System 3 6 Using the Control Panel 3 7 Setting the Printer 3 7 Printing Test Sheets 3 17 Setting Power Sav...

Страница 52: ...nt 4512 Control Panel Figure 3 1 serves two purposes It displays information about the status of the printer or the job in process and It provides the means for changing printer settings to control ho...

Страница 53: ...jams and running out of supplies Service messages These provide technical information about equipment failure Table 3 1 Control Panel indicator lights and their functions Light Description Fault Yell...

Страница 54: ...when the printer is on line Menu Cycles the display through the menus Item Cycles the display through the items in each menu Up Cycles the display backward through the values for each menu item The cu...

Страница 55: ...ne 2 Press Menu to display the menu you want to access 3 Press Item to display the menu item you want to set 4 Press Up or Down to change the item s value 5 Press Enter to set the item to the value di...

Страница 56: ...items Printing Menu Job Menu Config Menu Serial Menu Test Menu Misc Menu Copies Resolution Warn Msg Baud Rate Config Sheet Prt Screen Font Number Page P Manual Set Data Bit PCL 5e Font List Message Du...

Страница 57: ...may be different For an alphabetical listing of menu items and more detailed descriptions see Table 3 6 on page 3 23 For each task listed in Table 3 4 you will find All possible choices for the item t...

Страница 58: ...ting Sets the printer s base font Choices 0 45 On Line Takes the printer off line Printing Menu Item Displays the Copies item Copies X Item Displays the Font Number item Font Number X Up or Down Chang...

Страница 59: ...Line Takes the printer off line Printing Menu Menu Displays the Job Menu Job Menu Item Displays the Resolution item Resolution X Up or Down Toggles the resolution setting Resolution N Enter Saves the...

Страница 60: ...g N Enter Saves the new value St Saving N On Line Returns the printer on line PCL 5e A4 A4 Change the emulation setting Sets the base printer emulation Choices PCL 5e PS2 AUTO HEX On Line Takes the pr...

Страница 61: ...Returns the printer on line PCL 5e A4 A4 Change the manual feed setting Controls the override of manual paper feed requests from computer applications Choices On Off On Line Takes the printer off line...

Страница 62: ...ns the printer on line PCL 5e A4 A4 Change the advanced functions setting Controls whether or not the printer will send status messages to the computer Choices On Off On Line Takes the printer off lin...

Страница 63: ...g Baud Rate N Enter Saves the new value Baud Rate N On Line Returns the printer on line PCL 5e A4 A4 Change the data bit setting Controls a communications parameter for the optional serial interface C...

Страница 64: ...Line Returns the printer on line PCL 5e A4 A4 Change the Robust XON setting Controls a datastream handshaking protocol for the optional serial interface Choices On Off On Line Takes the printer off li...

Страница 65: ...X Up or Down Changes the polarity setting DTR Polarity N Enter Saves the new value DTR Polarity N On Line Returns the printer on line PCL 5e A4 A4 Change the print screen setting Controls the default...

Страница 66: ...Menu Displays Misc Menu Misc Menu Item Displays Prt Screen item Prt Screen X Item Displays Message item Message X Up or Down Changes the message language setting Message N Enter Saves the new value M...

Страница 67: ...enu if present Serial Menu Menu Displays the Test Menu Test Menu Item Displays the Config Sheet item Config Sheet Enter Prints the Configuration Sheet Config Sheet On Line Returns the printer on line...

Страница 68: ...e PS2 Font List PS2 Font List On Line Returns the printer on line PCL 5e A4 A4 Print the PCL 5e Demo Page Provides a sample of the printer s capabilities and lists the printer s key features On Line T...

Страница 69: ...t Item Displays the PCL 5e Font List item PCL 5e Font List Item Displays the PS2 Font List item PS2 Font List Item Displays the PCL 5e Demo Page item PCL 5e Demo Page Item Displays the PS2 Demo Page i...

Страница 70: ...ing Simplex and Duplex Demo Pages The DocuPrint 4512 has a Demo Page Mode in which demo pages can be printed by a single key press To enter Demo Page Mode 1 Power off the printer 2 Press Data Clear an...

Страница 71: ...o print a simplex demo page press Enter To print a duplex demo page press Up If the PostScript option is installed the PS2 demo pages will be printed Otherwise the PCL 5e demo pages will be printed 4...

Страница 72: ...l Panel menu items For each item listed you will find The menu item The menu under which the item is located All possible settings for the item The factory default setting for the item A boldfaced set...

Страница 73: ...ch data is transferred between the computer and the printer Older computers require slower settings Refer to your computer manual Bind Printing Menu Long Edge Short Edge Sets the binding of the print...

Страница 74: ...set to Off for slower or older computers Setting it to On improves data transfer speed Manual Set Config Menu On Off Controls processing of manual feed request from computer application When set to O...

Страница 75: ...0 300 Sets the print resolution in dpi dots per inch Robust XON Serial Menu On Off Appears only when the serial interface option is installed Controls the XON datastream handshaking protocol When set...

Страница 76: ...3 26 D o c u P r i n t 4 5 1 2 4 5 1 2 N U s e r G u i d e...

Страница 77: ...s 4 1 Fonts C h a p t e r 4 Fonts in Your Printer 4 2 Xerox Font Manager 4 2 Intellifont 4 3 TrueType 4 3 Bitmap 4 4 PostScript 4 4 Printing Font Lists 4 5 Selecting Fonts 4 6 Changing the Font Number...

Страница 78: ...s Most important the Xerox Font Manager uses Agfa s new MicroType font compression technology designed for high throughput of all type styles with uncompromised type rendering The Xerox Font Manager a...

Страница 79: ...c CG Times CG Times Bold CG Times Bold Italic CG Times Italic Clarendon Condensed Coronet Courier Courier Bold Courier Bold Italic Courier Italic Garamond Antiqua Garamond Halbfett Garamond Kursiv Gar...

Страница 80: ...vant Garde Gothic Demi ITC Avant Garde Gothic Demi Oblique ITC Bookman Demi ITC Bookman Demi Italic ITC Bookman Light ITC Bookman Light Italic Courier Courier Bold Courier Bold Oblique Courier Oblique...

Страница 81: ...splays the PCL 5e Font List item PCL 5e Font List Enter Prints the PCL 5e Font List PCL 5e Font List On Line Returns the printer on line PCL 5e A4 A4 Print the PS2 Font List On Line Takes the printer...

Страница 82: ...setting the N indicates a new setting and the asterisk indicates that the new setting has been entered Table 4 5 Using the Control Panel to change the font number setting Task Key Press Sequence Actio...

Страница 83: ...nloaded to printer memory on a job basis are cleared from the printer s memory after each job Permanent fonts downloaded to printer memory are cleared from the printer s memory whenever the printer is...

Страница 84: ...4 8 D o c u P r i n t 4 5 1 2 4 5 1 2 N U s e r G u i d e...

Страница 85: ...Chapter 5 C h a p t e r 5 P r i n t e r D r i v e r s 5 1 Printer Drivers C h a p t e r 5 DocuPrint 4512 PCL 5e Emulation Printer Drivers 5 2 DocuPrint 4512 PostScript Printer Drivers 5 3...

Страница 86: ...es and the Internet Table 5 1 DocuPrint 4512 PCL 5e emulation printer drivers Environment Printer Driver Diskette DOS Microsoft Word Ver 6 0 Xerox DocuPrint 4512 Printer Driver for MS Word 6 0 for DOS...

Страница 87: ...A Ordering Information Printer software and drivers may also be available through on line services and the Internet Table 5 2 DocuPrint 4512 PostScript printer drivers Environment Printer Driver Disk...

Страница 88: ...5 4 D o c u P r i n t 4 5 1 2 4 5 1 2 N U s e r G u i d e...

Страница 89: ...Chapter 5 C h a p t e r 5 P r i n t e r D r i v e r s 5 1 Printer Drivers C h a p t e r 5 DocuPrint 4512 PCL 5e Emulation Printer Drivers 5 2 DocuPrint 4512 PostScript Printer Drivers 5 3...

Страница 90: ...es and the Internet Table 5 1 DocuPrint 4512 PCL 5e emulation printer drivers Environment Printer Driver Diskette DOS Microsoft Word Ver 6 0 Xerox DocuPrint 4512 Printer Driver for MS Word 6 0 for DOS...

Страница 91: ...A Ordering Information Printer software and drivers may also be available through on line services and the Internet Table 5 2 DocuPrint 4512 PostScript printer drivers Environment Printer Driver Disk...

Страница 92: ...5 4 D o c u P r i n t 4 5 1 2 4 5 1 2 N U s e r G u i d e...

Страница 93: ...p t e r 6 Contacting Technical Support 6 2 Before Calling for Service 6 2 Printer Operation Problems 6 3 Print Quality Problems 6 8 Control Panel Messages 6 15 Error Messages at Power On 6 18 Paper J...

Страница 94: ...iginal manufacturer If the problem is related to a specific application package consider contacting the original manufacturer If the problem is driver related consider accessing the Xerox CompuServe o...

Страница 95: ...computer Printer is not on line Check if On Line indicator is glowing If it is not press the On Line key A printer error may have occurred Check the printer display panel Interface cable not secured R...

Страница 96: ...r error other than PAPER OUT may have set the printer off line Check the printer display panel Time Out Error message displayed Time out error Increase the time for I O time out in the computer softwa...

Страница 97: ...ying the file by using fewer characters per line Turn on page protection and try to print the file again Install more memory if you want to print complex files Too many fonts transferred to printer da...

Страница 98: ...ou are printing a long run of pages with more than 30 toner coverage the printer may not give the usual toner status messages Normally the printer will give advice messages on the display panel when t...

Страница 99: ...1 on page 2 3 Bad media Check the paper batch for creases tears nicks ragged edges dirt dampness etc Paper size mismatch Check that the page size setting in your application matches the paper size s...

Страница 100: ...conductor Drum as described in the section Replacing the Photoconductor Drum page 7 6 Irregular faded patches of print Paper quality problem Replace paper stock Corotron parts dirty Clean the transfer...

Страница 101: ...e 7 6 Used Toner Cartridge from a different printer installed Install a new Toner Cartridge as described in the section Replacing the Toner Cartridge and Cleaning Felt page 7 2 Vertical lines Main cor...

Страница 102: ...as described in the section Replacing the Photoconductor Drum page 7 6 Repetitive defects including ghost images Print density set too high Turn the print density adjuster dial counterclockwise to dec...

Страница 103: ...described in the section Replacing the Photoconductor Drum page 7 6 Character voids Paper quality problem Replace paper stock Toner Cartridge defective Replace the Toner Cartridge as described in the...

Страница 104: ...tridge as described in the section Replacing the Toner Cartridge and Cleaning Felt page 7 2 Photoconductor Drum defective Replace the Photoconductor Drum as described in the section Replacing the Phot...

Страница 105: ...ce the Photoconductor Drum as described in the section Replacing the Photoconductor Drum page 7 6 Dark spots or marks Fusing unit dirty Replace the Cleaning Felt as described in the section Replacing...

Страница 106: ...tion Inspect replace paper stock Unsuitable media Check the paper specifications See Table 2 1 on page 2 3 Paper not properly loaded in paper tray Reload the paper See Chapter 2 Paper Handling for pap...

Страница 107: ...tion switching between PCL 5e and PS2 The On Line light remains on ACTION None Cover Open A cover or the Photoconductor Drum is not correctly fitted The Error light remains on ACTION Close all the cov...

Страница 108: ...indicated in the display as UPPER LOWER indicating status of upper tray and lower tray For example LE PO indicates that the upper tray is loaded with letter sized paper and the lower tray is out of pa...

Страница 109: ...is set to PostScript Level 2 emulation The On Line light remains on ACTION None Repl Drum The Photoconductor Drum has worn out The Supply and Error lights remain on ACTION Replace the Photoconductor...

Страница 110: ...ering the printer off and on again or by reseating any options installed on the controller board If any of these messages persists contact your dealer or Xerox Rank Xerox Table 6 4 Error messages when...

Страница 111: ...o complete the print job reprinting the page that jammed What Causes a Paper Jam Paper jams occur most often when The throughput paper stock does not meet specification See Chapter 2 Paper Handling Th...

Страница 112: ...ot begin with the lower tray Open the tray part way and look inside 2 If you see a misfed sheet of paper out of alignment or loose in the tray remove it as carefully as you can If you tear the paper b...

Страница 113: ...dure From Under the Front Cover below 3 When you have completely cleared the jam close the cover The printer will then resume the print job 1 Open the front cover 2 If you see a misfed sheet of paper...

Страница 114: ...6 22 D o c u P r i n t 4 5 1 2 4 5 1 2 N U s e r G u i d e...

Страница 115: ...C h a p t e r 7 Replacing the Toner Cartridge and Cleaning Felt 7 2 Recycling the Toner Cartridge 7 5 Replacing the Photoconductor Drum 7 6 Recycling the Photoconductor Drum 7 8 Cleaning the Printer 7...

Страница 116: ...to a dark setting Exceed five percent area coverage Replace the Toner Cartridge as soon as you see the following message at the Control Panel display Toner Low The Supply indicator light will also gl...

Страница 117: ...pivoting the cover toward the front of the printer 2 Pivot the Photoconductor Drum up toward the front of the printer and lift it straight up and out Set it on a smooth flat surface The Photoconductor...

Страница 118: ...lower it into the printer The cartridge does not click into place The arrows on the cartridge and printer should line up 6 Hold the cartridge in place and pull the tab to remove the tape strip 7 Re i...

Страница 119: ...Cartridge can be recycled free of charge to you Follow the instructions packaged with your new Toner Cartridge to recycle the old one 9 Rotate the fuser cover to the rear 10 Remove the old Cleaning F...

Страница 120: ...if you routinely Print dense text and graphics Adjust the Print Density to a dark setting Exceed five percent area coverage Replace the Photoconductor Drum as soon as you see the following message at...

Страница 121: ...toward the front of the printer 2 Pivot the old Photoconductor Drum up toward the front of the printer and lift it straight up and out 3 Remove the new Photoconductor Drum from its wrapper and insert...

Страница 122: ...e DocuPrint 4512 Photoconductor Drum can be recycled free of charge to you Follow the instructions packaged with your new Photoconductor Drum to recycle the old one 5 Carefully remove the sheet of bla...

Страница 123: ...of paper to which it has not been fused from a spill during removal of the Toner Cartridge or from moving the printer Also dust from paper may accumulate inside the printer further impairing performan...

Страница 124: ...Corotron 1 Power OFF the printer disconnect the power cord and remove the Photoconductor Drum and Toner Cartridge following Steps 1 through 3 on page 7 3 2 Wipe the interior surfaces of the printer T...

Страница 125: ...slot The tabs above the brush on the cleaner fit into the groove above and parallel to the slot in the Photoconductor Drum 5 Draw the cleaner all the way along the main corotron to the other end of th...

Страница 126: ...s wire on the open side of the top cover and looking at the open printer from the back insert the cleaner s black indented edge over the left end of the wire 1 The cleaner s other angled surfaces fit...

Страница 127: ...packing materials To prepare your printer for transportation follow the instructions below If you need to return the printer for service follow the instructions of your service provider for packing a...

Страница 128: ...7 14 D o c u P r i n t 4 5 1 2 4 5 1 2 N U s e r G u i d e...

Страница 129: ...Appendix A A p p e n d i x A O r d e r i n g I n f o r m a t i o n A 1 Ordering Information A p p e n d i x A...

Страница 130: ...00 sheet capacity Envelope Tray 97S01493 Replaces upper paper tray Universal Tray 97S01494 Memory Options 4 MB SIMM 97K15280 No parity 70 ns 32 bits one sided 16 MB SIMM 97K15300 No parity 70 ns 32 bi...

Страница 131: ...RX German 301E7800 RX Spanish Network Interface Cards AppleTalk Serial Option 97S01492 English Ethernet Option Kit 97S01498 English Ethernet Option Kit 97S01499 Spanish Ethernet Option Kit 97S01501 Po...

Страница 132: ...Token Ring Option Kit 97K28660 English Rank Xerox Base Documentation Base Documentation Kit 673K29920 US English Base Documentation Kit 673K29930 French Canadian Base Documentation Kit 673K29940 AO S...

Страница 133: ...B I n s t a l l i n g O p t i o n s B 1 Installing Options A p p e n d i x B Precautions B 2 Memory SIMMs B 3 PostScript Board B 6 AppleTalk Serial Interface Board B 8 Ethernet Token Ring Interface Bo...

Страница 134: ...n then power it back ON after installing removing an option Caution DISCONNECT THE POWER CORD Never remove the printer controller board while the printer is plugged in To avoid the possibility of elec...

Страница 135: ...MB SIMMs are available from Xerox Rank Xerox See Appendix A Ordering Information for ordering additional memory Caution SIMMs and controller boards are sensitive to static electricity Before installin...

Страница 136: ...r OFF the printer and disconnect all cables from the back of the printer 2 Unscrew the outside pair of retaining screws holding the controller board in place Keep the screws in a safe place 3 Carefull...

Страница 137: ...ing into holes on either side of the SIMM and the spring clips gripping it in position 6 To remove a SIMM release the spring clips holding the SIMM in place 7 Reinstall the controller board by sliding...

Страница 138: ...hing something metal such as the metal back plate on any device plugged into a grounded power source If you walk around before finishing the installation again discharge any static electricity Never r...

Страница 139: ...controller board Line up the PostScript board plug with the controller board socket and the plastic post with its locating hole Then push the board into place 5 Reinstall the controller board by slidi...

Страница 140: ...body by touching something metal such as the metal back plate on any device plugged into a grounded power source If you walk around before finishing the installation again discharge any static electr...

Страница 141: ...angling the interface board s connection port into the slot Then push the board into place 6 Secure the interface board with the screws removed from the slot cover in Step 4 7 Reinstall the controller...

Страница 142: ...your body by touching something metal such as the metal back plate on any device plugged into a grounded power source If you walk around before finishing the installation again discharge any static e...

Страница 143: ...ard plug with the controller board socket while angling the interface board s connection port into the slot Then push the board into place 6 Secure the interface board with the screws removed from the...

Страница 144: ...r paper tray To install it remove the upper tray and slide the Envelope Tray into place The Envelope Tray will not fit into the lower tray slot Figure B 1 shows how to adjust the Envelope Tray for dif...

Страница 145: ...Appendix C A p p e n d i x C P r i n t e r S p e c i f i c a t i o n s C 1 Printer Specifications A p p e n d i x C DocuPrint 4512 Specifications C 2 Interface Hardware C 4...

Страница 146: ...0 MHz Maximum Monthly Duty Cycle Up to 35 000 prints Nominal Voltage There are two configurations 110 115 V or 220 240 V Nominal Frequency 50 Hz 60 Hz Power Consumption 500 W peak consumption In Energ...

Страница 147: ...er cord Printer driver diskettes User documentation 2 MB RAM printer memory Available Options See Appendix A Ordering Information for more details 4 MB SIMM 72 pin 70 ns 16 MB SIMM 72 pin 70 ns 1 000...

Страница 148: ...Talk Connector Female 8 pin TCS7189 01 201 or equivalent Serial Connector Female 25 pin DDK 17LE 13250 28 D4CK or equivalent Pin Signal Name Source 1 Frame Ground 2 Transmitted Data Printer 3 Received...

Страница 149: ...Appendix D A p p e n d i x D D o c u P r i n t 4 5 1 2 U n i q u e P r i n t e r C o m m a n d s D 1 DocuPrint 4512 Unique Printer Commands A p p e n d i x D...

Страница 150: ...rresponding paper trays supported by the DocuPrint 4512 An X indicates support for a paper size in a specific tray The escape sequence number refers to the parameter in the PCL Page Size command Esc A...

Страница 151: ...Appendix E A p p e n d i x E S y m b o l S e t T a b l e E 1 Symbol Set Table A p p e n d i x E...

Страница 152: ...145 146 147 148 149 150 151 152 153 154 155 156 157 158 159 160 161 162 163 164 165 166 167 168 169 170 171 172 173 174 175 176 177 178 179 180 181 182 183 184 185 186 187 188 189 190 191 192 193 194...

Страница 153: ...149 150 151 152 153 154 155 156 157 158 159 160 161 162 163 164 165 166 167 168 169 170 171 172 173 174 175 176 177 178 179 180 181 182 183 184 185 186 187 188 189 190 191 192 193 194 195 196 197 198...

Страница 154: ...144 145 146 147 148 149 150 151 152 153 154 155 156 157 158 159 160 161 162 163 164 165 166 167 168 169 170 171 172 173 174 175 176 177 178 179 180 181 182 183 184 185 186 187 188 189 190 191 192 193...

Страница 155: ...44 145 146 147 148 149 150 151 152 153 154 155 156 157 158 159 160 161 162 163 164 165 166 167 168 169 170 171 172 173 174 175 176 177 178 179 180 181 182 183 184 185 186 187 188 189 190 191 192 193 1...

Страница 156: ...128 129 130 131 132 133 134 135 136 137 138 139 140 141 142 143 144 145 146 147 148 149 150 151 152 153 154 155 156 157 158 159 160 161 162 163 164 165 166 167 168 169 170 171 172 173 174 175 176 177...

Страница 157: ...30 131 132 133 134 135 136 137 138 139 140 141 142 143 144 145 146 147 148 149 150 151 152 153 154 155 156 157 158 159 160 161 162 163 164 165 166 167 168 169 170 171 172 173 174 175 176 177 178 179 1...

Страница 158: ...44 145 146 147 148 149 150 151 152 153 154 155 156 157 158 159 160 161 162 163 164 165 166 167 168 169 170 171 172 173 174 175 176 177 178 179 180 181 182 183 184 185 186 187 188 189 190 191 192 193 1...

Страница 159: ...145 146 147 148 149 150 151 152 153 154 155 156 157 158 159 160 161 162 163 164 165 166 167 168 169 170 171 172 173 174 175 176 177 178 179 180 181 182 183 184 185 186 187 188 189 190 191 192 193 194...

Страница 160: ...1 142 143 144 145 146 147 148 149 150 151 152 153 154 155 156 157 158 159 160 161 162 163 164 165 166 167 168 169 170 171 172 173 174 175 176 177 178 179 180 181 182 183 184 185 186 187 188 189 190 19...

Страница 161: ...130 131 132 133 134 135 136 137 138 139 140 141 142 143 144 145 146 147 148 149 150 151 152 153 154 155 156 157 158 159 160 161 162 163 164 165 166 167 168 169 170 171 172 173 174 175 176 177 178 179...

Страница 162: ...42 143 144 145 146 147 148 149 150 151 152 153 154 155 156 157 158 159 160 161 162 163 164 165 166 167 168 169 170 171 172 173 174 175 176 177 178 179 180 181 182 183 184 185 186 187 188 189 190 191 1...

Страница 163: ...144 145 146 147 148 149 150 151 152 153 154 155 156 157 158 159 160 161 162 163 164 165 166 167 168 169 170 171 172 173 174 175 176 177 178 179 180 181 182 183 184 185 186 187 188 189 190 191 192 193...

Страница 164: ...143 144 145 146 147 148 149 150 151 152 153 154 155 156 157 158 159 160 161 162 163 164 165 166 167 168 169 170 171 172 173 174 175 176 177 178 179 180 181 182 183 184 185 186 187 188 189 190 191 192...

Страница 165: ...139 140 141 142 143 144 145 146 147 148 149 150 151 152 153 154 155 156 157 158 159 160 161 162 163 164 165 166 167 168 169 170 171 172 173 174 175 176 177 178 179 180 181 182 183 184 185 186 187 188...

Страница 166: ...1 142 143 144 145 146 147 148 149 150 151 152 153 154 155 156 157 158 159 160 161 162 163 164 165 166 167 168 169 170 171 172 173 174 175 176 177 178 179 180 181 182 183 184 185 186 187 188 189 190 19...

Страница 167: ...132 133 134 135 136 137 138 139 140 141 142 143 144 145 146 147 148 149 150 151 152 153 154 155 156 157 158 159 160 161 162 163 164 165 166 167 168 169 170 171 172 173 174 175 176 177 178 179 180 181...

Страница 168: ...55 156 157 158 159 160 161 162 163 164 165 166 167 168 169 170 171 172 173 174 175 176 177 178 179 180 181 182 183 184 185 186 187 188 189 190 191 192 193 194 195 196 197 198 199 200 201 202 203 204 2...

Страница 169: ...156 157 158 159 160 161 162 163 164 165 166 167 168 169 170 171 172 173 174 175 176 177 178 179 180 181 182 183 184 185 186 187 188 189 190 191 192 193 194 195 196 197 198 199 200 201 202 203 204 205...

Страница 170: ...4 145 146 147 148 149 150 151 152 153 154 155 156 157 158 159 160 161 162 163 164 165 166 167 168 169 170 171 172 173 174 175 176 177 178 179 180 181 182 183 184 185 186 187 188 189 190 191 192 193 19...

Страница 171: ...146 147 148 149 150 151 152 153 154 155 156 157 158 159 160 161 162 163 164 165 166 167 168 169 170 171 172 173 174 175 176 177 178 179 180 181 182 183 184 185 186 187 188 189 190 191 192 193 194 195...

Страница 172: ...68 169 170 171 172 173 174 175 176 177 178 179 180 181 182 183 184 185 186 187 188 189 190 191 192 193 194 195 196 197 198 199 200 201 202 203 204 205 206 207 208 209 210 211 212 213 214 215 216 217 2...

Страница 173: ...63 164 165 166 167 168 169 170 171 172 173 174 175 176 177 178 179 180 181 182 183 184 185 186 187 188 189 190 191 192 193 194 195 196 197 198 199 200 201 202 203 204 205 206 207 208 209 210 211 212 2...

Страница 174: ...7 160 161 162 163 164 165 166 167 168 169 170 171 172 173 174 175 176 177 178 179 180 181 182 183 184 185 186 187 188 189 190 191 192 193 194 195 196 197 198 199 200 201 202 203 204 205 206 207 208 20...

Страница 175: ...63 164 165 166 167 168 169 170 171 172 173 174 175 176 177 178 179 180 181 182 183 184 185 186 187 188 189 190 191 192 193 194 195 196 197 198 199 200 201 202 203 204 205 206 207 208 209 210 211 212 2...

Страница 176: ...162 163 164 165 166 167 168 169 170 171 172 173 174 175 176 177 178 179 180 181 182 183 184 185 186 187 188 189 190 191 192 193 194 195 196 197 198 199 200 201 202 203 204 205 206 207 208 209 210 211...

Страница 177: ...4 165 166 167 168 169 170 171 172 173 174 175 176 177 178 179 180 181 182 183 184 185 186 187 188 189 190 191 192 193 194 195 196 197 198 199 200 201 202 203 204 205 206 207 208 209 210 211 212 213 21...

Страница 178: ...1 2 N U s e r G u i d e ISO Substitution Table ISO 6 4 69 21 15 11 17 60 Name ASCII United Kingdom French German Italian Swedish for Names Spanish Norwegian version 1 ID 0U 1E 1F 1G 0I 0S 2S 0D Decima...

Страница 179: ...Appendix F A p p e n d i x F E n v i r o n m e n t a l S p e c i f i c a t i o n s F 1 Environmental Specifications A p p e n d i x F...

Страница 180: ...ve made it easy for you to return selected printer equipment and empty print cartridges to Xerox We recondition the print cartridges and refill them with Xerox toner and developer All products we manu...

Страница 181: ...there is no guarantee that interference will not occur in a particular installation If this equipment does cause harmful interference to radio or television reception which can be determined by turni...

Страница 182: ...e R glement sur le brouillage radio lectrique du Minist re des Communications du Canada European EME Regulations The CE marking applied to this product symbolizes Rank Xerox Declaration of Conformity...

Страница 183: ...ight of the machine Always exercise care in moving or relocating the equipment Always place the equipment in an area which provides adequate room area for ventilation and servicing Always use the mate...

Страница 184: ...ocedures other than those specified herein may result in a hazardous radiation exposure This product will produce less than 0 1 ppm ozone during normal operation The ozone produced is dependent on cop...

Страница 185: ...erform various operator functions laser danger labels may be visible These labels are for your dealer or service technician and are placed on or near panels or shields which require a tool for removal...

Страница 186: ...F 8 D o c u P r i n t 4 5 1 2 4 5 1 2 N U s e r G u i d e...

Страница 187: ...escribed 3 23 Advanced functions see Adv Fnctns item AppleTalk 1 4 AppleTalk Serial Interface board Installing B 8 to B 9 Auto message On Control Panel display 6 15 Autofeed pickup area Cleaning 7 10...

Страница 188: ...ntrol Panel Changing language displayed 3 16 Display 3 3 Indicator lights 3 3 Keys 3 4 to 3 5 Location of 1 3 Menu system 3 6 Purpose of 3 2 Control Panel messages 6 15 to 6 18 Controller board Locati...

Страница 189: ...play 6 15 DTR Polarity item Changing 3 15 Described 3 23 Duplex item Changing 3 8 Described 3 24 Duplex printing 1 4 Binding options 2 15 Manual paper feed 2 9 Paper tray loading 2 6 E Emulation Switc...

Страница 190: ...city Feeder connector Location of 1 3 High Speed item Changing 3 12 Described 3 24 I I F Board Error message On Control Panel display 6 18 Intellifont Fonts 4 3 Interface Error message On Control Pane...

Страница 191: ...of 1 3 Manual Set item Changing 3 11 Described 3 24 Media Specifications 2 3 Memory Expanding 1 5 Installing B 3 to B 5 Requirements 1 7 Menu system 3 6 Message item Changing 3 16 Described 3 24 Misc...

Страница 192: ...ing 2 5 Loading Duplex 2 6 Simplex 2 6 Location of 1 3 Overview 1 4 Tray switching 2 14 Parallel interface Location of 1 3 Parity item Changing 3 14 Described 3 25 Pause message On Control Panel displ...

Страница 193: ...0 Power Saver mode 1 6 Power saving 1 6 Power switch Location of 1 3 Print density Adjusting 2 12 Print density adjuster Location of 1 3 Using 2 12 Printer drivers PCL 5e emulation 5 2 PostScript 5 3...

Страница 194: ...lution item Changing 3 9 Described 3 25 Robust XON item Changing 3 14 Described 3 25 ROM Error message On Control Panel display 6 18 ROM IFB Error message On Control Panel display 6 18 ROM RAM Error m...

Страница 195: ...on of 1 3 Top cover release lever Location of 1 3 Transfer corotron Cleaning 7 12 Transparencies Manual feeding 2 11 Specifications 2 3 Transporting the printer 7 13 Tray Extension Inserting 2 13 Loca...

Страница 196: ...U IX 10 D o c u P r i n t 4 5 1 2 4 5 1 2 N U s e r G u i d e U Upper paper tray Location of 1 3 W Warn Msg item Changing 3 11 Described 3 25 Warning message see Warn Msg item X Xerox Font Manager 4 2...

Отзывы: