background image

Page 4-14

Xerox WorkCentre 450c/450cp Service Manual

REP 2.1.11: Ink Level Sensor

Parts List: 2.1

1.

Perform the following:

a.

REP 1.1: WorkCentre Cover on page 4-3

b.

REP 2.1.18: Printer Assembly on page 4-
24

2.

Carefully remove the forward printer baffle. 
It is glued in place.

3.

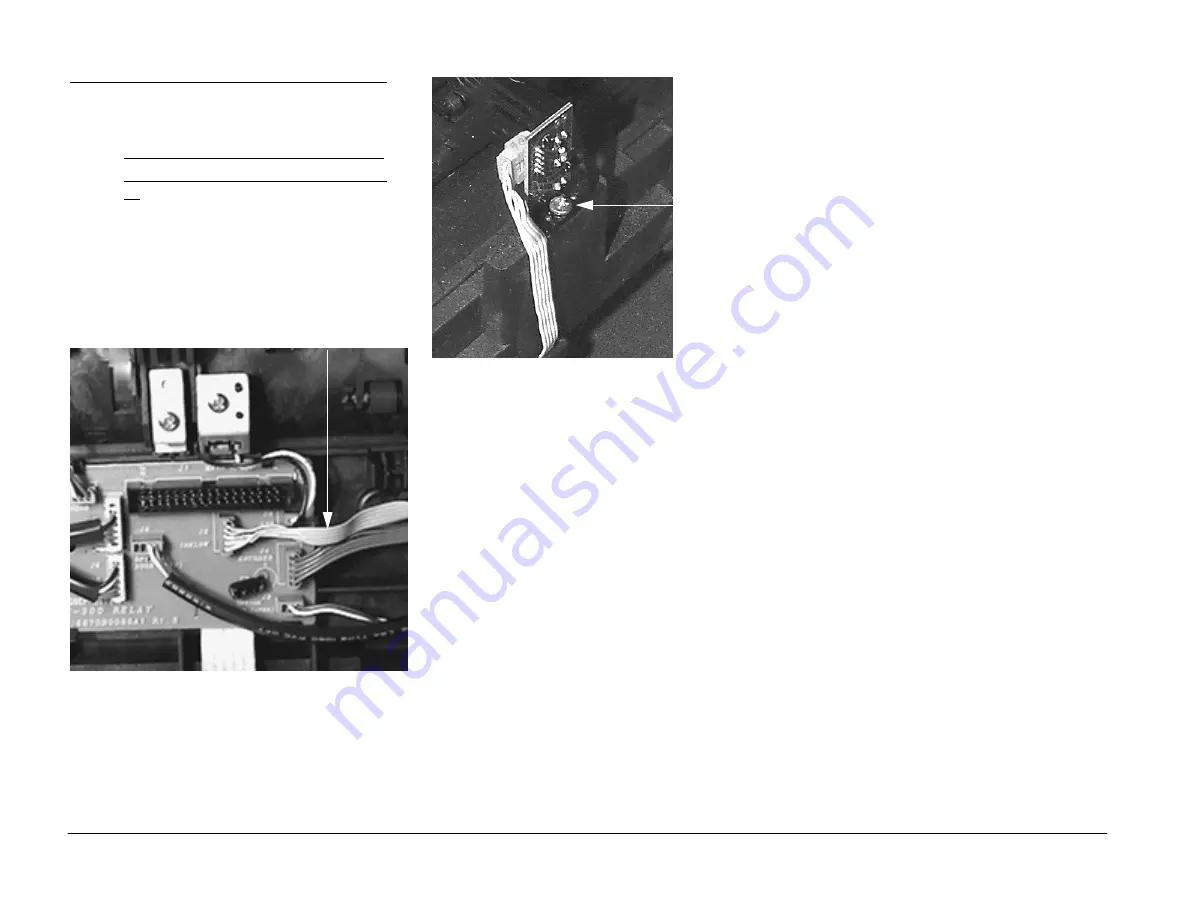
Disconnect the ink level sensor wiring 
harness from the printer interface PWB
(Figure 4-15) connector J2.

Figure 4-15   Ink level sensor wiring 
harness

4.

Remove the screw that attaches the ink level 
sensor to the printer, and remove the sensor 
(Figure 4-16)

Ink level sensor 
wiring harness

Figure 4-16   Ink level sensor

Ink level sensor
retaining screw

www.printcopy.info

www.printcopy.info

Содержание Document WorkCentre 450c

Страница 1: ...ed February 05 1999 Transmittal Page Product Document WorkCentre 450c 450cp Title Service Manual Part Number 701P14820 Status Initial Issue Date February 1999 www printcopy info w w w p r i n t c o p...

Страница 2: ...www printcopy info w w w p r i n t c o p y i n f o...

Страница 3: ...Binder Inserts Cut on the dotted lines Document WorkCentre 450c 450cp Service Manual Document WorkCentre 450c 450cp Service Manual www printcopy info w w w p r i n t c o p y i n f o...

Страница 4: ...www printcopy info w w w p r i n t c o p y i n f o...

Страница 5: ...p Service Manual 701P14820 February 1999 Certain components in this product are susceptible to damage from electrostatic discharge Observe all ESD procedures to avoid component damage www printcopy in...

Страница 6: ...equipment may void any otherwise applicable Xerox warranties If Customer services such equipment modules components or parts thereof Customer releases Xerox from any and all liability for actions by...

Страница 7: ...4 3 4 4 4 5 4 6 4 7 4 8 Page Revision 4 9 4 10 4 11 4 12 4 13 4 14 4 15 4 16 4 17 4 18 4 19 4 20 4 21 4 22 4 23 4 24 4 25 4 26 4 27 4 28 4 29 4 30 4 31 4 32 4 33 4 34 4 35 4 36 4 37 4 38 4 39 4 40 4 4...

Страница 8: ...Revision Control List Document WorkCenter 450c 450cp 02 99 iv Page Revision www printcopy info w w w p r i n t c o p y i n f o...

Страница 9: ...Tag MOD Distinction v 1 Service Call Procedures 1 1 Section Contents 1 1 2 Repair Analysis Procedures 2 1 Section Contents 2 1 3 Image Quality Repair Analysis Procedures 3 1 Section Contents 3 1 4 Rep...

Страница 10: ...n image quality defects Section 4 Repair Adjustment This section contains the instructions for removal replacement and adjustment of the spared parts within the machine Section 5 Parts List This secti...

Страница 11: ...nt models the model distinction xxx will identify the appropriate part or action Example 1 xxx The sequence is Example 2 The sequence is xxx Terminology and Symbols The following is the terminology an...

Страница 12: ...Document WorkCenter 450c 450cp Introduction 02 99 viii This page intentionally left blank www printcopy info w w w p r i n t c o p y i n f o...

Страница 13: ...y diagnose a symptom incorrectly and cause the customer undue frustration and expense Initial Actions are used to gather information regarding the performance of the machine and prepare the product fo...

Страница 14: ...Page 1 2 Xerox WorkCentre 450c 450cp Service Manual This page intentionally left blank www printcopy info w w w p r i n t c o p y i n f o...

Страница 15: ...any answering machines modems or other devices Power on the unit Go to Control Panel LED RAP 7 3 Normal and Standard LEDs light the following message appears on the LCD screen WorkCentre 450cp 1 xx Po...

Страница 16: ...nt Press MENU 6 ENTER 5 ENTER Go to Keyboard RAP 7 1 Go to Paper Feed RAP 3 1 printing the image paper feeds correctly during printing 4 1 If paper does not feed correctly go to Paper Feed RAP 3 1 Tes...

Страница 17: ...appears on the LCD go to LCD RAP 7 2 If any other message displays go to the Messages RAP 1 1 Press START The following message appears on the LCD Copying 01 xx free If no message appears on the LCD...

Страница 18: ...rrectly go to Paper Feed RAP 3 1 Copy completes and the following messages displays on the LCD momentarily Copy 01 Completed If no message appears on the LCD go to LCD RAP 7 2 If any other message dis...

Страница 19: ...s RAP 1 1 System Check Send Fax Test Press START The following Dial the remaining digits of the remote fax machine The Start send Enter add xxxxxxx remote If no message appears on the LCD go to LCD RA...

Страница 20: ...D is lit and the following displays Connecting xxx xxxx If tones or pulse dials are not audible go to Analog Communications RAP 6 1 If the on the LCD transmit LED is not lit go to the The document fee...

Страница 21: ...age appears on the LCD go to LCD RAP 7 2 If any other message displays go to the Messages RAP 1 1 Go to LED RAP 7 3 If no message appears on the LCD go to LCD RAP 7 2 If any other message displays go...

Страница 22: ...Paper Feed RAP 3 1 If paper does not feed correctly go to Paper Feed RAP 3 1 Go to Image Quality RAPs Press START The following The following displays on the LCD Receiving 01 Completed Paper feed mot...

Страница 23: ...pinch rollers and paper feed guide Clean using a lint free tissue USCO ACO part number 35P2163 or XL part number 600S4372 and water Maintenance station Clean using a lint free tissue USCO ACO part nu...

Страница 24: ...TER 9 ENTER ENTER START The counter is now reset to 100 Clean the machine s exterior Clean the exterior of the 450c 450cp using a lint free cloth and water Restore the customer s settings Use the menu...

Страница 25: ...P 7 3 Control Panel LED RAP 2 37 RAP 8 0 Ni Metal Battery 2 38 RAP 9 0 RAM Test 2 39 Overview This section includes repair analysis procedures RAPs These procedures aid you in diagnosing the defective...

Страница 26: ...cases report an error message on the LCD panel This RAP consists of a listing of messages and other symptoms that direct you to a RAP to further isolate the problem This section does not list all poss...

Страница 27: ...ressing the SCAN key the system could not run the scanning application on your PC Do one or more of the following 1 Make sure you installed a scanning application on your PC 2 Open the ControlCentre P...

Страница 28: ...printer is available You tried to retrieve a document from another fax machine when the printer was unavailable and the If cannot print option is set to do not answer Try again when the printer is ava...

Страница 29: ...sfeed or jam Press Feed to clear The paper did not load properly into the printer Press the FEED key to clear the misfed or jammed paper Go to RAP 3 1 Paper Feed on page 2 16 PC error Reload pages Whi...

Страница 30: ...ocument did not load into the scanner properly Remove your originals from the document tray Open the scanner cover and remove the misfed page Close the cover and reload the document Go to RAP 5 1 Doc...

Страница 31: ...cument could not be found Retry the operation E007 An internal error occurred at the WorkCentre No action E008 The remote machine did not respond after the WorkCentre s three attempts to confirm the r...

Страница 32: ...t from the remote machine poll in is incorrect Call the remote location and verify the password Retry the operation E022 The remote machine does not have the capability to respond as requested The Wor...

Страница 33: ...document stored for retrieval poll in or you used an incorrect password Check with the remote user to verify a document is stored for retrieval If a password is needed make sure it is correct E044 The...

Страница 34: ...kCentre cannot receive the call because of a problem with its printer For example you could have the Receive option set To print and the If cannot print option set to Do not answer If the WorkCentre c...

Страница 35: ...K Voltage at the wall receptacle is 180 VAC to 264 VAC between supply pins Voltage between one supply pin and earth is 197 VAC to 264 VAC Voltage between the other supply pin and earth is 3 VAC or les...

Страница 36: ...e Common lead on the GND test point and the Positive lead on the 5 VDC test point See Figure 2 3 for test point locations Make a note of the voltage reading Figure 2 3 Power Supply Voltage Test Points...

Страница 37: ...2 3 Unloaded Power Supply DC Voltage Check on page 2 14 Yes Power supply is good This concludes the Power Supply DC Voltage Check RAP Perform the System Check again or return to the RAP that sent you...

Страница 38: ...ltimeter place the Common lead on the GND test point and the positive lead on the 5 VDC test point See Figure 2 3 for test point locations Make a note of the voltage reading 5 Place the Common lead on...

Страница 39: ...t Power supply readings are within specification No Disconnect the wiring harness from connector CN3 on the main board Go to Step 4 Yes There s a problem with the control panel Replace it then go back...

Страница 40: ...ue with Step 2 CN10 CN4 2 Check for a loose or damaged wire harness from the printer interface board to the paper feed motor Figure 2 5 Result Harness and connections appear good Figure 2 5 Paper feed...

Страница 41: ...2 12 Yes Continue with Step 6 7 Replace the paper feed motor REP 2 1 5 Paper Feed Motor on page 4 8 If this does not solve the problem replace the main circuit board REP 5 1 2 Main Board on page 4 39...

Страница 42: ...y installed and the latches are not broken If a latch needs replacement go to REP 2 1 20 Printer Cassette Latch on page 4 26 worn or dirty retard pad damaged or dirty paper feed roller Correct any of...

Страница 43: ...n without any resistance Check the eject roller assembly It should rotate freely in one direction towards the rear of the printer Check the tickler rollers to ensure that no ticklers are broken or mis...

Страница 44: ...assemblies for damage or contamination Check the retard pad assembly for excess wear or contamination If paper still misfeeds in the scanner replace the ADF pad assembly See REP 3 1 2 ADF Pad on page...

Страница 45: ...nsor assembly REP 2 1 3 Paper Path Sensor on page 4 6 Yes Go to step 3 3 Check the connection at J3 on the printer interface PWB Result Harness and connection appear to be OK No Reconnect the sensor t...

Страница 46: ...cable or replace as required Yes Continue with Step 2 CN10 CN4 2 Check the cam sensor for proper positioning and wire harness Result Harness and connections appear good Figure 2 8 Cam sensor No Corre...

Страница 47: ...e goes away No Go to Step 3 Yes End of RAP Paper out sensor 3 Check the contact points between the printer cassette and printer as shown in Figure 2 10 Figure 2 10 Paper out sensor contact points Resu...

Страница 48: ...ure 2 11 Printer Interface PWB Result Harness and connections appear good No Reconnect the wire harness or replace as required Yes Replace the harness Wiring harness to the paper out sensor contact po...

Страница 49: ...rom the printer interface PWB to the Carriage Motor see Figure 2 13 Result Harness and connections appear good No Reconnect the wire harness or replace as required Yes Continue with Step 3 3 Check for...

Страница 50: ...the problem replace the main board REP 5 1 2 Main Board on page 4 39 CN10 CN4 Pins 23 and 24 NOTE You may also choose to check the carriage motor for an open motor winding Table 2 3 gives the resista...

Страница 51: ...or damaged wire harness from the printer interface PWB to the encoder See Figure 2 16 Figure 2 16 Encoder Wiring Harness Result Harness and connections appear good No Reconnect the wire harness or re...

Страница 52: ...he cable and connections are good No Reconnect the cable or replace as required Yes Continue with Step 3 3 Check the wire harness and connections from the printer interface PWB to the ink level sensor...

Страница 53: ...not pinched or damaged 4 Power on the machine In from cartridge Out to ink waste pad 5 After the POST test completes clean the cartridge Press CARTRIDGE RIGHT ENTER Result The paper feed motor starts...

Страница 54: ...ng see Figure 2 20 ADF Wiring Harness Figure 2 20 Doc and read point sensors Result Switches operate freely No Correct the condition or replace the switch assembly REP 4 1 5 Doc and Read Point Sensor...

Страница 55: ...ult Sensor test indicates Scan Position sensor H IGH No Replace the doc and read point sensor assembly REP 4 1 5 Doc and Read Point Sensor Assembly on page 4 35 Yes Go to RAP 5 2 Scanner Motor on page...

Страница 56: ...3 3 Perform RAP 5 1 Doc and Read Point Sensor on page 2 30 Result Sensors are functioning normally No Replace DOC and read point sensors REP 4 1 5 Doc and Read Point Sensor Assembly on page 4 35 Yes...

Страница 57: ...Board on page 4 41 If this does not solve the problem replace the main circuit board REP 5 1 2 Main Board on page 4 39 Yes Continue with Step 5 5 In the service menu Test Group run the DTMF and or Di...

Страница 58: ...ort and the customer s PC parallel port The connection must be a direct connection i e not routed through a switch box or other device 2 Power on the WorkCentre 3 At the customer s PC exit Windows to...

Страница 59: ...connector J4 Result Voltage is between 4 75 VDC and 5 25 VDC No Perform RAP 2 2 Power Supply DC Voltage Check on page 2 12 Yes Continue with Step 3 Pin 1 Connector J4 3 In the Service Menu perform th...

Страница 60: ...onnector J4 Result Voltage is between 4 75 VDC and 5 25 VDC No Perform RAP 2 2 Power Supply DC Voltage Check on page 2 12 Yes Continue with Step 3 Pin 1 Connector J4 3 In the Service Menu perform the...

Страница 61: ...onnector J4 Result Voltage is between 4 75 VDC and 5 25 VDC No Perform RAP 2 2 Power Supply DC Voltage Check on page 2 12 Yes Continue with Step 3 Pin 1 Connector J4 3 In the Service Menu perform the...

Страница 62: ...ne cover REP 1 1 Scanner assembly REP 4 1 9 2 Use a voltmeter and test the output of the battery Result Battery voltage is 3 0 volts or above No Replace the battery REP 5 1 3 Ni Metal Battery on page...

Страница 63: ...during system startup However you can run a RAM test from the service menu 1 Check the output of the Ni Metal battery RAP 8 0 Ni Metal Battery on page 2 38 2 Power on the machine 3 In the Service Menu...

Страница 64: ...Page 2 40 Xerox WorkCentre 450c 450cp Service Manual This page intentionally left blank www printcopy info w w w p r i n t c o p y i n f o...

Страница 65: ...ysis Procedures Section Contents Introduction 3 1 IQRAP 1 Blank Print RAP 3 2 IQRAP 2 Black Print After Scanning 3 3 IQRAP 3 Image Defect RAP 3 4 Introduction The Image Quality section is used to iden...

Страница 66: ...nk No End of RAP Yes Continue with Step 4 4 Replace the print head 5 Check the ribbon cable from the main board connector CN4 to the print head Replace or reconnect as required Figure 3 1 Connector CN...

Страница 67: ...the voltage between pin 10 5 0 VDC and pin 2 GND on scanner relay board connector J3 Result Voltage is between 4 75 VDC and 5 25 VDC No Perform RAP 2 2 Power Supply DC Voltage Check on page 2 12 Yes...

Страница 68: ...t head nozzles may be blocked Replace the paper Perform the following Press the Cartridge button then press RIGHT ARROW ENTER to clean and restore the print head Print a new test print If the print is...

Страница 69: ...4 24 REP 2 1 19 Toggle Gear 4 25 REP 2 1 20 Printer Cassette Latch 4 26 REP 3 1 1 Control Panel 4 27 REP 3 1 2 ADF Pad 4 28 REP 3 1 3 LCD Display 4 29 REP 3 1 4 Control Panel Circuit Board 4 30 REP 4...

Страница 70: ...Procedures This repair subsection contains instructions for removal and replacement tasks A removal and or replacement task is included when it is not obvious how components are removed and replaced o...

Страница 71: ...Remove the screw to the right of the A C input connector b Remove the screw to the right of the printer port 7 Remove the machine cover a Locate the two slots underneath the machine at the front b Us...

Страница 72: ...page 4 3 2 Position both thumbs at the lower front corners of the Exit Guide Apply modest pressure simultaneously up and toward the rear of the printer to unlatch the exit guide 3 Rotate the guide app...

Страница 73: ...ssembly 3 At each end of the eject roller there is a roller shaft securing cam Figure 4 1 Pry the end out slightly by the red dot on the cam tab and rotate until the tab points down Figure 4 1 Eject r...

Страница 74: ...b REP 2 1 18 Printer Assembly on page 4 24 2 Disconnect the paper path sensor wiring harness from connector J3 on the printer interface PWB See Figure 4 2 Figure 4 2 Paper path sensor 3 Remove the pap...

Страница 75: ...a REP 1 1 WorkCentre Cover on page 4 3 b REP 2 1 18 Printer Assembly on page 4 24 2 Disconnect the cam sensor at connector J7 on the printer interface PWB 3 Remove the cam sensor by pulling it out of...

Страница 76: ...nect the scanner motor wiring harness from connector J6 on the printer interface PWB See Figure 4 4 Figure 4 4 Paper feed motor wiring harness 3 Remove the mounting screws indicated in Figure 4 5 Pape...

Страница 77: ...bracket 3 Remove the switch from the slot in the paper cassette Push in on bracket 4 Turn the cassette over and unsnap the back of the cassette Use a small flat bladed screwdriver to release the tabs...

Страница 78: ...Retard pad and bracket 3 Remove the bracket and spring 4 Remove the retard pad Retard pad Bracket and mounting screw Replacement 1 Position the Retard Pad in the printer 2 Position the retard bracket...

Страница 79: ...mounting tabs 4 Slide the maintenance station toward the rear of the printer to engage the mounting tabs 5 Secure with mounting screw 6 Connect the ink waste tube to the nozzle NOTE Ensure tube is rou...

Страница 80: ...llowing a REP 1 1 WorkCentre Cover on page 4 3 2 Move the printhead carriage to the middle of the printer 3 Pull out each of the two wipers Figure 4 13 You can use your fingers or a pair of needlenose...

Страница 81: ...re Cover on page 4 3 2 Disconnect the two plastic hoses from the pump Figure 4 14 Figure 4 14 Pump 3 Remove the two screws that hold the pump and pump bracket in place and remove the pump bracket asse...

Страница 82: ...printer baffle It is glued in place 3 Disconnect the ink level sensor wiring harness from the printer interface PWB Figure 4 15 connector J2 Figure 4 15 Ink level sensor wiring harness 4 Remove the sc...

Страница 83: ...igned with the sides of the slot on each side frame CAUTION Be sure that no portion of carriage is beneath ink level sensor during carriage removal 3 Remove the carriage drive shaft from printer side...

Страница 84: ...arness from the encoder 8 Remove the encoder mounting screw Remove encoder and spring Replacement 1 Position and hold the spring on the plate install encoder on the plate Reinstall the screw securing...

Страница 85: ...bushings from printer side frames 7 Remove the timing belt from the encoder pulley left end 8 Remove one of the bushings from the shaft 9 Remove the carrier from the shaft 10 Unhook the cable from the...

Страница 86: ...ings as shown in Figure 4 21 Figure 4 21 Bushing position Timing belt Timing belt clip Index marks Pointer note Ensure the ribbon cable is not twisted after the carrier has been reinstalled in it s no...

Страница 87: ...re 4 22 Carriage lever removal 3 Lift up on the latch and tilt to the right as you move the bottom of the latch to the left Figure 4 23 Figure 4 23 Removing lever and cam 4 Place the lever cam in the...

Страница 88: ...t on each side frame Figure 4 25 Bushings 6 Remove the carriage drive shaft from printer side frames NOTE Expect moderate to heavy resistance when removing bushings from printer side frames Rotate bus...

Страница 89: ...t secure the carriage motor and ground plate to the printer Figure 4 28 Figure 4 28 Carriage motor mounting screws 10 Remove the carriage motor carefully guiding the carriage motor wire harness away f...

Страница 90: ...1 18 Printer Assembly on page 4 24 2 Disconnect the wiring harness at connector J3 on the printer interface PWB 3 Remove mounting screw 4 Remove the printer cover open switch mounting screw and remove...

Страница 91: ...1 1 WorkCentre Cover on page 4 3 b REP 2 1 18 Printer Assembly on page 4 24 2 Disconnect all the cables attached to the printer interface PWB Figure 4 30 3 Pull out gently on the board to release it...

Страница 92: ...nter up approximately 1 and back about 2 and rest on the chassis 6 Disconnect the cables from the main circuit board connectors CN10 and CN4 Figure 4 32 Figure 4 32 Main board connectors CN10 and CN4...

Страница 93: ...ws that secure the paper feed motor and pump to the printer 4 Remove the large 100 35 gear shown in Figure 4 33 Figure 4 33 Printer gears 5 Remove the toggle gear assembly 6 Remove the toggle gear and...

Страница 94: ...r Cassette Latch Parts List 2 1 1 Remove the WorkCentre s paper cassette 2 Remove the screw that secures the latch to the printer 3 Remove the latch and replace as shown in Figure 4 34 Figure 4 34 Pri...

Страница 95: ...her side of the base of the scanner This is best done at the chassis connection 3 Loosen the ground wire from the analog circuit board Replace the screw but do not tighten 4 Disconnect the wire harnes...

Страница 96: ...assembly Squeeze the two sides of the plastic housing that holds the pad and remove the housing with the pad Figure 4 36 Figure 4 36 ADF pad removal 3 Replace the ADF pad by inserting the plastic tab...

Страница 97: ...4 27 2 Remove the control panel rear cover It is secured with two screws 3 Disconnect the LCD wiring harness from connector J1 on the control panel circuit board Figure 4 37 4 Remove the 2 screws tha...

Страница 98: ...control panel rear cover It is secured with two screws 3 Disconnect the LCD wiring harness from connector J1 on the control panel circuit board Figure 4 38 4 Remove the 13 screws that secure the cont...

Страница 99: ...scanner housing 2 Disconnect the scanner motor wiring harness from connector CN5 on the main board 3 Disconnect the wiring harness at connector CN3 on the main board 4 Remove the two screws that secur...

Страница 100: ...lace a scanner bushing lift the roller away from the busing Lift the old busing out of it s slot and push in a new bushing Figure 4 40 Scanner roller bushings Scanner bushings ADF separator 1 way bush...

Страница 101: ...ntrol Panel on page 4 27 2 Remove the 4 screws that secure the scanner cover to the scanner chassis 3 Disconnect the CIS wiring harness at the scanner relay board connector J3 4 Remove the screw secur...

Страница 102: ...to Figure 4 43 and perform the following 1 Perform the following a REP 1 1 WorkCentre Cover on page 4 3 2 Disconnect all wiring harnesses connected to the scanner relay board 3 Remove the screw that...

Страница 103: ...l Panel on page 4 27 2 Remove the 4 screws that secure the scanner cover to the scanner chassis 3 Disconnect the doc and read point sensor wiring harness from connector J2 on the scanner relay board 4...

Страница 104: ...P 3 1 1 Control Panel on page 4 27 2 Remove the 4 screws that secure the scanner cover to the scanner chassis 3 Disconnect the scanner cover open switch wiring harness at connector J1 on the scanner r...

Страница 105: ...CN5 3 To remove the scanner motor only remove the 2 screws that secure the motor to its mounting bracket Figure 4 46 Figure 4 46 Scanner motor 4 To remove the scanner motor and gear assembly remove t...

Страница 106: ...Disconnect the AC wire harness from the power supply Figure 4 47 Figure 4 47 AC wiring harness AC wiring harness 3 Remove the four self tapping screws that secure the power supply to the chassis Note...

Страница 107: ...on page 4 3 b REP 2 1 18 Printer Assembly on page 4 24 c REP 4 1 1 Scanner Assembly on page 4 31 d REP 5 1 1 Power Supply on page 4 38 2 Remove the 8 screws that secure the main board to the chassis 3...

Страница 108: ...a REP 1 1 WorkCentre Cover on page 4 3 b REP 4 1 1 Scanner Assembly on page 4 31 2 Put on your protective eyewear 3 Attach heat sinks to the battery terminals 4 Use a soldering gun to unsolder each en...

Страница 109: ...onnect the speaker assembly from connector J2 on the analog board 3 For USA only disconnect the LCU wire harness at connector J3 on the analog board All others unplug the LCU from the analog board 4 R...

Страница 110: ...a REP 1 1 WorkCentre Cover on page 4 3 b REP 2 1 18 Printer Assembly on page 4 24 2 For USO XCL AO FX Disconnect the LCU wire harness at connector J1 on the LCU 3 For XL Use a flat blade screw driver...

Страница 111: ...ter Assembly on page 4 24 2 Remove the three screws securing the insulator plate to the main board One screw is located near the AC receptacle the others on the main circuit board See Figure 4 48 Figu...

Страница 112: ...over on page 4 3 2 Disconnect the speaker wiring harness from connector J2 on the analog board 3 Use your thumb to push out the speaker retaining clips until you can remove the speaker from the slot F...

Страница 113: ...cal power from the printer for at least 10 seconds 2 Load paper into the paper tray 3 Print the Bi Directional Printing Alignment Test Pattern Figure 4 50 Press MENU 6 ENTER 4 ENTER 4 Examine the vert...

Страница 114: ...the bottom of the carrier The upper tab on the carrier should press against the tool See Figure 4 52 Figure 4 52 Inserting the Head Gap Adjustment Tool 9 CAREFULLY move the carriage left and right by...

Страница 115: ...djusting 1 Manually move the carriage to the right to expose the encoder mounting screw 2 Loosen the encoder mounting screw 3 Manually slide the carriage to the far right back to the far left then bac...

Страница 116: ...are lined up together Use a scribe or some other similar tool to check that the holes are aligned Refer to Figure 4 54 for the following 2 steps 7 The top black gear is the drive gear for the paper ca...

Страница 117: ...canner assembly 5 2 PL 2 1 Printer assembly 5 3 PL 2 2 Printer assembly 5 4 PL 2 3 Printer assembly 5 5 PL 3 1 Machine base 5 6 PL 4 1 Control Panel 5 7 PL 5 1 Miscellaneous Parts 5 8 PL 6 1 Spare par...

Страница 118: ...sembly 6 130K56571 CIS sensor assembly 7 130K56580 Doc and read point sensor assembly 8 160K32271 Scanner relay PWB 9 162K29130 CIS to scanner relay harness 10 110K09060 OP cover open switch assembly...

Страница 119: ...6E12390 Carriage drive bushing 3 023E14841 Timing belt 4 041K05320 Carrier assembly 5 127K22240 Pump 6 130K56600 Ink low sensor assembly 7 146K00491 Encoder 8 Tensioner 9 015E59830 Blotter 10 033E0351...

Страница 120: ...station 3 127E10810 Paper feed motor 4 160K32290 Interface board PWB 5 127E10800 Carriage motor 6 160K45370 Cam sensor PWB 7 110K09050 Cover open switch assembly 8 130K56490 Paper path sensor 9 007E52...

Страница 121: ...tre 450c 450cp Service Manual Page 5 5 Item Part Number Description 1 038K11210 Exit guide assembly 2 022K53800 Eject roller assembly PL 2 3 Printer assembly 1 2 www printcopy info w w w p r i n t c o...

Страница 122: ...attery 4 105K16320 Power supply 110V 220V 5 450c 160K32253 450cp 160K59960 160K59970 160K59980 160K59990 Main PWB R2 2 Main PWB USO XCL Main PWB AO Main PWB FX Main PWB XL 6 160K32260 160K33140 Analog...

Страница 123: ...1K29450 Control panel assembly without overlay 4 123K04080 123K03910 123K04740 LCD assembly USO XCL XL AO LCD assembly Russia LCD assembly FX 5 162K29130 CIS to relay harness assembly 6 162K29150 Rela...

Страница 124: ...tridge cover 7 130K56620 Paper out sensor assembly 8 048K56800 048K78260 Top cover assembly USO XCL RX AO Top cover assembly FX 9 891E08110 891E26530 891E37180 891E37170 891E42070 891E42080 891E43980...

Страница 125: ...300K71101 300K65111 300K65121 450c AO Download Disk 450c USO XCL Download Disk 450cp XL Download Disk V3 10 11 300K70720 300K70730 450cp Software disk kit Italy Switzerland Germany Switzerland Austria...

Страница 126: ...for AO 18 097K37820 Telephone kit AO 19 098K65050 450cp AO Spanish Nationalization Kit 20 673K55150 450c Portuguese Nationalization S W kit 21 110K09500 Telephone with Handset 22 117K26560 Data Cable...

Страница 127: ...1 117S26658 6 1 117S26660 6 1 117S26662 6 1 117S26663 6 1 117S26664 6 1 117S26665 6 1 117S26667 6 1 117S26668 6 1 117S26672 6 1 117S26678 6 1 117S26680 6 1 117S26682 6 1 117S26684 4 1 123K03910 4 1 12...

Страница 128: ...0 6 1 673K38570 6 1 673K38620 6 1 673K38790 3 1 673K38820 6 1 673K42160 6 1 673K55150 6 1 830E06730 6 1 830E06740 5 1 891E08110 5 1 891E26530 5 1 891E37170 5 1 891E37180 5 1 891E42070 5 1 891E42080 PL...

Страница 129: ...dures includes a Service Menu map all unique service operations and the machine soft switch parameters and defaults When you suspect a machine is functioning outside the range of its specifications re...

Страница 130: ...WorkCentre 450c 450cp test print This page shows the printer ROM version the page setup and font setup for the WorkCentre It also contains a test pattern gray or color scale and font printout for you...

Страница 131: ...n the following page shows the Xerox Test Print part number 82P151 Use the test print when you test the copier and fax functions of the WorkCentre 450c 450cp see System Check Copier and System Check S...

Страница 132: ...following 1 Make sure the WorkCentre is powered on and has passed the power on system test 2 Prepare the WorkCentre to receive the first part of the new firmware At the control panel type MENU 5 ENTER...

Страница 133: ...on error always 3 Clear 2 Edit soft switch 4 Print Report 5 Test Group 1 Documents 2 Soft Switches 3 Counters 4 All Memory 1 Documents 2 Protocol trace 1 Modem test 2 Sensors test 3 Keyboard test 4 LC...

Страница 134: ...ree minutes Exiting Service Mode To exit Service Mode 1 Press the Exit key 2 Press the key three times Additional Information on the Service menu When you print the service menu you also print three t...

Страница 135: ...instructions on entering Service Mode see Service Mode earlier in this chapter 3 Go to the Edit soft switch menu selection Press MENU LEFT ARROW ENTER ENTER RIGHT ARROW ENTER The following displays o...

Страница 136: ...on PTT Delay time after line connection to start dialing at BLIND DIAL Mode ex ABBR dial 4 3 DISPOSE 00 delete the fax 01 save the fax 10 print delete 00 Post document retrieval disposition code 5 DOC...

Страница 137: ...When the percentage of the error line is over the ERROR_LINE RTN is transmit ted in case of ENABLE Other wise RTP is transmitted 5 4 ERROR_LINE 00 5 Error line 01 10 Error line 10 15 Error line 11 20...

Страница 138: ...DELAY_CED_DIS 0 60 msec 1 500 msec 0 Delay from CED reception to DIS transmission C MODEM_EPT 0 OFF 1 ON 1 EPT tone is transmitted during Training signal E D MIN_RCV_LEVEL 00 43db 01 47db 10 49 5db 0...

Страница 139: ...6 RESERVED 7 ENB_XMT_COVER_ NOTE 0 Disable 1 Enable 0 in case of ON User can send Cover sheet 9 8 PAPER_SIZE 00 LETTER 01 LEGAL 10 A4 11 ENVELOPE 10 Paper size C A RESERVED D PASSWORD_RCV JUNK_MAIL 0...

Страница 140: ...Delay time before signal transmission after CML connec tion 8 CALL_PROGRESS 0 OFF 1 ON 1 Dial tone detection and busy tone detection is performed dur ing call setup when it is ON 9 WAIT_PAGE_FINISHED_...

Страница 141: ...M mode 6 4 ECM_RETRY 000 Not avail 001 1 time 111 7 times 100 Total number of retransmission at same speed 7 LINE_SPEAKER_VO LUME_ENABLE 0 DISABLE 1 ENABLE 1 9 8 SPEAKER_VOLUME 00 SPEAKER OFF 01 SPEAK...

Страница 142: ...iption 2 0 RESERVED 5 3 RESOLUTION 000 STANDARD 001 FINE 010 SUPER FINE 000 Transmission resolution 8 6 CONTRAST 000 Lighten 001 Normal 010 Darken 100 Halftone Lighten 101 Halftone Normal 110 Halftone...

Страница 143: ...ce for Japan 5 2 TCF_ERR_PERCENT 0000 0 1111 75 1010 Acceptable limit of TCF error percentage value 5 8 6 XMT_DELAY 000 0 ms 111 70 ms 100 Set transmit delay value 10 ms B 9 LEFT MARGIN 000 0 mm 111 7...

Страница 144: ...e is no dial tone within this time it returns to IDLE state 9 7 DT_DIAL_START_TIME 000 TONE_ON_500MS 001 TONE_ON_800MS 010 TONE_ON_1000MS 011 TONE_ON_1500MS 100 TONE_ON_2500MS 101 TONE_ON_3500MS 110 T...

Страница 145: ...0011 ON_TIME_400MS 0100 ON_TIME_450MS 0101 ON_TIME_500MS 0110 ON_TIME_550MS 0111 ON_TIME_600MS 1000 ON_TIME_650MS 1001 ON_TIME_700MS 1010 ON_TIME_750MS 1011 ON_TIME_800MS 1100 ON_TIME_900MS 1101 ON_T...

Страница 146: ...101 OFF_TIME_900MS 110 OFF_TIME_1000MS 111 OFF_TIME_1100MS Maximum dial tone OFF time in burst mode Sweden TIME 10 2ms F D DT_DETECT_LEVEL 000 DETECT_LVL_25DB 001 DETECT_LVL_30DB 010 DETECT_LVL_35DB...

Страница 147: ...Q_200HZ 0011 FREQ_250HZ 0100 FREQ_300HZ 0101 FREQ_350HZ 0110 FREQ_400HZ 0111 FREQ_425HZ 1000 FREQ_450HZ 1001 FREQ_500HZ 1010 FREQ_550HZ 1011 FREQ_600HZ 1100 FREQ_650HZ 1101 FREQ_900HZ 1110 FREQ_1150HZ...

Страница 148: ..._TIME_20S 100 WAIT_TIME_25S Waiting time to detect busy tone A 7 TONE_LEVEL_ADJUST_0 1 0000 1111 0 1 5dB Adjust the unsensitivity of tone by 1 0dB steps C B TONE_LEVEL_ADJUST_1 6 00 0dB 01 1 6dB 10 3...

Страница 149: ...0100 450MS 0101 500MS 0110 550MS 0111 600MS 1000 650MS 1001 700MS 1010 750MS 1011 800MS 1100 900MS 1101 1000MS 1110 1100MS 1111 1200MS Maximum ON time to be detected in burst mode 6 4 BUSY_MIN_OFF_TIM...

Страница 150: ...400MS 0110 450MS 0111 500MS 1000 550MS 1001 600MS 1010 650MS 1011 700MS 1100 850MS 1101 900MS 1110 1000MS 1111 1100MS Maximum OFF time in burst mode D B BUSY_DETECT_LVL 000 25DB 001 30DB 010 35DB 011...

Страница 151: ..._200HZ 0011 FREQ_250HZ 0100 FREQ_300HZ 0101 FREQ_350HZ 0110 FREQ_400HZ 0111 FREQ_425HZ 1000 FREQ_450HZ 1001 FREQ_500HZ 1010 FREQ_550HZ 1011 FREQ_600HZ 1100 FREQ_650HZ 1101 FREQ_900HZ 1110 FREQ_1150HZ...

Страница 152: ...MAKE MAKE BREAK Switch is used to meet each country s spec 6 4 PRE_PULSE_PERIOD 000 PRE_PULSE_500MS 001 PRE_PULSE_800MS 010 PRE_PULSE_1000MS 011 PRE_PULSE_1200MS 9 7 POST_PULSE_PERIOD 000 POST_PULSE_...

Страница 153: ...ME_70MS 01 OFF_TIME_80MS 10 OFF_TIME_100MS 11 OFF_TIME_120MS DTMF off time SPAIN 120ms to 150ms 7 4 DTMF_SIGNAL_LVL 0000 0dbm 1111 15dbm DTMF signal output Level 9 8 DTMF_DIFF 00 DTMF_DIFF_1_DB 01 DTM...

Страница 154: ...10 T1_TIME_90S 11 T1_TIME_150S T1 time waiting time for identifi cation from remote FAX default 10 90 30 sec 11 for France 150 sec 01 for Germany 60 sec Note DTS requires 90 30 sec for auto dialing an...

Страница 155: ...NG_FREQ 00000 15HZ 00001 16HZ 11111 46HZ Minimum ring frequency 1HZ Steps available 01111 for France min ring freq to be 30Hz D C MIN_RING_ON_TIME 00 MIN_ON_TIME_200MS 01 MIN_ON_TIME_350MS 10 MIN_ON_T...

Страница 156: ...0S 10 OFF_TIME_15S 11 OFF_TIME_20S Max Ring off time 4 RESERVED 7 5 RESERVED A 8 RESERVED D B GR_REDIAL_INTERVAL 000 INTERVAL_5S 001 INTERVAL_10S 010 INTERVAL_30S 011 INTERVAL_1MIN 100 INTERVAL_2MIN 1...

Страница 157: ...DETECT_BLIND 6 5 PABX_DETECT_NUM 00 1 11 4 Times Number of PABX tone to dial at BURST tone default 2 times 9 7 PABX_WAIT_TIME 000 WAIT_TIME_3S 001 WAIT_TIME_5S 010 WAIT_TIME_10S 011 WAIT_TIME_15S 100...

Страница 158: ...100 450MS 0101 500MS 0110 550MS 0111 600MS 1000 650MS 1001 700MS 1010 750MS 1011 800MS 1100 900MS 1101 1000MS 1110 1100MS 1111 1200MS 9 7 PABX_MIN_OFF_TIME 000 150MS 001 200MS 010 250MS 011 300MS 100...

Страница 159: ...n 3 0 PABX_FREQ_1 0000 100HZ 0001 150HZ 0010 200HZ 0011 250HZ 0100 300HZ 0101 350HZ 0110 400HZ 0111 425HZ 1000 450HZ 1001 500HZ 1010 550HZ 1011 600HZ 1100 650HZ 1101 900HZ 1110 1150HZ 1111 NO_FREQ 7 4...

Страница 160: ...S 100 WAIT_TIME_20S A 8 IT_START_TIME 000 500MS 001 800MS 010 1000MS 011 1500MS 100 2500MS 101 3500MS 110 4500MS 111 5500MS B CRP_OPTION 0 DISABLE 1 ENABLE Enable the response to CRP sig nal C ID_RIGH...

Страница 161: ...0100 450MS 0101 500MS 0110 550MS 0111 600MS 1000 650MS 1001 700MS 1010 750MS 1011 800MS 1100 900MS 1101 1000MS 1110 1100MS 1111 1200MS 9 7 IT_MIN_OFF_TIME 000 150MS 001 200MS 010 250MS 011 300MS 100 3...

Страница 162: ...ption 3 0 IT_FREQ_1 0000 100HZ 0001 150HZ 0010 200HZ 0011 250HZ 0100 300HZ 0101 350HZ 0110 400HZ 0111 425HZ 1000 450HZ 1001 500HZ 1010 550HZ 1011 600HZ 1100 650HZ 1101 900HZ 1110 1150HZ 1111 NO_FREQ 7...

Страница 163: ...quency of CED signal 5 RESERVED 7 6 ECM T5 TIMER 00 30 min 01 10 min 10 1 min 11 2 min 11 Line disconnect time by RR response 8 ECM CTC 0 Enable 1 Disable Do not care 9 LINE CURRENT 0 Disable 1 Enable...

Страница 164: ...l duration 9 6 RESERVED A BINARY_ABC_MODE 0 OFF 1 ON 0 Binary ABC mode B CHARGE_PULSE 0 OFF 1 ON 0 Line charge pulse enable E C CONSECUTIVE RTN BASE std fine super 0 0 0 0 1 150 600 900 2 600 1200 180...

Страница 165: ...Define Default Description 0 ACUSTIC_ALARM 0 OFF 1 ON 0 Acustic alarm ON OFF 1 WHITE_SKIP 0 OFF 1 ON 1 Skip white data in printing 5 2 RESERVED 7 6 CL2_SCAN_TIME normal fine 00 0 0 01 10 5 10 20 10 1...

Страница 166: ...ld BIT No NAME Define Default Description 1 0 RING PATTERN 00 pattern 1 01 pattern 2 10 pattern 3 0 When distinctive ring is YES only the selected pattern is detected 5 2 NUMBER OF REDIAL 0000 0 redia...

Страница 167: ...ting received files When Auto reduction ratio is continuous from 75 to 95 in a step of 5 6 RECEIVE TO MEMORY 0 No 1 Yes 0 When YES all received docu ment are stored in memory 7 FORWARD 0 No 1 Yes 0 9...

Страница 168: ...n YES print activity report automatically for every 50 activi ties 5 NEW_SCANNING_FLAG 0 OLD 1 NEW 1 New scan motor adapted 7 6 PROTOCOL TRACE REPORT 00 Off 01 Error 10 Always 00 9 8 GROUP DIAL CONFIR...

Страница 169: ...counter is less than or equal to this threshold AND ink low flag is set then Ink Low be displayed Ink low flag is set by printer firmware See Ink low threshold 2 in switch 28 F 8 THE NUMBER OF MFPI RE...

Страница 170: ...ble area Incoming faxes Top left and right margins 5 mm Bottom margin 10 mm Printer Specifications Technology Color inkjet Compatibility Windows 3 1 3 11 Windows 95 98 Print speed Black and white High...

Страница 171: ...r Specifications Copy speed Up to 3 pages per minute Multiple copies Up to 99 copies of multi page originals Resolution 300 x 300 dpi Image quality Normal Bi level and 4 levels of gray Halftone Error...

Страница 172: ...r a description of what the Tag is and what you need to install the Tag The Change Tag Index will either list a kit number or indicate piece part If piece part is indicated the parts lists reference s...

Страница 173: ...Connector Pin Assignments 7 6 LCU Module DIP Switch Settings not for USA 7 10 Line connection pinouts 7 14 Introduction This section contains connector and PWB location drawings and pin assignment in...

Страница 174: ...ly Main Circuit Board Scanner Analog F1 Relay Board CN3 SOPEN OPE Printer Interface Board J8 J4 J3 J2 J9 J6 J5 J7 J1 J1 to CN10 main board J2 to ink low sensor J3 to paper path sensor J4 to encoder J5...

Страница 175: ...ay Board BSD J1 Scanner Relay Board 14 1 14 1 To Main Board 5 1 4 1 4 1 To ADF OPE 5 1 ADF 10 1 10 1 Scanner CIS CIS 2 1 Scanner Cover Open Switch SOPEN C4 Sensors 14 1 14 1 LCD PCB J5 Control Panel C...

Страница 176: ...4 Xerox WorkCentre 450c 450cp Service Manual Analog Relay Board BSD 1 2 Speaker 14 1 J2 J3 40 1 Wire harness on USA version Edge connector on all others J1 www printcopy info w w w p r i n t c o p y i...

Страница 177: ...1 5 1 Ink level 3 1 3 1 Cam 5 1 5 1 Encoder 25 1 25 1 2 1 2 1 Paper path Printer interface board sensor J7 J4 J1 J3 J6 J5 Paper feed motor Carriage motor J2 CN10 on main sensor 5 1 Paper out sensor J8...

Страница 178: ...ND 4 DOC RPS Table 7 2 Connector CIS to CIS assembly Pin Description 1 CIS DATA 2 GND 3 5 VDC 4 12 VDC 5 GND 6 CIS START 7 GND 8 CIS CLK 9 CIS LED ON 10 5 VDC Table 7 3 Connector SOPEN scanner cover o...

Страница 179: ...11 DOC RPS 12 DOC ADF 13 GND 14 SCAN COVER OPEN Analog Relay Board Connectors Table 7 6 Connector J3 to LCU Pin Description 1 RNGDT 2 Not Used 3 HKDT 4 Not Used 5 Frame GND 6 Not Used 7 12 VDC 8 Not U...

Страница 180: ...ATA 10 5 VDC 11 DOC RPS 12 DOC ADF Table 7 6 Connector J3 to LCU Pin Description 13 GND 14 SCAN COVER OPEN Table 7 8 Connector CN5 to Scanner motor Pin Description 1 42 VDC 2 42 VDC 3 SMOTOR 4 4 SMOTO...

Страница 181: ...15 PMV 16 PMV 17 PHOTORA 18 PHOTORB 19 PHOTORC 20 PHOTORD 21 Not Used 22 Not Used 23 MMV 24 MMV 25 CMDTDRA 26 CMDTDRB 27 CMDTDRC 28 CMDTDRD 29 Not Used 30 GND 31 5 VDC 32 INK LEVEL 33 SLED7 34 SLED6...

Страница 182: ...not for USA Refer to the following illustration to locate switches on the LCUs Figure 7 1 LCU Switch Locations SW1 MSB LSB MSB LSB S1 S2 S3 S4 S5 S6 S7 S8 COUNTRY CODE LANGUAGE DIAG SW2 SW5 SW4 SW3 S...

Страница 183: ...BELGIUM BE 10000 SWISS CH 11100 SINGAPORE 00100 DENMARK DK 10001 U K GB 11101 MALAYSIA 00101 FINLAND FI 10010 BULGARIA BG 11110 PHILIPPINE 00110 FRANCE FR 10011 CZECK CS 11111 JAPAN 00111 GERMANY DE...

Страница 184: ...istance 1 ON BIT AT BE DK FI DE GR IR IT NL NO PT ES SE CH GB 1 1 1 1 1 2 1 1 1 1 1 1 1 1 1 1 1 3 1 1 1 1 1 4 1 1 1 1 1 1 1 1 1 1 5 1 1 1 1 6 1 1 1 1 1 1 BIT AT BE DK FI DE GR IR IT NL NO PT ES SE CH...

Страница 185: ...tivity and insensitivity 1 ON BIT AT BE DK FI DE GR IR IT NL NO PT ES SE CH GB 1 1 1 1 1 1 1 1 1 1 1 2 1 1 1 1 1 1 1 1 1 1 1 3 1 1 1 1 1 4 1 1 1 1 1 1 5 1 1 1 1 1 1 1 1 6 BIT AT BE DK FI DE GR IR IT N...

Страница 186: ...S FI GR HU IT NL NO PL PT RO SA SE SU TR UK Ukraine Harness name INT Germany DE Harness Name DE SHUNT AT BE DK FI DE GR IR IT NL NO PT ES SE CH GB J1 1 1 1 1 1 1 1 1 1 1 1 1 1 0 1 Pin No Line Socket E...

Страница 187: ...1 6 Earth Pin No Line Socket Ext Tel Socket 1 2 Tel 1 3 Line 2 Tel 1 4 Line 1 Tel 2 5 Tel 2 6 Pin No Line Socket Ext Tel Socket 1 2 3 Line 1 Tel 1 4 Line 2 Tel 2 5 6 France FR France LCU Board Assy P...

Страница 188: ...Page 7 16 Xerox WorkCentre 450c 450cp Service Manual This page intentionally left blank www printcopy info w w w p r i n t c o p y i n f o...

Отзывы: