background image

IN-LINE STAPLER FINISHER USER GUIDE

25

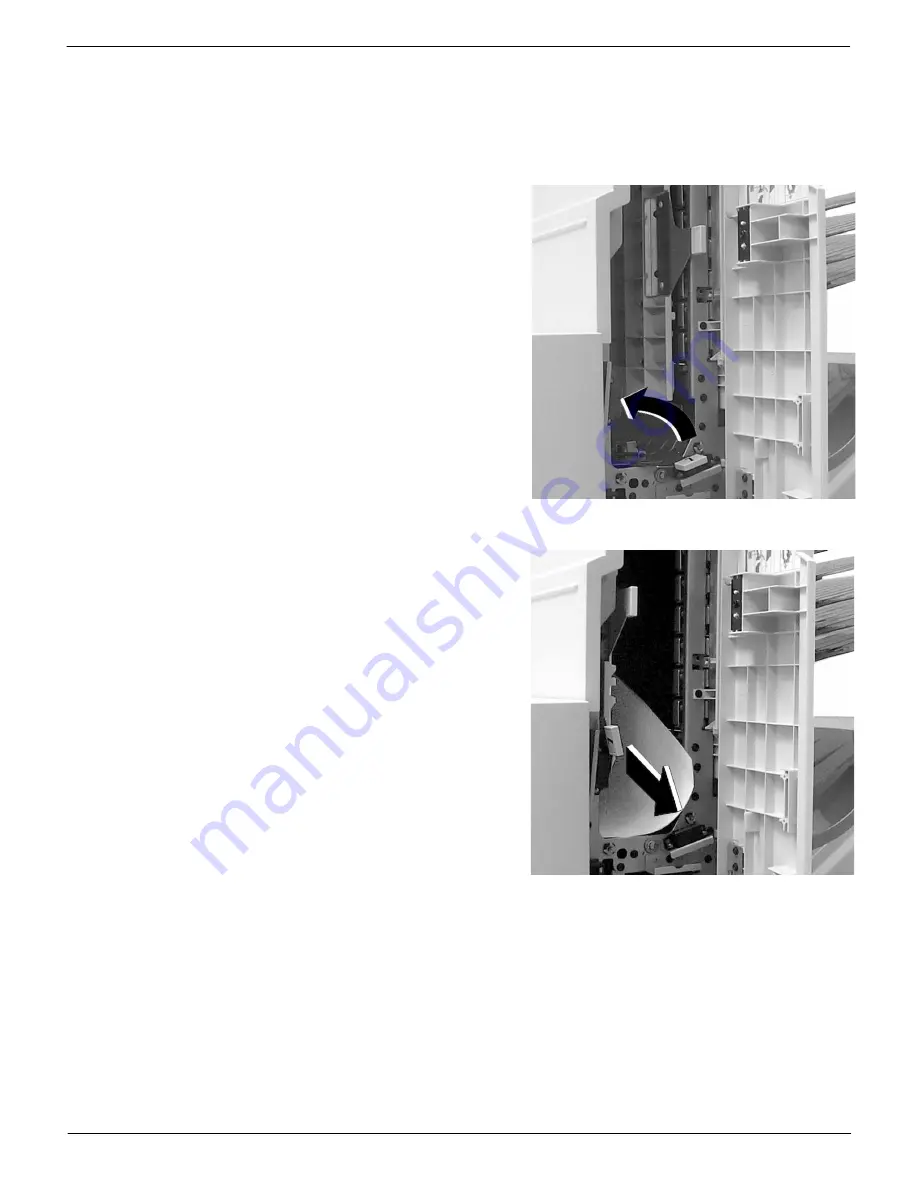
Area 7 jam

1

Open the Right Door of the Finisher.

2

Pull up on Handle 7 until it snaps into place (Fig-
ure 14).

Figure 14: Pulling up on Handle 7

3

Remove the jammed paper (Figure 15).

4

Push down on Handle 7 until it snaps into place.

5

Close the Right Door of the Finisher.

If the door does not close, ensure that 
Handle 7 is all the way down.

Figure 15: Removing paper from Area 7

Содержание DocuColor 12 CP

Страница 1: ......

Страница 2: ...are displayed on the screen such as styles templates icons screen displays looks etc Xerox The Document Company Xerox the stylized X and all Xerox product names and product numbers mentioned in this...

Страница 3: ...d above 8 Using the Finisher 9 Stapling options 9 Resolving stapling conflicts 10 Stapling mixed size documents 11 Rotate Page 11 Printing procedures 12 From Windows 2000 12 From Windows 95 98 13 From...

Страница 4: ...HER USER GUIDE Problem solving 22 Clearing paper jams 22 Interface Area jam 22 Area 5 jam 24 Area 7 jam 25 Area 7 and 8 jam 26 Area 9 jam 27 Problem solving table 28 Ordering supplies 29 Customer supp...

Страница 5: ...any kind into slots or openings on this equipment Making a contact with a voltage point or shorting out a part could result in fire or electrical shock If any of the following conditions occur switch...

Страница 6: ...h of children Do not remove the covers or guards that are fastened with screws There are no parts behind these covers that you can maintain or service Do not perform any maintenance procedures unless...

Страница 7: ...ng options are selected from the printer properties window of the application used to print the job All stapled sets are delivered to the Finisher Output Tray The Finisher Output Tray offsets the outp...

Страница 8: ...guration are directed to the Center Output Tray The mailbox bins and the Finisher Output Tray are not available for copy jobs Finisher Sorter configuration When the Finisher is configured as a Finishe...

Страница 9: ...r up to 10 copied sets can be sorted to these bins Each bin holds a maximum of 100 sheets 5 Center Output Tray Top Tray Uncollated output from copy and print jobs will be delivered to this tray When t...

Страница 10: ...he manufacturer of the Digital Front End connected to your DocuColor 12 The minimum software levels for the Splash and Fiery Digital Front Ends are as follows To support the IOT finisher functionality...

Страница 11: ...ray 5 In the Change setting for box select Finisher Output Tray Mailbox 6 Select OK to complete the installation Windows NT 4 0 1 From the Start menu select Settings Printers Xerox Document Centre CS...

Страница 12: ...th the printer the Select a PostScript Printer Description File window is displayed If a PostScript Printer Description file has already been associated with the printer go to step 6 4 Browse until yo...

Страница 13: ...is section apply to the Document Centre ColorSeries 50 copier printer only To use the Finisher options on the DocuColor 12 copier printer refer to the product manual supplied by the manufacturer of th...

Страница 14: ...ge setup dialog box of the application you are using you must choose a landscape stapling option The paper selection shown in the printer driver must be the same as the paper selection of the first pa...

Страница 15: ...age The Rotate Page option allows you to rotate an image 180 degrees This option is located in the same drop down list box as the Staple option The following are some examples of when you might use th...

Страница 16: ...t manual supplied by the manufacturer of the Digital Front End connected to your DocuColor 12 From Windows 2000 1 Open your document 2 From the File menu select Print 3 In the Select Printer box selec...

Страница 17: ...own list box select the desired staple option 9 Click OK to return to the Print dialog box 10 Click OK to print your job From Windows NT 4 0 1 Open your document 2 From the File menu select Print 3 In...

Страница 18: ...nu select Page Setup 3 Select the desired paper size and orientation 4 Click OK 5 From the File menu select Print 6 From the drop down list box immediately beneath the printer name select Output Optio...

Страница 19: ...nt Center ColorSeries 50 copier printer Using CentreWare Internet Services you can easily determine whether the copier printer has a Finisher installed and how the Finisher has been configured To chec...

Страница 20: ...ntre ColorSeries 50 CentreWare Internet Services Home Page 2 Click Status The status tab is displayed It will contain Input Trays and Output Trays information 3 Scroll to the Output Trays box to view...

Страница 21: ...ms box to view the Staple Cartridge status Examples of status messages are OK the Staple Cartridge is operational Low the Staple Cartridge is nearing empty Empty the Staple Cartridge needs to be fille...

Страница 22: ...the following If you want the copier printer to continue processing all jobs when the Staple Cartridge is empty select the Bypass Out of Staples checkbox This is the factory default setting When the S...

Страница 23: ...ridge The staples are not interchangeable NOTE The Finisher Staple Cartridge is reusable and should not be thrown away 1 Open the Finisher Front Door located on the lower right front of the Finisher 2...

Страница 24: ...CAUTION Do not remove the white paper strip that holds the staples in place until the Staple Pack has been loaded into the Staple Cartridge Figure 5 Removing the empty Staple Pack from the Staple Cart...

Страница 25: ...he Staple Cartridge by the gold bar and insert the Staple Cartridge into the cartridge holder Figure 8 9 Push the Staple Cartridge into the cartridge holder until the Staple Cartridge snaps into place...

Страница 26: ...clearing the paper jam is displayed on the copier printer Touch Screen NOTE Remove the jammed paper carefully and gradually so you do not tear it If the jammed paper tears be sure to remove all the t...

Страница 27: ...o step 3 Figure 10 Removing paper from the Interface Area 3 Open the copier printer Right Door and remove the jammed paper Figure 11 4 Close the copier printer Right Door 5 Slide the Finisher to the l...

Страница 28: ...to the lower position Figure 12 Figure 12 Lowering Handle 5 3 Rotate Knob 6 counterclockwise to release the jammed paper Figure 13 4 Remove the jammed paper Figure 13 5 Lift Handle 5 until it snaps in...

Страница 29: ...le 7 until it snaps into place Fig ure 14 Figure 14 Pulling up on Handle 7 3 Remove the jammed paper Figure 15 4 Push down on Handle 7 until it snaps into place 5 Close the Right Door of the Finisher...

Страница 30: ...proce dure 2 Swing Handle 8 to the right until it snaps into place Figure 16 Figure 16 Swinging Handle 8 to the right 3 Remove the jammed paper carefully Figure 17 4 Swing Handle 8 to the left until...

Страница 31: ...er Area 9 located above the Finisher Output Tray Figure 18 2 Remove the jammed sheet Figure 18 3 Lower the Finisher Exit Cover 4 If the jam message continues to display open and close the Finisher Exi...

Страница 32: ...xed paper sizes that are not compat ible with the Finisher Change the paper sizes to sizes that are compatible with the Finisher Finisher is not stapling the print job Finisher Staple Cartridge may be...

Страница 33: ...Net at 1 800 822 2200 In Canada call 1 800 668 0199 English 1 800 668 0133 French In Latin America call your Respective Affiliate Supplies Order Center Customer support The Xerox Customer Support Cent...

Страница 34: ...ox Service Representative 300 sheets Stapling Capability 2 50 sheets 24 lb 90 gsm Same size media Long Edge Feed papers LEF B5 A4 8 5 x 10 8 5 x 11 Short Edge Feed papers SEF B5 A4 8 5 x 11 8 5 x 13 8...

Страница 35: ......

Страница 36: ...Prepared by Xerox Corporation Global Knowledge Language Services 780 Salt Road Webster New York 14580 March 2000 701P34148...

Отзывы: