


3.
Enter the Wi-Fi Direct password.
C
Coonnnneeccttiinngg tthhee PPrriinntteerr ttoo aa W
Wii--FFii N
Neettw
woorrkk
Note:
This feature is available only in some printer models.
Before you begin, make sure that:
• Active Adapter is set to Auto. From the control panel, navigate to
Settings > Network/Ports > Network Overview > Active Adapter
.
For non-touch-screen printer models, to navigate through the
settings, press
OK
.
• The Ethernet cable is not connected to the printer.
U
Ussiinngg tthhee W
Wiirreelleessss SSeettuupp W
Wiizzaarrdd iinn tthhee PPrriinntteerr
• These instructions apply only to some printer models.
• Before using the wizard, make sure that the printer firmware is
updated.
1.
From the home screen, touch the
Wi-Fi
icon, then touch
Set up
now
.
2.
Select a Wi-Fi network, and then type the network password.
3.
Touch
Done
.
U
Ussiinngg tthhee PPrriinntteerr C
Coonnttrrooll PPaanneell
1.
From the control panel, navigate to
Settings
>
Network/Ports
>
Wireless
>
Setup On Printer Panel
.
For non-touch-screen printer models, to navigate through the
settings, press
OK
.
2.
Select a Wi-Fi network, and then type the network password.
For Wi-Fi-network-ready printer models, a prompt to set up the
Wi-Fi network appears during initial setup.
Clearing Jams
A
Avvooiiddiinngg JJaam
mss
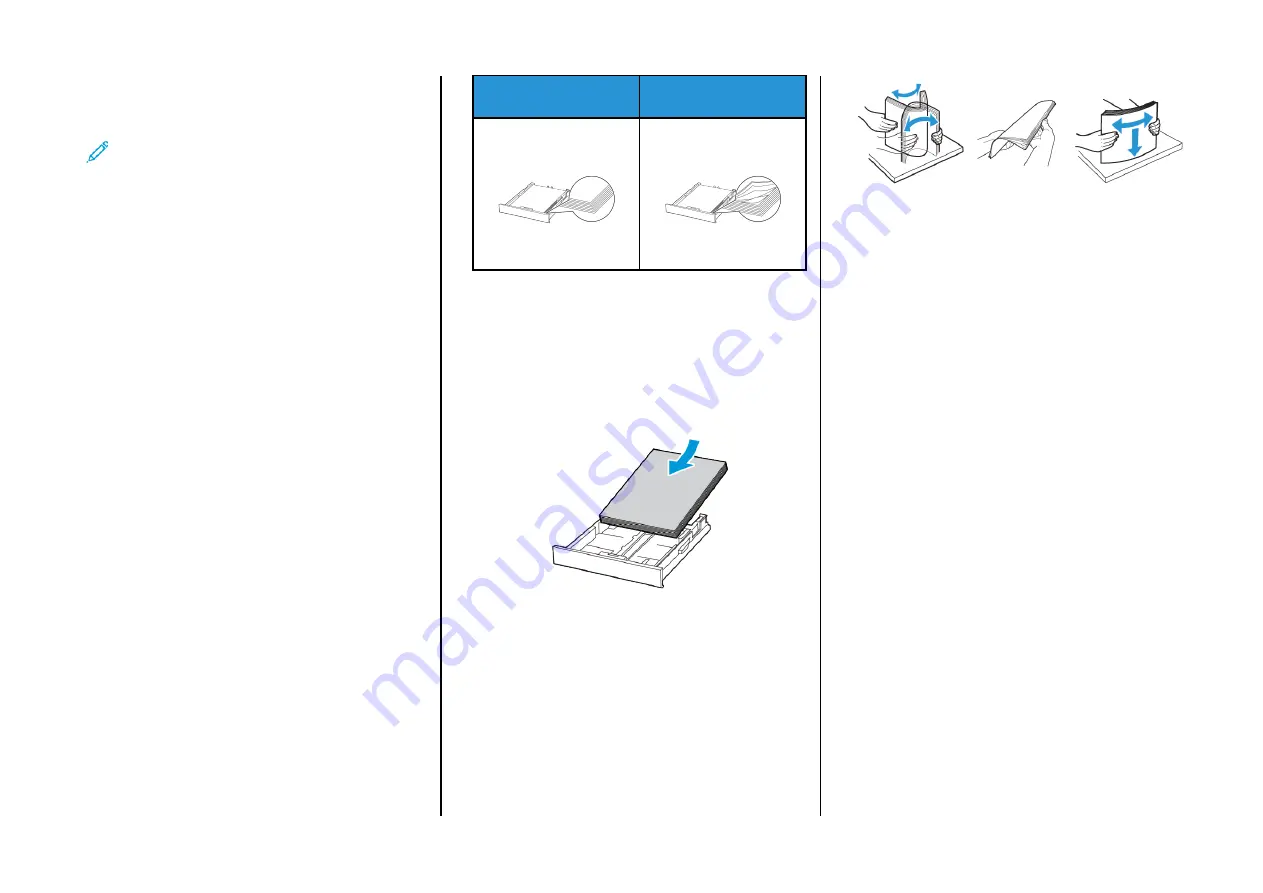
LLooaadd PPaappeerr PPrrooppeerrllyy
• Make sure that the paper lies flat in the tray.
Correct loading of paper
Incorrect loading of paper
• Do not load or remove a tray while the printer is printing.
• Do not load too much paper. Make sure that the stack height is
below the maximum paper fill indicator.
• Do not slide paper into the tray. Load paper as shown in the
illustration.
• Make sure that the paper guides are positioned correctly and are
not pressing tightly against the paper or envelopes.
• Push the tray firmly into the printer after loading paper.
U
Ussee RReeccoom
mm
meennddeedd PPaappeerr
• Use only recommended paper or specialty media.
• Do not load paper that is wrinkled, creased, damp, bent, or curled.
• Flex, fan, and align the paper edges before loading.
• Do not use paper that has been cut or trimmed by hand.
• Do not mix paper sizes, weights, or types in the same tray.
• Make sure that the paper size and type are set correctly on the
computer or printer control panel.
• Store paper according to manufacturer recommendations.
IIddeennttiiffyyiinngg JJaam
m LLooccaattiioonnss
• When Jam Assist is set to
On
, the printer might attempt to flush
blank pages or pages with partial prints after a jammed page has
been cleared. Check your printed output for blank pages.
• When Jam Recovery is set to
On
or
Auto
, the printer reprints
jammed pages.
5
Содержание C230
Страница 9: ...Duplex unit 3 Close the door 9...


