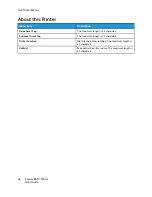
Xerox B310 Скачать руководство пользователя страница 61

Device

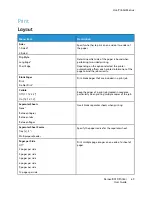
PPrreeffeerreenncceess
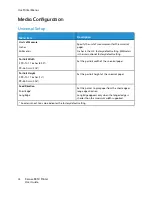
Menu item

Description

Display Language

Set the language of the text that appears on the
display.

Country/Region

Identify the country or region that the printer is
configured to operate.

Run Initial Setup

• Yes
• No*

Run the setup wizard.

Displayed information

• Display Text 1
• Display Text 2

Specify the information to appear on the home
screen.

Date and Time

• Configure

Current Date and Time

Manually Set Date and Time

Date Format [MM-DD-YYYY*]

Time Format [12 hour A.M./P.M.*]

Time Zone [USA/Canada EST*]

• Network Time Protocol

Enable NTP

NTP Server

Configure the printer date and time.
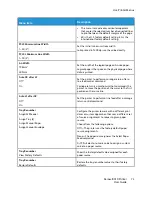
Paper Sizes

• U.S.*
• Metric

Specify the unit of measurement for paper sizes.

The country or region selected in the initial setup
wizard determines the initial paper size setting.
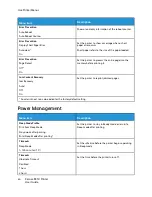
Screen Timeout

5–300 (60*)

Set the idle time in seconds before the display shows
the home screen, or before the printer logs out a user
account automatically.

* An asterisk next to a value indicates the factory default setting.

Xerox

®

B310 Printer

User Guide

61

Use Printer Menus

Содержание B310

Страница 1: ...Version 1 0 March 2021 702P08627 Xerox B310 Printer User Guide...

Страница 2: ...trator and McAfee ePO are trademarks or registered trademarks of McAfee Inc in the United States and other countries Microsoft Windows Vista Windows Windows Server and OneDrive are registered trademar...

Страница 3: ...weights 26 3 Set up Install and Configure 27 Selecting a location for the printer 28 Attaching cables 29 Loading paper and specialty media 30 Setting the Paper Size and Type 30 Configuring Universal...

Страница 4: ...Printing from a Mobile Device Using AirPrint 53 Printing from a Mobile Device using Wi Fi Direct 53 Printing a font sample list 55 Placing separator sheets between copies 56 Canceling a print job 57...

Страница 5: ...7 Maintain the Printer 99 Checking the Status of Parts and Supplies 100 Configuring supply notifications 101 Setting up e mail alerts 102 Viewing reports 103 Ordering Parts and Supplies 104 Using Genu...

Страница 6: ...Paper Jam in the Duplex Unit 165 Paper Jam in the Rear Door 168 Paper feed problems 170 Envelope Seals When Printing 170 Collated printing does not work 171 Tray linking does not work 172 Paper frequ...

Страница 7: ...de 7 B Recycling and Disposal 185 Product Disposal and Recycling 186 North America 187 Xerox Green World Alliance 188 Waste from Electrical and Electronic Equipment WEEE Directive 189 India E Waste no...

Страница 8: ...8 Xerox B310 Printer User Guide Table of Contents...

Страница 9: ...0 Product Statements 11 Maintenance Safety 14 Consumable Information 15 Your printer and the recommended supplies have been designed and tested to meet strict safety requirements Attention to the foll...

Страница 10: ...types of statements include CAUTION POTENTIAL INJURY Indicates a risk of injury CAUTION SHOCK HAZARD Indicates a risk of electrical shock CAUTION HOT SURFACE Indicates a risk of burn if touched CAUTI...

Страница 11: ...TION POTENTIAL INJURY Do not cut twist bind crush or place heavy objects on the power cord Do not subject the power cord to abrasion or stress Do not pinch the power cord between objects such as furni...

Страница 12: ...n you set it down Make sure that there is adequate clearance around the printer CAUTION TIPPING HAZARD Installing one or more options on your printer or MFP may require a caster base furniture or othe...

Страница 13: ...ng instructions that discusses the guidelines for selecting print media to avoid the possibility of harmful emissions This product may produce small amounts of ozone during normal operation and may be...

Страница 14: ...ws Customer service items are not located behind these covers In case of a Dry Ink or Toner Spill use a broom or a wet cloth to wipe off spilled dry ink or toner Sweep slowly to minimize generation of...

Страница 15: ...This can increase the risk of skin or eye contact Store all consumables in accordance with the instructions given on the package or container Keep all consumables away from the reach of children Never...

Страница 16: ...16 Xerox B310 Printer User Guide Safety...

Страница 17: ...erox B310 Printer User Guide 17 2 Learn About the Printer This chapter contains Printer configuration 18 Using the control panel 19 Understanding the status of the indicator light 20 Selecting paper 2...

Страница 18: ...Printer configuration 1 Control panel 2 Multipurpose feeder 3 Standard 250 sheet tray 4 Optional 550 sheet tray 5 Standard output tray 18 Xerox B310 Printer User Guide Learn About the Printer...

Страница 19: ...Stop the current job 4 Indicator light Check the status of the printer 5 Select button Select a menu option Save the changes in a setting 6 Back button Return to the previous screen 7 Left arrow butto...

Страница 20: ...ight Printer status Off The printer is off or in Hibernate mode Blue The printer is ready or processing data Blinking red The printer requires user intervention Solid amber The printer is in Sleep mod...

Страница 21: ...Excessive curl can cause paper feeding problems Curl can occur after the paper passes through the printer where it is exposed to high temperatures Storing paper unwrapped in hot humid cold or dry con...

Страница 22: ...n the page greater than 2 3mm 0 9in such as optical character recognition OCR forms In some cases registration can be adjusted with a software application to successfully print on these forms Coated p...

Страница 23: ...5 75 F with relative humidity between 40 and 60 percent Store paper in cartons on a pallet or shelf rather than on the floor Store individual packages on a flat surface Do not store anything on top of...

Страница 24: ...x 8 5 in X Executive 184 2 x 266 7 mm 7 25 x 10 5 in X Letter 215 9 x 279 4 mm 8 5 x 11 in Legal 215 9 x 355 6 mm 8 5 x 14 in Folio 215 9 x 330 2 mm 8 5 x 13 in Universal3 99 x 148 mm to 215 9 x 359 9...

Страница 25: ...X X 1 The default support is long edge feed 2 Paper must be at least 210 mm 8 27 in wide and 279 4 mm 11 in long for two sided printing 3 When Universal is selected the paper is formatted for 215 90 x...

Страница 26: ...are supported for occasional use of less than 20 pages per month Vinyl pharmacy or two sided labels are not supported S Su up pp po or rt te ed d p pa ap pe er r w we eiig gh ht ts s Standard 250 shee...

Страница 27: ...stall and Configure This chapter contains Selecting a location for the printer 28 Attaching cables 29 Loading paper and specialty media 30 Installing and Updating Software Drivers and Firmware 35 Netw...

Страница 28: ...ndard or the CEN Technical Committee 156 standard Provide a flat sturdy and stable surface Keep the printer Clean dry and free of dust Away from stray staples and paper clips Away from the direct airf...

Страница 29: ...and easily accessible CAUTION POTENTIAL INJURY To avoid the risk of fire or electrical shock use only the power cord provided with this product or the manufacturer s authorized replacement Warning To...

Страница 30: ...urce 2 Set the paper size and type C Co on nf fiig gu ur riin ng g U Un niiv ve er rs sa all p pa ap pe er r s se et tt tiin ng gs s 1 From the control panel navigate to Settings Paper Media Configura...

Страница 31: ...able side facedown and then make sure that the guides fit snugly against the paper Load letterhead facedown with the header toward the front of the tray for one sided printing Load letterhead faceup w...

Страница 32: ...r 5 Insert the tray If necessary set the paper size and paper type from the control panel to match the paper loaded L Lo oa ad diin ng g t th he e M Mu ullt tiip pu ur rp po os se e F Fe ee ed de er r...

Страница 33: ...k adhesives 4 Adjust the guide to match the size of the paper that you are loading 5 From the control panel set the paper size and paper type to match the paper loaded L Liin nk kiin ng g t tr ra ay y...

Страница 34: ...of the fuser varies according to the specified paper type To avoid printing issues match the paper type setting in the printer with the paper loaded in the tray 34 Xerox B310 Printer User Guide Set u...

Страница 35: ...er r 1 Insert the Software and Documentation disc into the appropriate drive on your computer If the installer does not start automatically navigate to the drive then double click the Setup exe instal...

Страница 36: ...tall the print driver click Next 12 If needed set the printer as the default printer Note Before you select Share Printer contact your system administrator 13 To send a test page to the printer click...

Страница 37: ...vers 5 xx x dmg or pkg double click the appropriate file name 4 When prompted click Continue 5 To accept the license agreement click I Agree 6 To accept the current installation location click Install...

Страница 38: ...IP address of the printer 7 In the Name field enter a name for the printer 8 From the Use list choose Select a driver to use 9 From the printer software list select the print driver for your printer m...

Страница 39: ...s of your printer into a text file and then import the file to apply the settings to other printers 1 Open a web browser and then type the printer IP address in the address field View the printer IP a...

Страница 40: ...W Wii F Fii P Pr ro ot te ec ct te ed d S Se et tu up p W WP PS S Note This feature is available only in some printer models Before you begin make sure that The access point wireless router is WPS ce...

Страница 41: ...Configuring Wi Fi Direct C Co on nn ne ec ct tiin ng g U Us siin ng g W Wii F Fii D Diir re ec ct t Note These instructions apply only to Android mobile devices 1 From the mobile device go to the sett...

Страница 42: ...ch your computer back to its previous network after disconnecting from the Wi Fi Direct network D De ea ac ct tiiv va at tiin ng g t th he e W Wii F Fii n ne et tw wo or rk k Note This feature is avai...

Страница 43: ...Printing the Menu Settings Page 1 From the control panel navigate to Settings Reports 2 Select Menu Settings Page and then press Xerox B310 Printer User Guide 43 Set up Install and Configure...

Страница 44: ...44 Xerox B310 Printer User Guide Set up Install and Configure...

Страница 45: ...Xerox B310 Printer User Guide 45 4 Secure the Printer This chapter contains Locating the Security Slot 46 Erasing printer memory 47 Restoring factory default settings 48 Statement of Volatility 49...

Страница 46: ...lot The printer is equipped with a security lock feature Attach a security lock compatible with most laptop computers in the location shown to secure the printer in place 46 Xerox B310 Printer User Gu...

Страница 47: ...and network settings security settings and embedded solutions do the following 1 From the control panel navigate to Settings Device Maintenance Out of Service Erase Sanitize all information on nonvol...

Страница 48: ...ng factory default settings 1 From the control panel navigate to Settings Device Restore Factory Defaults Restore all settings 2 Select Yes and then press 48 Xerox B310 Printer User Guide Secure the P...

Страница 49: ...ile memory EEPROM and NAND flash memory Both types are used to store operating system device settings and network information Erase the content of any installed printer memory in the following circums...

Страница 50: ...50 Xerox B310 Printer User Guide Secure the Printer...

Страница 51: ...uide 51 5 Print This chapter contains Printing from a Computer 52 Printing from a Mobile Device 53 Printing a font sample list 55 Placing separator sheets between copies 56 Canceling a print job 57 Ad...

Страница 52: ...and envelopes set the paper size and type in the printer before printing the document 1 From the document that you are trying to print open the Print dialog 2 If necessary adjust the settings 3 Print...

Страница 53: ...ion that allows you to print directly from Apple devices to an AirPrint certified printer Make sure that the Apple device and the printer are connected to the same network If the network has multiple...

Страница 54: ...pending on your mobile device do one of the following Tap Print Tap Print Tap Print 3 Select a printer and then adjust the settings if necessary 4 Print the document 54 Xerox B310 Printer User Guide P...

Страница 55: ...Printing a font sample list 1 From the control panel navigate to Settings Reports Print Print Fonts 2 Select a font sample and then press Xerox B310 Printer User Guide 55 Print...

Страница 56: ...Placing separator sheets between copies 1 From the control panel navigate to Settings Print Layout Separator Sheets Between Copies 2 Print the document 56 Xerox B310 Printer User Guide Print...

Страница 57: ...2 Select a print job to cancel and then press F Fr ro om m t th he e c co om mp pu ut te er r 1 Depending on the operating system do either of the following Open the printers folder and then select y...

Страница 58: ...Adjusting toner darkness 1 From the control panel navigate to Settings Print Quality Toner Darkness 2 Adjust the setting and then press 58 Xerox B310 Printer User Guide Print...

Страница 59: ...Xerox B310 Printer User Guide 59 6 Use Printer Menus This chapter contains Menu map 60 Device 61 Print 69 Paper 75 Network Ports 78 Security 92 Reports 96 Troubleshooting 98...

Страница 60: ...k Overview Wireless Wi Fi Direct Ethernet TCP IP SNMP IPSec 802 1x LPD ConfigurationHTTP FTP Settings USB Restrict external network access Security Login Methods Certificate Management Login Restricti...

Страница 61: ...nually Set Date and Time Date Format MM DD YYYY Time Format 12 hour A M P M Time Zone USA Canada EST Network Time Protocol Enable NTP NTP Server Configure the printer date and time Paper Sizes U S Met...

Страница 62: ...rint Toner Darkness Light Normal Dark Determine the lightness or darkness of text images An asterisk next to a value indicates the factory default setting N No ot tiif fiic ca at tiio on ns s Menu ite...

Страница 63: ...ars only in the Embedded Web Server Error Prevention Jam Assist Off On Set the printer to check for jammed paper automatically Error Prevention Auto Continue Disabled 5 255 5 Let the printer continue...

Страница 64: ...ery Jam Recovery Auto Off On Set the printer to reprint jammed pages An asterisk next to a value indicates the factory default setting P Po ow we er r M Ma an na ag ge em me en nt t Menu item Descript...

Страница 65: ...De ef fa au ullt ts s Menu item Description Restore Settings Restore all settings Restore printer settings Restore network settings Restore the printer factory default settings M Ma aiin nt te en na a...

Страница 66: ...er source that the user fills when a prompt to load paper appears Tray Configuration Envelope Prompts Auto MP Feeder Manual Envelope Set the paper source that the user fills when a prompt to load enve...

Страница 67: ...de Off On Set the printer to reduce the amount of noise that it makes when printing Enabling this setting slows down the overall performance of the printer Device Operations Panel Menus Enable Disable...

Страница 68: ...aximum length is 32 characters Customer Asset Tag The maximum length is 32 characters Printer Location Identify the printer location The maximum length is 63 characters Contact Personalize the printer...

Страница 69: ...s that are included in a print job Collate Off 1 1 1 2 2 2 On 1 2 1 2 1 2 Keep the pages of a print job stacked in sequence particularly when printing multiple copies of the job Separator Sheets None...

Страница 70: ...nt job Print Area Normal Whole Page Set the printable area on a sheet of paper An asterisk next to a value indicates the factory default setting S Se et tu up p Menu item Description Printer Language...

Страница 71: ...to a value indicates the factory default setting Q Qu ua alliit ty y Menu item Description Print Resolution 300 dpi 600 dpi 1200 Image Q 2400 Image Q Set the resolution for the text and images on the...

Страница 72: ...u item Description Font Name List of available fonts Courier Select a font from the specified font source Symbol Set List of available symbol set 10U PC 8 Specify the symbol set for each font name A s...

Страница 73: ...r to move the position of the cursor to the first position on the same line Auto LF after CR Off On Set the printer to perform a line feed after a carriage return control command Tray Renumber Assign...

Страница 74: ...es the scaling and orientation settings for the image Invert Off On Invert bitonal monochrome images This menu item does not apply to GIF or JPEG image formats Scaling Anchor Top Left Best Fit Anchor...

Страница 75: ...prompts the user to load the required paper size Letter A4 prints A4 size document on letter when loading letter and letter size jobs on A4 paper size when loading A4 All Listed substitutes Letter A4...

Страница 76: ...ortrait Width 3 90 14 17 inches 8 50 99 360 mm 216 Set the portrait width of the universal paper Portrait Height 3 90 14 17 inches 14 99 360 mm 356 Set the portrait height of the universal paper Feed...

Страница 77: ...ain Paper Card Stock Recycled Labels Bond Envelope Rough Envelope Letterhead Preprinted Colored Paper Light Heavy Rough Cotton Custom Type X Specify the texture weight and orientation of the paper loa...

Страница 78: ...4 address All IPv6 Addresses Show all IPv6 addresses Reset Print Server Start Reset all active network connections to the printer This setting removes all network configuration settings Network Job Ti...

Страница 79: ...less network when a PIN on the printer is entered into the wireless settings of the access point Compatibility 802 11b g n 2 4GHz Specify the wireless standard for the wireless network Wireless Securi...

Страница 80: ...Enable Dynamic Host Configuration Protocol DHCP DHCP is a standard protocol that lets a server dynamically assign an IP address and other network configuration parameters to each device on the network...

Страница 81: ...witch is off then the printer does not examine incoming data and uses the default printer language specified in the Setup menu PS SmartSwitch On Off Set the printer to switch automatically to PS emula...

Страница 82: ...the IP address of the group owner Auto Accept Push Button Requests Off On Accept requests to connect to the network automatically Accepting clients automatically is not secured An asterisk next to a v...

Страница 83: ...r addresses Network Address UAA LAA Show the printer Media Access Control MAC addresses Locally Administered Address LAA and Universally Administered Address UAA You can change the printer LAA manuall...

Страница 84: ...work An asterisk next to a value indicates the factory default setting T TC CP P I IP P Note This menu appears only in network printers or printers that are attached to print servers Menu item Descrip...

Страница 85: ...t Port 1 65535 9100 Specify a raw port number for printers connected on a network Outbound Traffic Maximum Speed On Off Enable the printer maximum transfer rate Enable TLSv1 0 On Off Enable the TLSv1...

Страница 86: ...On Context Name Set Read Write Credentials User Name Authentication Password Privacy Password Set Read only Credentials User Name Authentication Password Privacy Password Authentication Hash MD5 SHA1...

Страница 87: ...ars only when Enable IPSec is set to On DH Diffie Hellman Group Proposal modp2048 14 modp3072 15 modp4069 16 modp6144 17 Set the IPSec encryption DH Diffie Hellman Group Proposal appears only when Bas...

Страница 88: ...On Certificate Authenticated Connections Host x Address subnet Address subnet An asterisk next to a value indicates the factory default setting 8 80 02 2 1 1x x Note This menu appears only in network...

Страница 89: ...return conversion Carriage return is a mechanism that commands the printer to move the position of the cursor to the first position on the same line An asterisk next to a value indicates the factory...

Страница 90: ...port requires it regardless of the default printer language If PCL SmartSwitch is off then the printer does not examine incoming data and uses the default printer language specified in the Setup menu...

Страница 91: ...item Description Restrict external network access Off On Restrict access to network sites External network address Specify the network addresses with restricted access E mail address for notification...

Страница 92: ...printer functions Manage Permissions Administrative Menus Security Menu Network Ports Menu Paper Menu Reports Menu Function Configuration Menus Supplies Menu SE Menu Device Menu Control access to the...

Страница 93: ...Permissions Add Group Import Access Controls Function Access Administrative Menus Device Management All Users Import Access Controls Function Access Administrative Menus Device Management Admin Funct...

Страница 94: ...CA certificates L Lo og giin n R Re es st tr riic ct tiio on ns s Menu item Description Login failures 1 10 3 Specify the number of failed login attempts before the user gets locked out Failure time f...

Страница 95: ...ow the user to print Security Reset Jumper Enable Guest access No Effect Specify user access to the printer The jumper is located beside a lock icon on the controller board Enable Guest access gives a...

Страница 96: ...the printer Device Statistics Print a report about printer usage and supply status Profile List Print a list of profiles that are stored in the printer Asset Report Print a report that contains the pr...

Страница 97: ...printer This menu item appears only in network printers or printers connected to print servers Wi Fi Direct Connected Clients Print a page that shows the list of devices that are connected to the prin...

Страница 98: ...Troubleshooting Menu item Description Print Quality Test Pages Print sample pages to identify and correct print quality defects 98 Xerox B310 Printer User Guide Use Printer Menus...

Страница 99: ...the Status of Parts and Supplies 100 Configuring supply notifications 101 Setting up e mail alerts 102 Viewing reports 103 Ordering Parts and Supplies 104 Replacing parts and supplies 105 Cleaning pr...

Страница 100: ...From the control panel navigate to Settings OK Reports OK Device OK Device Statistics OK 2 From the Supply Information section of the pages printed check the status of parts and supplies 100 Xerox B3...

Страница 101: ...s as four sets of numbers separated by periods such as 123 123 123 123 If you are using a proxy server then temporarily disable it to load the web page correctly 2 Click Settings OK Device OK Notifica...

Страница 102: ...address appears as four sets of numbers separated by periods such as 123 123 123 123 If you are using a proxy server then temporarily disable it to load the web page correctly 2 Click Settings OK Devi...

Страница 103: ...inter IP address in the address field View the printer IP address on the printer home screen The IP address appears as four sets of numbers separated by periods such as 123 123 123 123 If you are usin...

Страница 104: ...maging components It can also affect warranty coverage Damage caused by the use of third party parts or supplies is not covered by the warranty All life indicators are designed to function with Xerox...

Страница 105: ...r riid dg ge e 1 Open the front door Warning Potential Damage To prevent damage from electrostatic discharge touch any exposed metal frame of the printer before accessing or touching interior areas of...

Страница 106: ...exposure to light may cause print quality problems Warning Potential Damage Do not touch the photoconductor drum Doing so may affect the quality of future print jobs 4 Unpack the new toner cartridge...

Страница 107: ...giin ng g u un niit t 1 Open the front door Warning To prevent damage from electrostatic discharge touch any exposed metal frame of the printer before accessing or touching interior areas of the print...

Страница 108: ...t clicks into place Warning Do not expose the imaging unit to direct light for more than 10 minutes Extended exposure to light may cause print quality problems Warning Do not touch the photoconductor...

Страница 109: ...R Re ep plla ac ciin ng g t th he e t tr ra ay y 1 Remove the used tray 2 Unpack the new tray 3 Insert the new tray Xerox B310 Printer User Guide 109 Maintain the Printer...

Страница 110: ...aper from the standard output tray and multipurpose feeder 3 Remove any dust lint and pieces of paper around the printer using a soft brush or vacuum 4 Wipe the outside of the printer with a damp soft...

Страница 111: ...K 2 Select the amount of time before the printer enters Hibernate mode Make sure to wake the printer from Hibernate mode before sending a print job To wake the printer from Hibernate mode press the po...

Страница 112: ...r has a caster base then carefully roll it to the new location Use caution when passing over thresholds and breaks in flooring If the printer does not have a caster base but is configured with optiona...

Страница 113: ...t a Problem This chapter contains Print quality problems 114 Printing problems 115 The printer is not responding 149 Network connection problems 151 Issues with supplies 154 Clearing Jams 156 Paper fe...

Страница 114: ...lded or wrinkled paper Gray background Horizontal light bands Incorrect margins Light print Mottled print and dots Paper curl Print crooked or skewed Print crooked or skewed Solid black pages Text or...

Страница 115: ...and supported Xerox toner cartridge If the cartridge is not supported then install a supported one 2 Print the document Is the printer printing blank or white pages Go to step 2 The problem is solved...

Страница 116: ...ng blank or white pages Go to step 4 The problem is solved Step 4 Replace the imaging unit Is the printer printing blank or white pages Contact customer support The problem is solved D Da ar rk k p pr...

Страница 117: ...3 Print the document Is the print dark Go to step 3 The problem is solved Step 3 1 Depending on your operating system specify the paper type from the Printing Preferences or Print dialog Make sure tha...

Страница 118: ...s solved Step 7 1 Remove and then insert the imaging unit Do not expose the imaging unit to direct light for more than 10 minutes Extended exposure to light may cause print quality problems Do not tou...

Страница 119: ...he printer is using a genuine and supported Xerox toner cartridge If the cartridge is not supported then install a supported one 2 Print the document Are fine lines not printed correctly Go to step 2...

Страница 120: ...2 1 Load paper from a fresh package Paper absorbs moisture due to high humidity Store paper in its original wrapper until you are ready to use it 2 Print the document Is the paper folded or wrinkled G...

Страница 121: ...l panel navigate to Settings Print Quality Toner Darkness 3 Print the document Does gray background appear on prints Go to step 2 The problem is solved Step 2 1 Check if the printer is using a genuine...

Страница 122: ...use print quality problems Do not touch the photoconductor drum under the imaging unit Doing so may affect the quality of future print jobs 2 Print the document Does gray background appear on prints G...

Страница 123: ...l panel navigate to Settings Paper Tray Configuration Paper Size Type 2 Print the document Are the margins correct The problem is solved Go to step 3 Step 3 1 Depending on your operating system specif...

Страница 124: ...supported one 2 Print the document Is the print light Go to step 2 The problem is solved Step 2 1 Turn off the printer wait for about 10 seconds and then turn on the printer 2 Increase toner darkness...

Страница 125: ...problem is solved Step 5 1 Remove the imaging unit Do not expose the imaging unit to direct light for more than 10 minutes Extended exposure to light can cause print quality problems Do not touch the...

Страница 126: ...ontact customer support Step 7 1 Replace the toner cartridge 2 Print the document Is the print light Contact customer support The problem is solved M Mo ot tt tlle ed d p pr riin nt t a an nd d d do o...

Страница 127: ...ked toner Go to step 3 Contact customer support Step 3 1 Check the status of the imaging unit From the control panel navigate to Settings Reports Device Device Statistics 2 From the Supply Information...

Страница 128: ...rled Go to step 2 The problem is solved Step 2 1 Check if the printer is using a genuine and supported Xerox toner cartridge If the cartridge is not supported then install a supported one 2 Print the...

Страница 129: ...solved Step 6 1 Load paper from a fresh package Paper absorbs moisture due to high humidity Store paper in its original wrapper until you are ready to use it 2 Print the document Is the paper curled C...

Страница 130: ...rint crooked or skewed Go to step 3 The problem is solved Step 3 1 Check if the paper loaded is supported If paper is not supported then load a supported paper 2 Print the document Is the print crooke...

Страница 131: ...is not supported then install a supported one 2 Print the document Is the printer printing solid black pages Go to step 2 The problem is solved Step 2 1 Remove and then insert the imaging unit Do not...

Страница 132: ...Print the document Is the printer printing solid black pages Contact customer support The problem is solved T Te ex xt t o or r iim ma ag ge es s c cu ut t o of ff f Note Before solving the problem pr...

Страница 133: ...irect light for more than 10 minutes Extended exposure to light may cause print quality problems Do not touch the photoconductor drum under the imaging unit Doing so may affect the quality of future p...

Страница 134: ...ur operating system specify the paper type from the Printing Preferences or Print dialog Make sure that the setting matches the paper loaded You can also change the setting on the printer control pane...

Страница 135: ...ht for more than 10 minutes Extended exposure to light may cause print quality problems Do not touch the photoconductor drum under the imaging unit Doing so may affect the quality of future print jobs...

Страница 136: ...t the document Do vertical light bands appear on prints Go to step 2 The problem is solved Step 2 1 Check the status of the toner cartridge From the control panel navigate to Settings Reports Device D...

Страница 137: ...s not supported then install a supported one 2 Print the document Do vertical white lines appear on prints Go to step 2 The problem is solved Step 2 1 Depending on your operating system specify the pa...

Страница 138: ...ing the problem print the Print Quality Test Pages From the control panel navigate to Settings Troubleshooting Print Quality Test Pages For non touch screen printer models press to navigate through th...

Страница 139: ...or more than 10 minutes Extended exposure to light may cause print quality problems Do not touch the photoconductor drum under the imaging unit Doing so may affect the quality of future print jobs 2 P...

Страница 140: ...te Before solving the problem print the Print Quality Test Pages From the control panel navigate to Settings Troubleshooting Print Quality Test Pages For non touch screen printer models press to navig...

Страница 141: ...s Extended exposure to light can cause print quality problems Do not touch the photoconductor drum under the imaging unit Doing so may affect the quality of future print jobs 2 Print the document Do v...

Страница 142: ...Do not touch the photoconductor drum under the imaging unit Doing so may affect the quality of future print jobs 2 Print the document Do vertical dark streaks with missing images appear on prints Go...

Страница 143: ...7mm 1 48in Toner cartridge 43 5mm 1 71in 37 5mm 1 48in Transfer roller 52mm 2 05in Fuser 79 8mm 3 14in 62 5mm 2 46in Does the distance between the repeating defects match the toner cartridge or imagi...

Страница 144: ...to step 3 Step3 1 Check if the ports are working and if the cables are securely connected to the computer and the printer For more information see the setup documentation that came with the printer 2...

Страница 145: ...enu Device Operations Quiet Mode 2 Print the document Is the printer printing slow Go to step 3 The problem is solved Step 3 1 Depending on your operating system specify the print resolution from the...

Страница 146: ...nt more slowly 2 Print the document Is the printer printing slow Go to step 6 The problem is solved Step 6 1 Make sure that the printer settings for texture and weight match the paper being loaded Fro...

Страница 147: ...verheating Allow the printer to cool down after a long print job Observe the recommended ambient temperature for the printer For more information refer to Selecting a location for the printer 2 Print...

Страница 148: ...ize and paper type from the Printing Preferences or Print dialog You can also change the settings on the printer control panel Navigate to Settings Paper Tray Configuration Paper Size Type 2 Make sure...

Страница 149: ...by a switch or breaker Turn on the switch or reset the breaker Go to step 3 Step3 Check if the printer is on Is the printer on Go to step 4 Turn on the printer Step4 Check if the printer is in Sleep o...

Страница 150: ...tep7 Install the correct print driver Is the printer responding The problem is solved Go to step 8 Step8 Turn off the printer wait for about 10 seconds and then turn on the printer Is the printer resp...

Страница 151: ...3 Type the correct printer IP address in the address field Step3 Check if you are using a supported browser Internet Explorer version 11 or later Microsoft Edge Safari version 6 or later Google Chrome...

Страница 152: ...t th he e p pr riin nt te er r t to o t th he e W Wii F Fii n ne et tw wo or rk k Action Yes No Step 1 Make sure that Active Adapter is set to Auto From the control panel navigate to Settings Network...

Страница 153: ...y Mode Is the correct wireless security mode selected Go to step 6 Go to step 5 Step 5 Select the correct wireless security mode Can the printer connect to the Wi Fi network The problem is solved Go t...

Страница 154: ...cates the region of the cartridge Table 8 1 Printer and toner cartridge regions Region Numeric code Worldwide or Undefined region 0 North America United States Canada 1 European Economic Area Western...

Страница 155: ...are used Imaging component usage beyond the intended life may damage your Xerox printer or associated components Warning Use of third party supplies or parts can affect warranty coverage Damage caused...

Страница 156: ...ile the printer is printing Do not load too much paper Make sure that the stack height is below the maximum paper fill indicator Do not slide paper into the tray Load paper as shown in the illustratio...

Страница 157: ...type are set correctly on the computer or printer control panel Store paper according to manufacturer recommendations I Id de en nt tiif fy yiin ng g J Ja am m L Lo oc ca at tiio on ns s When Jam Assi...

Страница 158: ...t all paper fragments are removed P Pa ap pe er r J Ja am m iin n t th he e M Mu ullt tiip pu ur rp po os se e F Fe ee ed de er r 1 Remove paper from the multipurpose feeder 2 Remove the jammed paper...

Страница 159: ...interior areas of the printer 5 Remove the imaging unit Warning Do not expose the imaging unit to direct light for more than 10 minutes Extended exposure to light may cause print quality problems Warn...

Страница 160: ...hot To reduce the risk of injury from a hot component allow the surface to cool before touching it Note Make sure that all paper fragments are removed 7 Insert the imaging unit 8 Close the door 9 Open...

Страница 161: ...10 Flex fan and align the paper edges before loading 11 Reload paper P Pa ap pe er r J Ja am m iin n T Tr ra ay ys s 1 Remove the tray Xerox B310 Printer User Guide 161 Troubleshoot a Problem...

Страница 162: ...interior areas of the printer 3 Remove the imaging unit Warning Do not expose the imaging unit to direct light for more than 10 minutes Extended exposure to light may cause print quality problems Warn...

Страница 163: ...ouching it Note Make sure that all paper fragments are removed 5 Insert the imaging unit 6 Close the front door and then insert the tray 7 Open the rear door CAUTION HOT SURFACE The inside of the prin...

Страница 164: ...that all paper fragments are removed 9 Close the rear door 10 Remove the optional tray 11 Remove the jammed paper Note Make sure that all paper fragments are removed 12 Insert the tray 164 Xerox B310...

Страница 165: ...rinter before accessing or touching interior areas of the printer 2 Remove the imaging unit Warning Do not expose the imaging unit to direct light for more than 10 minutes Extended exposure to light m...

Страница 166: ...ht be hot To reduce the risk of injury from a hot component allow the surface to cool before touching it Note Make sure that all paper fragments are removed 4 Insert the imaging unit 5 Close the door...

Страница 167: ...ex unit latch to open the duplex unit 8 Remove the jammed paper Note Make sure that all paper fragments are removed 9 Close the duplex unit 10 Insert the tray Xerox B310 Printer User Guide 167 Trouble...

Страница 168: ...nter before accessing or touching interior areas of the printer 2 Remove the imaging unit Warning Do not expose the imaging unit to direct light for more than 10 minutes Extended exposure to light may...

Страница 169: ...the risk of injury from a hot component allow the surface to cool before touching it 4 Remove the jammed paper Note Make sure that all paper fragments are removed 5 Close the rear door 6 Insert the im...

Страница 170: ...can seal the flaps 2 Send the print job Does the envelope seal when printing Go to step 2 The problem is solved Step2 1 Make sure that paper type is set to Envelope From the control panel navigate to...

Страница 171: ...t collated correctly The problem is solved Go to step 2 Step 2 1 From the document that you are trying to print open the Print dialog and then select Collate 2 Print the document Is the document colla...

Страница 172: ...From the control panel navigate to Settings Paper Tray Configuration Paper Size Type 2 Set the paper size and paper type to match the paper loaded in the linked trays 3 Print the document Do the trays...

Страница 173: ...cur frequently Go to step 2 The problem is solved Step 2 1 From the control panel navigate to Settings Paper Tray Configuration Paper Size Type 2 Set the correct paper size and type 3 Print the docume...

Страница 174: ...Yes No 1 From the control panel navigate to Settings Device Notifications Jam Content Recovery 2 In the Jam Recovery menu select On or Auto and then press Are the jammed pages reprinted The problem is...

Страница 175: ...rt or to browse the supported documentation drivers and other downloads go to www xerox com click on the Customer Support link and search for your product Technical support via telephone is also avail...

Страница 176: ...176 Xerox B310 Printer User Guide Troubleshoot a Problem...

Страница 177: ...Xerox B310 Printer User Guide 177 A Regulatory Information This appendix contains Basic Regulations 178 Material Safety Data Sheets 184...

Страница 178: ...discharge when performing maintenance tasks such as clearing paper jams or replacing supplies touch any exposed metal frame of the printer before accessing or touching interior areas of the printer ev...

Страница 179: ...er milliwatts 25 Wavelength nanometers 775 800 P Po ow we er r P Pr ro od du uc ct t P Po ow we er r C Co on ns su um mp pt tiio on n The following table documents the power consumption characteristic...

Страница 180: ...he printer waits after a job is printed before it enters Hibernate mode can be modified between one hour and one month O Of ff f M Mo od de e If this product has an off mode which still consumes a sma...

Страница 181: ...nctionnement ind sirable E Eu ur ro op pe ea an n U Un niio on n a an nd d E Eu ur ro op pe ea an n E Ec co on no om miic c A Ar re ea a C Co om mp plliia an nc ce e The CE mark applied to this produc...

Страница 182: ...e To assure compliance with FCC regulations on electromagnetic interference for a Class B computing device use a properly shielded and grounded cable Use of a substitute cable not properly shielded an...

Страница 183: ...rmarbeitsplatz vorgesehen Um st rende Reflexionen am Bildschirmarbeitsplatz zu vermeiden darf dieses Produkt nicht im unmittelbaren Gesichtsfeld platziert werden I Im mp po or rt te eu ur r Xerox GmbH...

Страница 184: ...ion regarding your printer go to Web Address https safetysheets business xerox com en us United States and Canada 1 800 ASK XEROX 1 800 275 9376 Other markets send an email request to EHS Europe xerox...

Страница 185: ...er User Guide 185 B Recycling and Disposal This appendix contains Product Disposal and Recycling 186 North America 187 Xerox Green World Alliance 188 Waste from Electrical and Electronic Equipment WEE...

Страница 186: ...Recycling Do not dispose of the printer or supplies in the same manner as normal household waste Consult your local authorities for disposal and recycling options 186 Xerox B310 Printer User Guide Re...

Страница 187: ...e program Contact your Xerox representative 1 800 ASK XEROX to determine if this Xerox product is part of the program For more information about Xerox environmental programs go to https www xerox com...

Страница 188: ...he empty cartridges returned to Xerox are either reused or de manufactured for recycling The boxes used to return the cartridges are also recycled To return Xerox cartridges for reuse or recycling do...

Страница 189: ...options contact your local sales office I In nd diia a E E W Wa as st te e n no ot tiic ce e This product including components consumables parts and spares complies with the India E Waste Rules and pr...

Страница 190: ...190 Xerox B310 Printer User Guide Recycling and Disposal...

Страница 191: ......

Страница 192: ......

Отзывы: