Xceed 7LI18VK Скачать руководство пользователя страница 8

8

operate automatically.

d.


Always observe that the lower guard is covering the 

blade before placing saw down on bench or floor.


An unprotected, coasting blade will cause the saw to 

walk backwards, cutting whatever is in its path. Be aware 

of the time it takes for the blade to stop after switch is 

released.

e. Do not use abrasive wheels
WARNING.

 We recommend the use of a residual current 

device with a residual current rating of 30mA or less.

Wear goggles
Wear earmuffs
Wear a breathing mask

Additional safety rules for reciprocating saws


Always remove the battery pack before making any 

adjustments or maintenance, including changing the 

blade.


When operating the saw, use safety equipment including 

safety goggles or shield, ear protection, dust mask and 

protective clothing including safety gloves.


Ensure that the lighting is adequate.


Keep the area free of tripping hazards.


Do not let anyone under the age of 18 years operate  

this saw.


Always stand to one side when operating the saw.


Never use a cracked or distorted saw blade.  

Only use sharp blades.


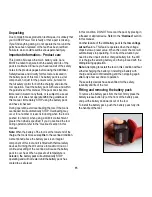
When cutting round wood, use clamps that prevent  

the work piece from turning on both sides of the blade.


Never use your hands to remove sawdust, chips or waste 

close by the blade.


Use only blades as recommended.


Rags, cloths, cord and string and the like should never be 

left around the work area.


Avoid cutting nails. Inspect the work piece and remove all 

nails and other foreign objects before beginning sawing.


Support the work properly.


Never reach over the blade to remove waste or off cuts.


Do not attempt to free a jammed blade before first 

switching off the machine.


Do not slow or stop a blade with a piece of wood.  

Let the blade come to rest naturally.


If you are interrupted when operating the saw, complete 

the process and switch off before looking up.


Periodically check that all nuts, bolts and other fixings are 

properly tightened.


Always hold the saw on parts that are insulated. If you 

accidentally cut into hidden wiring or the saw’s own cable, 

the metal parts of the saw will become “live”.


Never saw near combustible liquids or gases.

The tool must be used only for its prescribed purpose 

Any use other than those mentioned in this Manual will 

be considered a case of misuse. The user and not the 

manufacturer shall be liable for any damage or injury 

resulting from such cases of misuse.

The manufacturer shall not be liable for any changes made 

to the tool nor for any damage resulting from such changes. 

Even when the tool is used as prescribed it is not possible 

to eliminate all residual risk factors. The following hazards 

may arise in connection with the tool’s construction  

and design:


Contact with the blade.


Kickback of work piece and parts of work piece.


Blade fracture.


Catapulting of blade pieces.


Damage to hearing if effective earmuffs are not worn.


Harmful emissions of sawdust when the machine is 

used in closed rooms. Always use supplementary dust 

extraction where possible.


Do not use blades that are deformed or cracked.

Содержание 7LI18VK

Страница 1: ...INSTRUCTION MANUAL 7LI18VK 254 8592 7 PIEce Cordless Tool Combination Set...

Страница 2: ...Fitting and removing the battery pack 15 Battery charging 16 To obtain the best life for the battery 16 Safety features incorporated with ALL tools using this battery pack 16 Know your product Drill 1...

Страница 3: ...g time 1 Hour Charger Model XK18L1CH Battery pack Model XK18LB Introduction Your new Xceed power tool will more than satisfy your expectations It has been manufactured under stringent Xceed Quality St...

Страница 4: ...le for outdoor use Use of a cord suitable for outdoor use reduces the risk of electric shock 3 Personal safety a Stay alert watch what you are doing and use common sense when operating a power tool Do...

Страница 5: ...they do not play with the appliance 5 Battery tool use and care a Ensure the switch is in the off position before inserting battery pack Inserting the battery pack into power tools that have the switc...

Страница 6: ...e in the area in which the tool is being used It is also imperative that you observe the accident prevention regulations in force in your area The same applies for general rules of occupational health...

Страница 7: ...back may occur Investigate and take corrective actions to eliminate the cause of blade binding c When restarting a saw in the workpiece centre the saw blade in the kerf and check that saw teeth are no...

Страница 8: ...ve all nails and other foreign objects before beginning sawing Support the work properly Never reach over the blade to remove waste or off cuts Do not attempt to free a jammed blade before first switc...

Страница 9: ...the motor down Allow the attachments to work without pressure You will get better results and you will be taking better care of your tool Keep the area free of tripping hazards Do not let anyone under...

Страница 10: ...limitations as well as the specific potential hazards related to this tool Following this rule will reduce the risk of electric shock fire or serious injury Always wear eye protection Any power tool...

Страница 11: ...mpt to charge the battery pack with any other charger than the one supplied If there is a problem with the battery or the tool take it to your nearest Authorised Service centre or phone and speak with...

Страница 12: ...the mains power socket Do not use an extension cord unless it is absolutely necessary The use of an improper extension cord could cause the risk of fire electric shock or electrocution Never attempt t...

Страница 13: ...from fire If battery liquid leaks onto your skin or clothes wash well with clean water immediately If liquid leaking from the battery gets into your eyes do not rub your eyes Rinse your eyes well for...

Страница 14: ...1 Battery Pack 2 Battery Release Button 3 Charger Base 2 x 18V Lithium ion Batteries are supplied for this 7 piece tool combination set A battery is shown on all products within this instruction manu...

Страница 15: ...al Note When the battery of the tool is at the lower end of the charge the tool is more susceptible to the overload condition As mentioned above the battery pack is an integral component of this tool...

Страница 16: ...ceably running down or the tool no longer performs a task it previously performed For storage charge between 50 and 75 Avoid allowing loose items like screws or nails etc to be stored with battery pac...

Страница 17: ...voltage cut out feature within the circuitry The low voltage cut out feature operates when the voltage drops below a preset value This feature automatically stops the tool from operating similar to th...

Страница 18: ...ther applications are expressly ruled out 1 Keyless chuck 2 Variable speed trigger with electric brake 3 Forward reverse control 4 LED Work light 5 17 Drill position clutch collar 6 Battery Specificat...

Страница 19: ...h 3 will allow you to change the direction of the motor while the trigger switch is not depressed Drilling uses the forward mode The reverse mode is intended for the removal of screws and assisting to...

Страница 20: ...h to mark the centre of the hole Use a suitable lubricant for the material you are working on USE FOR Oil Steel Turpentine or paraffin Aluminium Do not lubricate Brass copper or cast iron Drilling pla...

Страница 21: ...stic and brick for scraping or removing grout from brick or tiles and detail sanding work Use the tool only for intended applications All othe applications are expressly ruled out 1 On Off switch 2 Ba...

Страница 22: ...the blade is secured Using a detail sander attachment 1 Install the sanding pad on the oscillating tool as per the Installing accessories instructions 2 Install the sandpaper on the sanding pad 3 Tur...

Страница 23: ...hazard or cause product damage DO NOT use solvents when cleaning plastic parts Plastics are susceptible to damage from various types of commercial solvents and may be damaged by their use Use a clean...

Страница 24: ...ing knob 4 Lock off button 5 Motor housing 6 Auxiliary handle 7 Parallel fence attachment point 8 Spindle lock 9 Upper blade guard 10 Parallel fence not shown 11 Trigger switch 12 Base plate 13 Lower...

Страница 25: ...cut Tighten the depth adjustment locking knob 3 Making a cut Mark the line of cut on the workpiece Adjust the depth of cut as required When making 90 cross or rip cuts align your line of cut with the...

Страница 26: ...wise using the hex key provided Remove the outer blade flange and the blade bolt Fully open by rotating the lower rotating blade guard Remove the saw blade from the inner flange and pull it out Note t...

Страница 27: ...using the hex key provided WARNING The direction in which the blade rotates has to be the same as the direction of the arrow marked on the housing Ensure that the spindle lock button 8 is released Bef...

Страница 28: ...ther applications are expressly ruled out 1 Trigger switch 2 Lock off button 3 Blade clamp 4 Blade clamp screw 5 Battery Specifications Tool Model XK18RS Voltage 18Vdc Strokes per minute 0 2000 SPM Bl...

Страница 29: ...de is secure Tighten if necessary Failure to do so may result in serious injury Removing the blade Caution Always ensure the saw is switched OFF and the battery pack removed BEFORE attempting to fit o...

Страница 30: ...lade and the saw to do the work WARNING Use of excessive pressure that causes bending or twisting of the blade may cause the blade to break Metal cutting Metals such as sheet steel pipe steel rods alu...

Страница 31: ...ther applications are expressly ruled out 1 Collet Chuck 2 Nose Collar 3 Spindle lock 4 On Off switch 5 Digital speed display 6 Decrease speed button 7 Increase speed button 8 Battery Specifications T...

Страница 32: ...s are suggested on scrap material first If material is burning reduce speed and also pressure on the tool Faster speeds are also suggested for grinding as slower speeds have a tendency to clog the whe...

Страница 33: ...While holding the spindle lock button down and engaged finger tighten the collet nut Then tighten the colt nut with the small wrench WARNING Make sure that the accessory is inserted as far as possible...

Страница 34: ...Handstrap attachment loop 6 Handstrap attachment 7 Lamp head rotation button Tool Model XK18LT Voltage 18Vdc Charger Model XK18L1CH Battery pack Model XK18LB Weight with battery 0 56kg Note The torch...

Страница 35: ...second time the Single LED will be turned off Swinging the lamp head Your LED work light has a swivel head that can be rotated to the desired position To change the position of the head simply rotate...

Страница 36: ...plications intended All other applications are expressly ruled out 1 On Speed button 2 Off button 3 Air Vents 4 Vacuum port 5 Vacuum bag 6 Vacuum bag cover release button 7 Vacuum bag support 8 Vacuum...

Страница 37: ...llows access to empty the vacuum bag The vacuum bag 5 can be washed Make sure the bag is completely dry before replacing it and that there is no clogging of dust within the bag NOTE This vacuum is sup...

Страница 38: ...n addition to all rights and remedies to which you may be entitled under the Competition and Consumer Act 2010 Commonwealth and any other relevant legislation the manufacturer warrants this product to...

Страница 39: ......

Отзывы: