background image

X7028r User’s Manual                                          

Version 2.0 


- 35 - 


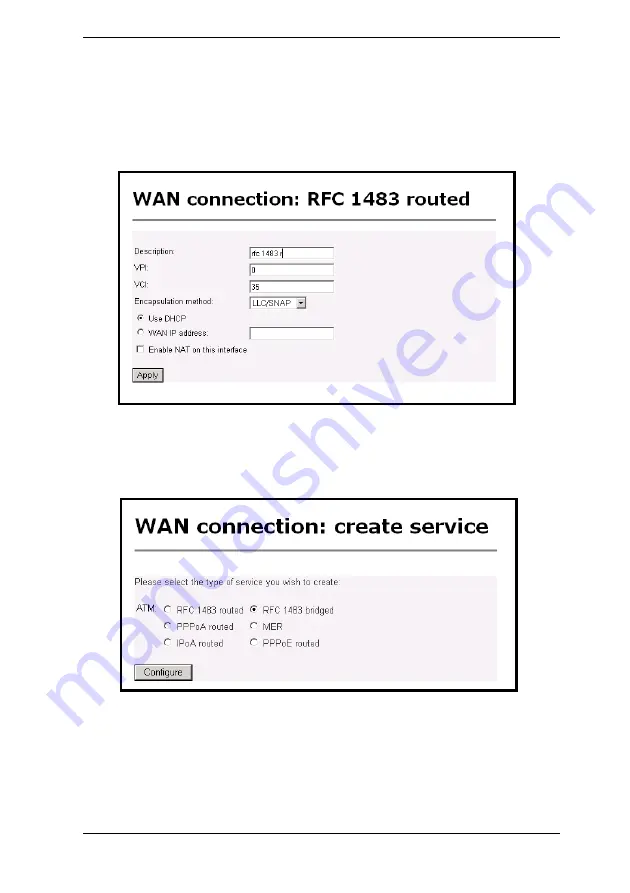
Define the 

VPI, VCI, WAN IP

 to match the DSLAM setting. 

(Provided by the ISP)   


Select 

LLC/SNAP

 for 

Encapsulation


Choose between DHCP and WAN IP, and then click on the 

Apply


button to confirm the configuration. 


5.3.2  RFC 1483 Bridged 


Click 

Create a new service

 to display the type of service. 


Select 

RFC 1483 Bridged

 and then click on the 

Configure


button. 


Define the 

VPI

VCI

 to match the DSLAM setting 


Select 

LLC/SNAP

 for 

Encapsulation,

 and then click on the 

Apply


button to confirm the configuration. 


Содержание X7028r

Страница 1: ...X7028r User s Manual Version 2 0 1...

Страница 2: ...out notice No part of this manual may be reproduced or transmitted in any form or by any means electronic or mechanical including photocopying or scanning for any purpose without the written permissio...

Страница 3: ...I Default Values 15 IX Software Upgrade 16 X Console Setup 17 C Ch ha ap pt te er r 2 2 W We eb b M Ma an na ag ge em me en nt t I In nt te er rf fa ac ce e I Overview 17 II Preparation 17 1 Login 18...

Страница 4: ...ch Hub 53 6 3 ADSL 54 A Ap pp pe en nd di ix x A A S Sp pe ec ci if fi ic ca at ti io on ns s A1 Hardware Specifications 55 A2 Software Specifications 56 A Ap pp pe en nd di ix x B B W Wa ar rr ra an...

Страница 5: ...occur in a particular installation If this equipment does cause harmful interference to radio or television reception which can be determined by switching the equipment on off the user is encouraged t...

Страница 6: ...X7028r User s Manual Version 2 0 6 R Re ev vi is si io on n M Ma ar rk ks s Revision Date Notes V2 0 May 14 2003 Annex A Software Version 5 06XAF0 AWR Annex B Software Version 5 06XAF0 BWR...

Страница 7: ...L router which complies with ANSI T1 413 issue 2 ITU G 992 1 Annex A B and ETSI ITS 101388 ADSL Standards X7028r provides high speed Internet access via one WAN port over ATM over ADSL and also connec...

Страница 8: ...idly over existing wire infrastructure POTs or ISDN line 802 11b WLAN support up to 11Mbps DHCP server supported for easy LAN IP address management Support PPPoE RFC2516 PPP RFC2364 and IP RFC 2225 RF...

Страница 9: ...X7028r User s Manual Version 2 0 9 III Packaging This package consists of the following items X7028r ADSL Router RJ 45 Cable RJ 11 Cable AC Adapter User s Manual CD ROM...

Страница 10: ...power adapter supplied this device should not be connected to any other adapters Do not spill liquid of any kind on this device Do not place the unit on an unstable stand or table This unit may drop...

Страница 11: ...properly connected 1 PWR WAN ON Green ADSL line is connected Green 100M data transfer 2 LAN 1 ON Orange 10M data transfer Green 100M data transfer 3 LAN 2 ON Orange 10M data transfer Green 100M data...

Страница 12: ...X7028r User s Manual Version 2 0 12 Rear Panel Label Description 1 PWR DC inlet for AC adapter 2 Wireless LAN AP slot 3 1X 4X Four RJ 45 ports for LAN connections 4 WAN RJ 11 ADSL port 1 2 3 4...

Страница 13: ...em and the other end into your PC or LAN 3 Plug in the AC adapter into the AC power socket and connect the DC jack into the PWR inlet of the modem 4 Use a 9 pin RS 232 cable to connect the Console cab...

Страница 14: ...68 1 1 Local Ethernet Port Web Browser connect the Ethernet port to your local area network or directly to a PC Launch your web browser and enter default local Ethernet IP address 192 168 1 1 into the...

Страница 15: ...erface For further details see Chapter 2 4 3 Update Default Mode Bridge Username Password admin Bridge Mode Setting WAN and ADSL Ethernet local IP 192 168 1 1 Local Line Code AUTO Subnet Mask 255 255...

Страница 16: ...ing X7028r The default local IP address is 192 168 1 1 Under the DOS prompt execute the command xupgrade IP address of X7028r for instance xupgrade 192 168 1 1 This upgrading process may last as long...

Страница 17: ...sories Hyper Terminal Group Double Click Hypertrm exe Enter Connection Name Select Icon Click OK 2 Select COM port to communicate with the modem Choose direct to COM1 or COM2 and click OK 3 Set Port P...

Страница 18: ...item will be described in detail II Preparation 1 Please refer the hardware installation procedure in Chapter 1 to install X7028r 2 You should configure the PC to the same IP subnet as X7028r Example...

Страница 19: ...ow Enter Network password will pop up while starting the configuration With the window active type admin for both the User Name and the Password You can also edit the Username and Password or add a ne...

Страница 20: ...refer to section 5 3 WAN Connections for further details Click LAN Settings to edit the default LAN IP address refer to section 5 2 LAN Connections for further details Click Login Settings to edit the...

Страница 21: ...X7028r User s Manual Version 2 0 21...

Страница 22: ...tatistics The Statistics page displays the current interfaces of the X7028r Click on the appropriate Show Statistics link to view the statistics of that interface Three examples are listed below two f...

Страница 23: ...current statistics of the wireless LAN wlan port This includes port name connection status speed and transfer receive packets You may edit the default LAN port by clicking on the Configure LAN Connec...

Страница 24: ...the current statistics of the Ethernet port This includes port name connection status speed and transfer receive packets You may edit the default LAN port by clicking on the Configure LAN Connections...

Страница 25: ...statistics of the default bridge RFC 1483 This includes port name VPI VCI values transfer receive packets and encapsulation type You may edit add WAN connections by clicking on the Configure WAN Conn...

Страница 26: ...link is described in detail below 4 1 Users Click on the Users link on the navigation bar to view the list of users By default only the admin user exists Click on the Edit User link to change the sett...

Страница 27: ...to add a new user On this page you need to enter a username password select true or false if you would like this user to have configuration rights and add a comment Click on the Create button when co...

Страница 28: ...view the history of errors Click on the Clear Logs button to clear the log table 4 3 Update Click on the Upgrade link on the navigation bar to view the firmware upgrade page then follow the steps belo...

Страница 29: ...ion 2 0 29 4 4 Restart To restart the modem click on the Restart button You may also check the box if you would like to restart the modem with the factory settings The default settings are displayed a...

Страница 30: ...ection WAN connections routing table DHCP server DNS relay Security and IGMP proxy links Each link is described in detail below 5 1 Save Config Click on the Save Config link in the navigation bar to v...

Страница 31: ...ce or change the default LAN port IP address from this page Both examples are listed below 5 2 1 Create a New Service In order to create a new LAN service click on the Create a new service button You...

Страница 32: ...escription for the route b Port Select between Ethernet and wireless c Select to use DHCP or enter a LAN IP address d Click on the Apply button Example 2 Ethernet Bridged In order to create an Etherne...

Страница 33: ...on the LAN connections link in the navigation bar and then click on the configure default LAN port IP address Define the primary IP address and subnet mask of your device here and make the change by...

Страница 34: ...eating each type of the WAN connection You can create multiple WAN connection services from each of following protocols 5 3 1 RFC 1483 Routed 5 3 2 RFC 1483 Bridged 5 3 3 PPPoA Routed 5 3 4 MER 5 3 5...

Страница 35: ...and WAN IP and then click on the Apply button to confirm the configuration 5 3 2 RFC 1483 Bridged Click Create a new service to display the type of service Select RFC 1483 Bridged and then click on th...

Страница 36: ...oA routed and then click on the Configure button Type PPPoA router for the description then define the VPI VCI to match the DSLAM setting Keep WAN IP default setting 0 0 0 0 Leave LLC header Mode HDLC...

Страница 37: ...X7028r User s Manual Version 2 0 37 5 3 4 MER Click Create a new service to display the type of service Select MER and then click on the Configure button...

Страница 38: ...k on the Apply button to confirm the configuration 5 3 5 IPoA Routed Click Create a new service to display the type of service Select IPoA routed and then click on the Configure button Type IPoA route...

Страница 39: ...pe PPPoE router for the description Define the VPI VCI value to match the DSLAM ISP setting Set PPPoE Auto Connect to Enabled Use WAN IP default setting 0 0 0 0 Leave Access concentrator and service n...

Страница 40: ...X7028r User s Manual Version 2 0 40...

Страница 41: ...he table In order to create an routing table entry the following fields need to be filled in a Destination Enter the destination of the router b Gateway Enter the IP address of the gateway c Netmask E...

Страница 42: ...the DHCP Server and enables the data connection between multiple PCs by configuring IP address ranges and lease times Click on the DHCP Server link in navigation bar You will then see the following s...

Страница 43: ...e Default Setting Place a check in this box if you would like to use the default lease times If not enter the default and maximum lease times in the text boxes provided Use Router as DNS Server Place...

Страница 44: ...n 2 0 44 5 6 DNS Relay Click on the DNS Relay link in the navigation bar You may enable or disable DNS Relay Then click on the Configure button Enter the primary and secondary DNS Server IP address in...

Страница 45: ...link on the navigation bar In this section you will be able to configure the Security Interface This includes the security state security level security interfaces policies triggers and intrusion det...

Страница 46: ...internal and then click on the Apply button You will then see the added interface on the main page Once again click on the Add Interface button to add an external interface Select an interface name p...

Страница 47: ...Triggers and Intrusion Detection section You will then see the following screen Currently there are no policies set Click on New Policy to add a firewall policy On this page you will be able to select...

Страница 48: ...start end IP and direction inbound outbound UDP Filter Requires port range start end IP and direction inbound outbound Raw IP Filter Requires protocol type TCP UDP and direction inbound outbound Host...

Страница 49: ...le 21 for FTP Allow multiple hosts Choose between allow or block Max Activity Interval Enter the activity interval per second Enable Session Chaining Choose between allow or block Enable UDP Session C...

Страница 50: ...ly set up Policies Triggers and Intrusion Detection settings Select a security level none high medium or low and then click on the Change Level button This will automatically set up values for firewal...

Страница 51: ...0 51 5 8 IGMP Proxy Click on the IGMP Proxy link on the navigation bar On this page you will be able to select an Upstream interface for the IGMP proxy Select and interface from the drop down list and...

Страница 52: ...X7028r User s Manual Version 2 0 52 6 Interfaces The Interfaces section includes Wireless Switch Hub and ADSL links Each link is described in detail below...

Страница 53: ...address and WEP Encryption options In order to configure WEP encryption fill in the following fields a WEP Encryption Select between 64 bit 128 bit or disable if you do not want to use web encryption...

Страница 54: ...Switch Hub link on the navigation bar This page displays a table of the port configurations Included are the port numbers configuration type link and speed duplex You may select a speed duplex rate f...

Страница 55: ...e navigation bar This page displays a table of the default ADSL settings This includes standard trellis coding coding gain EC FDM mode and Tx power attenuation You may change the default settings in o...

Страница 56: ...TU G 992 1 G dmt Annex B ADSL ETSI ITS 101388 and Deutsche Telekom U R2 Automatic rate adaptation or programmable in step of 32Kbps Line Impedance 100 Connector RJ 11 OAM P Remote Telnet or Web browse...

Страница 57: ...364 PPP over ATM CHAP and PAP supported RFC2516 PPPoE PPP over Ethernet over ATM Bridging Transparent Bridging IEEE 802 1D RFC2684 RFC1483 Bridged Spanning Tree Protocol IEEE 802 1D Supporting IP IGMP...

Страница 58: ...ologies repair procedures or XAVi Technologies tests disclose that the alleged defect is not due to defects in material or workmanship XAVi Technologies liability shall be limited to either repair or...

Страница 59: ...greater XAVi Technologies will ship surface freight Expedited freight is at customer s expense 2 The customer must return the defective product to XAVi Technologies within fourteen 14 days after the...

Страница 60: ...This equipment generates used and can radiate radio frequency energy and if not installed and used in accordance with the instruction manual may cause harmful interference to radio communications Ope...

Страница 61: ...uipment The customer should be aware that compliance with the above conditions might not prevent degradation of service in some situations Repairs to certified equipment should be coordinated by a rep...

Страница 62: ...n We look forward to hearing from you World Headquarter XAVi Technologies Corporation 9F No 129 Hsing Te Road Sanchung City Taipei Hsien 241 Taiwan R O C Tel 886 2 2995 7953 Fax 886 2 2995 7954 USA Br...

Отзывы: