1
Speakers & Volume Controls
RAT1
REMOTE AUTO TRANSFORMER
The RAT1 is an infrared remote controlled stereo
speaker volume control with impedance matching
capability. It allows individual volume control of from
one to 16 pair of stereo speakers from one stereo
power amplifier, using one RAT1 for each stereo
speaker pair. It is controlled with any Xantech IR
Receiver or keypad or with Xantech MIRV1 motorized
volume controls. The RAT1 maintains correct imped-
ance matching between the amplifier and the speak-
ers with the use of instant setting S1 to S8 jumpers,
located on the unit. This eliminates the need for
separate impedance matching devices in multi-room
installations.
FEATURES AND SPECIFICATIONS
• 10-position relay driven stepped auto transformer design.
• Tri-Fi™ winding system for highest quality audio performance.
• Amplifier Input: 4-screw plug-in connector.
• Speaker Output: 4-screw plug-in connector.
• IR, STATUS & +12V: 4-screw plug-in connector.
• STATUS Input Jack: 2.1mm coaxial type.
• POWER Input Jack (+12V): 2.1mm coaxial type.
• Power Consumption: 300 mA @ +12V DC. Use Xantech Model 786-00 or 782-00 Power Supply.
• Requires IR commands from the RC68+ (or RC68) Programmer or from the MIRV1, for volume
operations.
• Using the RC68+ Programmer, internal E
2
PROM can be set to different group codes for independent
operation of RAT1's when on a common IR bus.
• Factory preset Group Code number is 30.
• Independent grounds between channels.
• 75 watts per channel music power, 25 watts per channel continuous.
• Frequency response: 20 Hz - 20,000 Hz
±
1 dB at 1 Watt power input.
• Attenuation: 10 steps at 3 to 6 dB per step, 35 dB maximum.
• Impedance Multiplier Settings: S1, S2, S4, & S8.
• Plug-in connectors accept wire sizes from 24 to 12 gauge.
• "Flat Pack" design permits easy mounting.
• Dimensions: 8" x 4-1/8" x 2-5/8" (203mm x 105mm x 67mm).
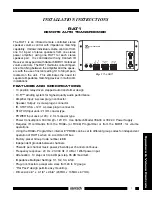
Fig. 1
The RAT1
S8
S4
S2
S1
L+ L– R– R+
L+ L– R– R+
AMPLIFIER
INPUT
SPEAKER
OUTPUT
STATUS
POWER
IR IN
ST
A
TUS
GND
+12 VDC
12VDC
RAT1
REMOTE AUTO TRANSFORMER
INSTALLATION INSTRUCTIONS


