background image

7

The multipurpose feeder supports non-

standard size media, including envelopes from
3.94” x 5.83” (100 mm x 148 mm) to 13” x 18.5”
(330 mm x 902 mm).

With the FilmMaker 4, you can feed media up

to 13” x 35.5” (330 mm x 902 mm) and can handle
media weights from 16 - 36 lb (60 - 155 g/m

2

).

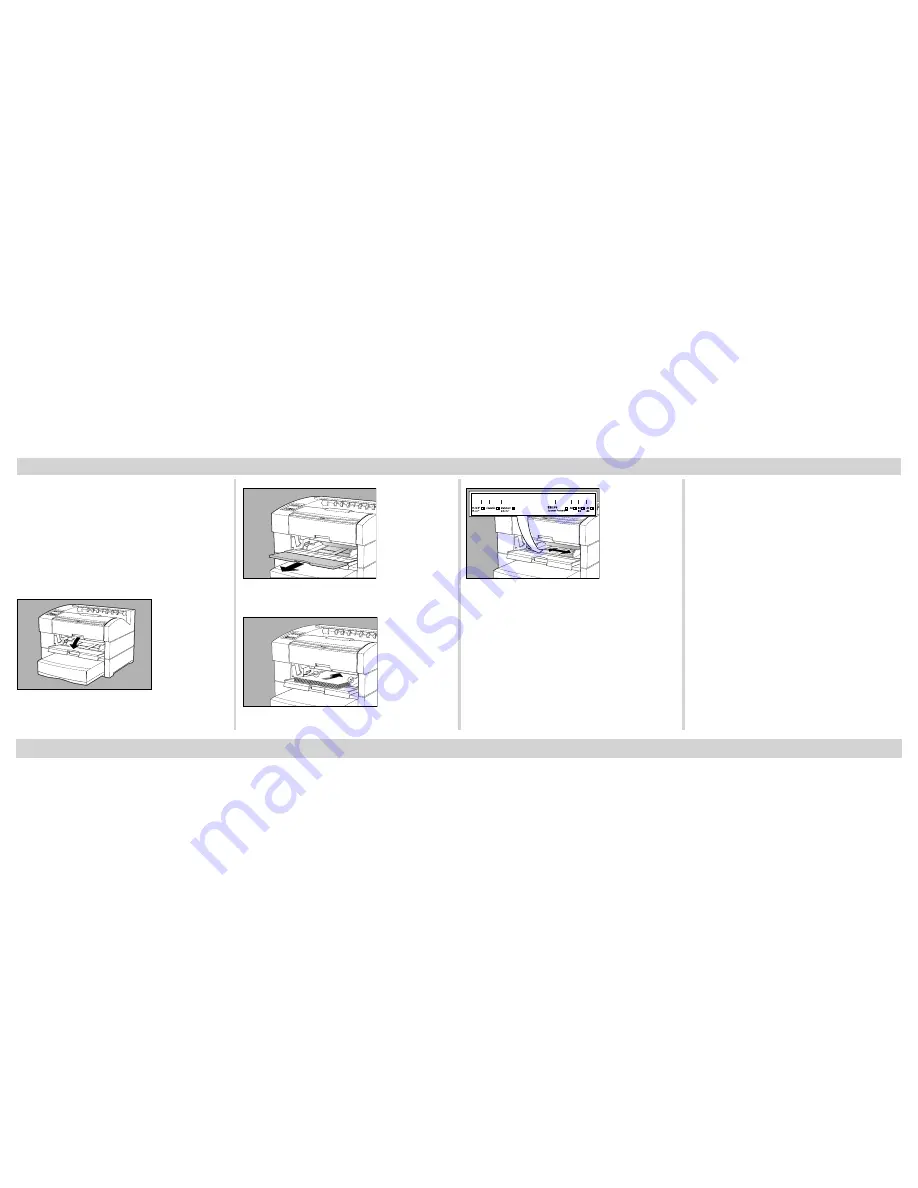
Fig. 17  Open Multipurpose Feeder.

Getting Set-up (

continued

)

Fig. 18   Pull Out Tray Extension.

Fig. 19  Load Paper.

Fig. 20  Adjust Media Guide.

Media Types

Plain Paper

Heavy Paper

Cover Stock

Labels and Transparencies

Clear and Matte film

Connecting the Power Cord

WARNING

:

Be sure to plug the printer
into a properly grounded AC
outlet.  

Do not

 use an

extension cord.  Use a surge
protected outlet to help
prevent power source
fluctuations from damaging
your printer.

WARNING

:

Never use a power cord that
is damaged. Check the cord
and plug monthly and
replace immediately if you
find any damage.

Содержание FilmMaker 4

Страница 1: ...100 100608 k...

Страница 2: ...Copyrighted 2003 by XANT CORPORATION All Rights Reserved Printed in the USA This manual may not be copied in whole or in part nor transferred to any other media or language without the express written...

Страница 3: ...r Windows 98 Me 15 Configuring IP SubNet and Gateway Addresses 16 PPD Configuration 17 Installation Windows NT 2000 XP 18 IP Address Configuration 18 Printer Driver Installation 18 Network Setup 20 Co...

Страница 4: ...assette Power cord Manual and Utilities CD ROM Toner cartridge Note If you do not receive your full shipment or if anything is damaged call XANT Customer Support at 1 800 926 8393 US and Canada or you...

Страница 5: ...g 7 Insert Toner Cartridge Fig 8 Close Top Cover Fig 9 Close Multipurpose Feeder Standard Cassette The standard universal paper cassette feeds up to 500 sheets of 20 lb bond 60 lb text weight 65 g m2...

Страница 6: ...under the cassette s retaining clips Note Pull out the output tray extension and turn up the paper stop for paper sizes larger than letter A4 sizes fig 16 Fig 16 Adjust Output Tray Extension Multipur...

Страница 7: ...g 18 Pull Out Tray Extension Fig 19 Load Paper Fig 20 Adjust Media Guide Media Types Plain Paper Heavy Paper Cover Stock Labels and Transparencies Clear and Matte film Connecting the Power Cord WARNIN...

Страница 8: ...llel Port PC 36 pin Connector To Printer 25 pin Connector To Host Computer Fig 24 Parallel Cable 1 Plug the cable s 36 pin connector into the printer s parallel port and the 25 pin connector into the...

Страница 9: ...hin larger connector into the computers USB port Note It is not necessary to turn off your printer or computer before plugging in the USB USB does not support Window 98 or Me InstallingAdobe Acrobat R...

Страница 10: ...lick Quit Applications Fig 36 Installation Progress Window Appears Fig 37 Click Quit to End Acrobat Reader Installation Note If you are on line a caution window appears which allows you to quit Netsca...

Страница 11: ...t number flashing Installation Windows 98 Me continued Test key moves to the next number to the left of the current number flashing Enter key accept new address if valid and returns to Network IpAddr...

Страница 12: ...g 43 Select Folder s Click Next Fig 44 Setup Complete Click Finish Note After you click Finish fig 44 a ReadMe file window appears Read it carefully and then close the window The Restart Computer wind...

Страница 13: ...Install only Fig 49 Read Setup Information Click Yes Fig 50 Read File Destination Click Yes Fig 51 Choose Language Click OK Note After clicking OK Windows launches the Adobe PostScript Printer Driver...

Страница 14: ...en click Next to continue to figure 55 If your printer will be connected to your network skip to the Network Printer section later in this chapter Local Printer Windows 98 Me Fig 55 Select Appropriate...

Страница 15: ...Fig 61 ReadMe file Close Window Network Printer Windows 98 Me Fig 62 Type Network Path for your Printer Click Next Fig 63 Select Printer Model Click Next Fig 64 Name Your Printer Click Next Fig 65 Re...

Страница 16: ...opy dhcpoff ps to lpt1 4 Power cycle the printer turn off then back on 5 Using a word processing application open setipsub ps file from the ps_files folder Edit the file so it contains the IP Subnet a...

Страница 17: ...Highlight XanteLPR click OK Fig 72 Enter IP Address and Queue Name 13 Enter your printer s IP address and Queue name then click OK fig 72 14 Click Apply when the Printer Properties window reappears th...

Страница 18: ...hen using the Ethernet interface and TCP IP protocol use the front panel IP address Network IpAddr configuration menu and front panel keys to set the address as follows Reset key increases the current...

Страница 19: ...ck OK Fig 76 Enter IP Address Network Installation only Fig 77 Read Setup Information Click Yes Fig 78 Read File Destination Click Yes Fig 79 Read Welcome Window Click Next Fig 80 Select Local or Netw...

Страница 20: ...Click Next Fig 86 Print Test Page Click Next Fig 87 Setup Complete Click Finish Network Setup 1 Select Start Settings Printers and Faxes 2 Highlight your printer and click the right mouse button Selec...

Страница 21: ...dress Click Next Fig 92 Select Generic Network Card Click Next Fig 93 Click Finish Close Window Fig 94 Go back to Printer Properties Select the Ports tab highlight your printer s port and click Config...

Страница 22: ...d Gateway address you obtained from your network administra tor Save the file to your c drive 6 Go to DOS Command Prompt 7 Type copy setipsub ps to lpt1 8 Power cycle the printer again and verify that...

Страница 23: ...tings Printer 2 Highlight your printer and click the right mouse button Select Properties from the drop down menu 3 Click the DeviceSettings tab fig 99 Fig 99 Device Settings Window 4 Select Installed...

Страница 24: ...the designated software select the appropriate application s click OK Fig 104 Warning Window Fig 105 Installation Complete click Quit Note If AdobePS doesn t open simply double click AdobePS Installer...

Страница 25: ...llation sections Note XANT Utilities CD ROM docu mentation is in Adobe Acrobat Portable Documentation Format PDF If you do not have Adobe Acrobat Reader on your system you should install it Installati...

Страница 26: ...tallation window does not open automati cally Fig 113 Click Install FilmMaker 4 Fig 114 Click Add Printer Fig 115 Select AppleTalk AppleTalk Network your printer and your printer s PPD then click Add...

Страница 27: ...n to your desktop 2 Follow this path to access the ReadMe file CD OSX_Installer XANT Utilities FilmMaker 4_OSX readme rtf 3 Read the ReadMe file then click close or select File and go to Page Setup Pa...

Страница 28: ...installation window does not open automati cally Fig 122 Click Install FilmMaker 4 Fig 123 Click Add Printer Fig 124 Select AppleTalk AppleTalk Network your printer and your printer s PPD then click A...

Страница 29: ...can configure your printer by selecting Page Setup and Printer Features 1 Close the Print Center window to return to your desktop 2 Follow this path to access the ReadMe file CD OSX_Installer XANT Uti...

Страница 30: ...he web browser window and all links within it are the same for both Macintosh and PC environments Printer Configuration This link contains information on your printer s Informational Pages Network Eth...

Страница 31: ...art up Page Low Toner Page Network Page Font List Page Font Sample Page and Menu Layout Page Service and Support Tech Support 1 800 926 8393 US and Canada Other areas call your XANT vendor Fax 1 251 4...

Отзывы: