X10 VANGUARD VK77A Скачать руководство пользователя страница 20

39

38

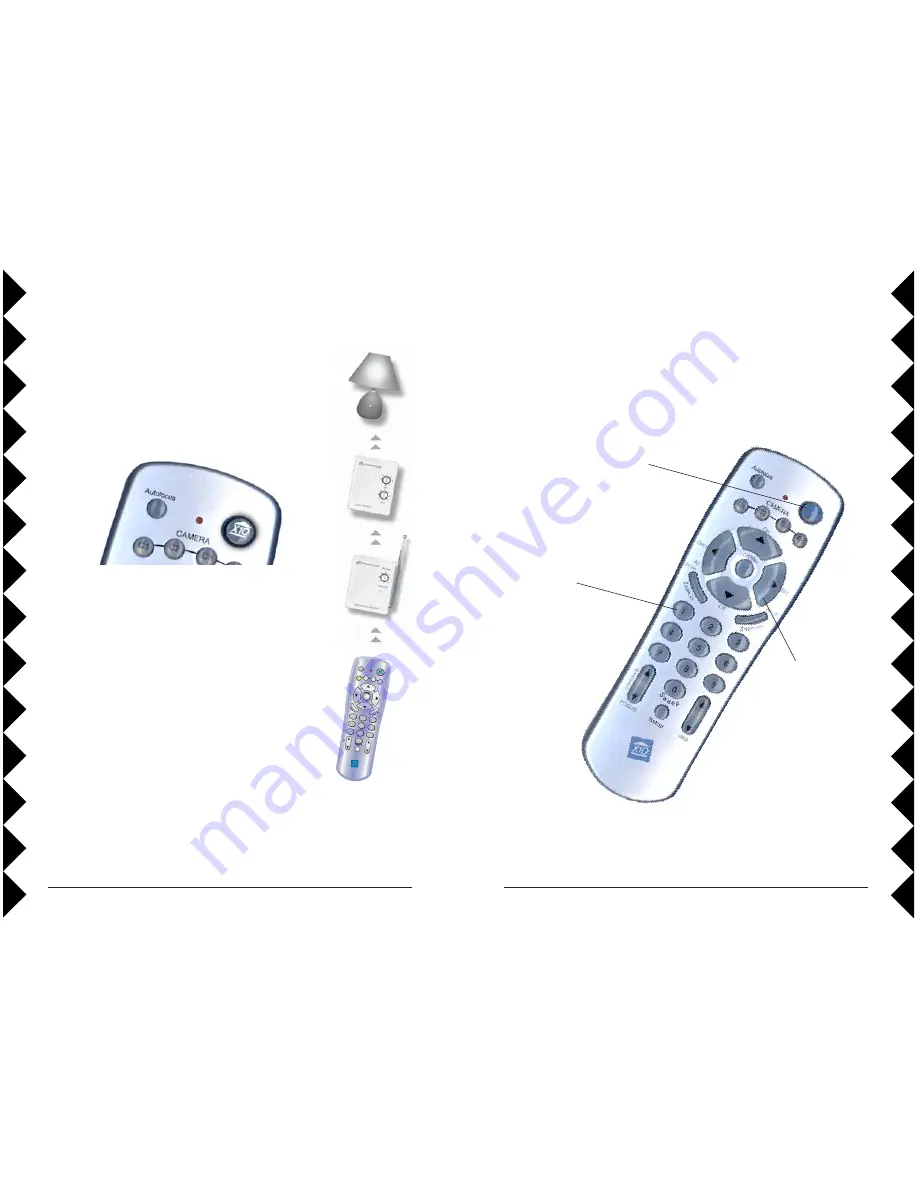
Controlling X10 Modules

Here’s how to control X10 modules with your Vanguard Remote Control.
The remote is set to House Code A by default.

1.

Press and release the X10
button.

2.

Use the number buttons to
enter the Unit Code number
of the chosen module. (You
can press 1, then 6 for Unit
Code 16).

3.

Press the appro-
priate button
(labeled in blue)
for the function
you require (On,
Off, Bright, Dim,
All Lights On, All
Units Off).

Home Control

Note: when using buttons C1, C2, C3, and C4 to control cameras, they will
also turn on X10 modules set to A1, A2, A3, and A4. To turn these
modules off, use the procedure described above.

H

OME

 C

ONTROL

The X10 button on the Vanguard Camera’s remote control is
your gateway to a world of useful control and automation
solutions built by X10. Why enter a dark room when there is
a simple and affordable solution that can keep you safe and
secure? From a simple remote control that can turn on a lamp,
to a full-blown automation system, X10 provides you with all
the products you need.

CAMERA

C2

C3

C1

C4

Brt

Dim

On

Off

All off

All

Lts on

Setup

1

2

3

4

5

6

7

8

9

0

Autofocus

Focus

Iris

M
n

u

a

l

C

With the correct components in your X10 system, you
can have all of these powerful options at your control:

· Enhance the color, brightness and detail of your

camera’s subject by adding more light automatically

· Give your home a secure appearance by scheduling

when lights and other electronics turn on and off

· Distribute audio and video to stereos and televisions

using wireless technology

· Turn on house lights while sitting in your car

· Schedule sprinkler systems

· Control your lights and electronic devices using your

personal computer

X10’s control and automation products are easy to install and extremely
affordable. Visit X10.com today for more information and the latest
products to build and enhance your X10 system.

Содержание VANGUARD VK77A

Страница 1: ...OWNER S MANUAL Please keep for future reference MODEL VK77A INCLUDES VANGUARD PAN TILT ZOOM CAMERA XC21A AND REMOTE CONTROL CR15A VANGUARD PROFESSIONAL PAN TILT ZOOM CAMERA SYSTEM...

Страница 2: ...llance solution The Vanguard Professional Pan Tilt Zoom Camera has superior image quality a high powered zoom and pan and tilt motion You can operate the camera through walls using the supplied remote...

Страница 3: ...era is ready to go out of the box Follow these steps for a quick setup of your new camera You should have the camera and its power supply the camera remote the camera mounting bracket and the screws t...

Страница 4: ...Plug its power supply into a standard wall outlet and the other end into the video receiver Basic Camera Setup Insert batteries into the remote Remove the battery cover and put four 4 AAA batteries in...

Страница 5: ...re the power switch on the video receiver is set to ON Basic Camera Setup Connect the video receiver to your TV Connect the video cable into the video out jack on the video receiver and into the video...

Страница 6: ...e side of the receiver s antenna marked with four squares Adjust the positions to improve the picture on your TV Basic Camera Setup Fine tune the antennas Turn on your TV Turn on your TV and select it...

Страница 7: ...Plug the other end into the camera Remove the protective cover from the camera s lens Select Transmit Disable BASIC CAMERA OPERATION Once you have the camera set up you re ready to start using it It s...

Страница 8: ...ished press Setup to save the positions you entered Selecting Positions Once you ve stored positions in the camera press the desired number button on the remote to move to that position If you press S...

Страница 9: ...old Setup until the C1 button lights green 3 Press Center 4 Press Setup again Focus Controls In addition to the auto focus feature you can control the focus of the camera manually Press the focus butt...

Страница 10: ...age Up and Down arrows flip the image from top to bottom Picture Orientation Vertical Orientation In some situations you may want to mount the camera upside down Here s how to flip the picture vertica...

Страница 11: ...5 8 press C3 for Units 9 12 or press C4 for Units 13 16 Once you have changed the group Unit Codes on the remote control you have to reprogram the cameras Follow the Multiple Camera Setup instruction...

Страница 12: ...ys on again ADVANCED ONSCREEN MENU OPTIONS The onscreen menu is displayed over the picture from the camera 1 Use the Up and Down arrow buttons to select items from the main menu 2 Use the Right arrow...

Страница 13: ...n lighting conditions Your options are PEAK This setting controls the reaction of the automatic iris adjustment in relation to the average light level in the picture A higher level of peak sets the ca...

Страница 14: ...AGC affect the brightness and picture levels of the video produced by the camera AGC amplifies existing video to help the camera reproduce a video signal at low light levels Sensitivity controls adjus...

Страница 15: ...ow the camera to focus on objects any distance away or a short focal length NEAR if you are using the camera only to view objects relatively close In Manual mode the camera will set focus automaticall...

Страница 16: ...or from left to right Set this to ON if you want to use the camera like a mirror for viewing objects behind you V REV When set to ON this settings mirrors the picture vertically allowing you to mount...

Страница 17: ...e the Up and Down arrows to select the desired position on the screen up top or down bottom Then use the Up and Down arrows to select characters from the screen above selecting each character with the...

Страница 18: ...on the bottom of the camera is set to Transmit Enable Bottom of camera 5 Follow the setup instructions again pages 4 through 11 and check that you have done each step correctly 6 Make sure that the AB...

Страница 19: ...ep 0 and Setup again This will turn off the label Repeat these same steps to turn the label on again For more help with setup please visit http www x10 com support Troubleshooting Troubleshooting If t...

Страница 20: ...dable solution that can keep you safe and secure From a simple remote control that can turn on a lamp to a full blown automation system X10 provides you with all the products you need CAMERA C2 C3 C1...

Страница 21: ...correct the interference by one or more of the following measures Reorient the antenna of the radio TV experiencing the interference Relocate the equipment with respect to the radio TV Move the equip...

Отзывы: