X10 SENTINEL VK79A Скачать руководство пользователя страница 20

39

38

T

ROUBLESHOOTING


If there’s no camera picture on your TV (wireless connection):

1. Make sure your Wireless Video Receiver is connected to power and

turned On.

2. Select the appropriate video input on your TV. Usually you can select

the input mode by pressing the VIDEO or INPUT button on the remote
control. Or you might have to change the TV to Channel 0 or 2, and
then use Channel Down to change video inputs. See your TV’s owner’s
manual if you still aren’t sure how to change the video source.

3. Make sure your camera is connected to power and turned on. Press C1

on the remote to turn it on.

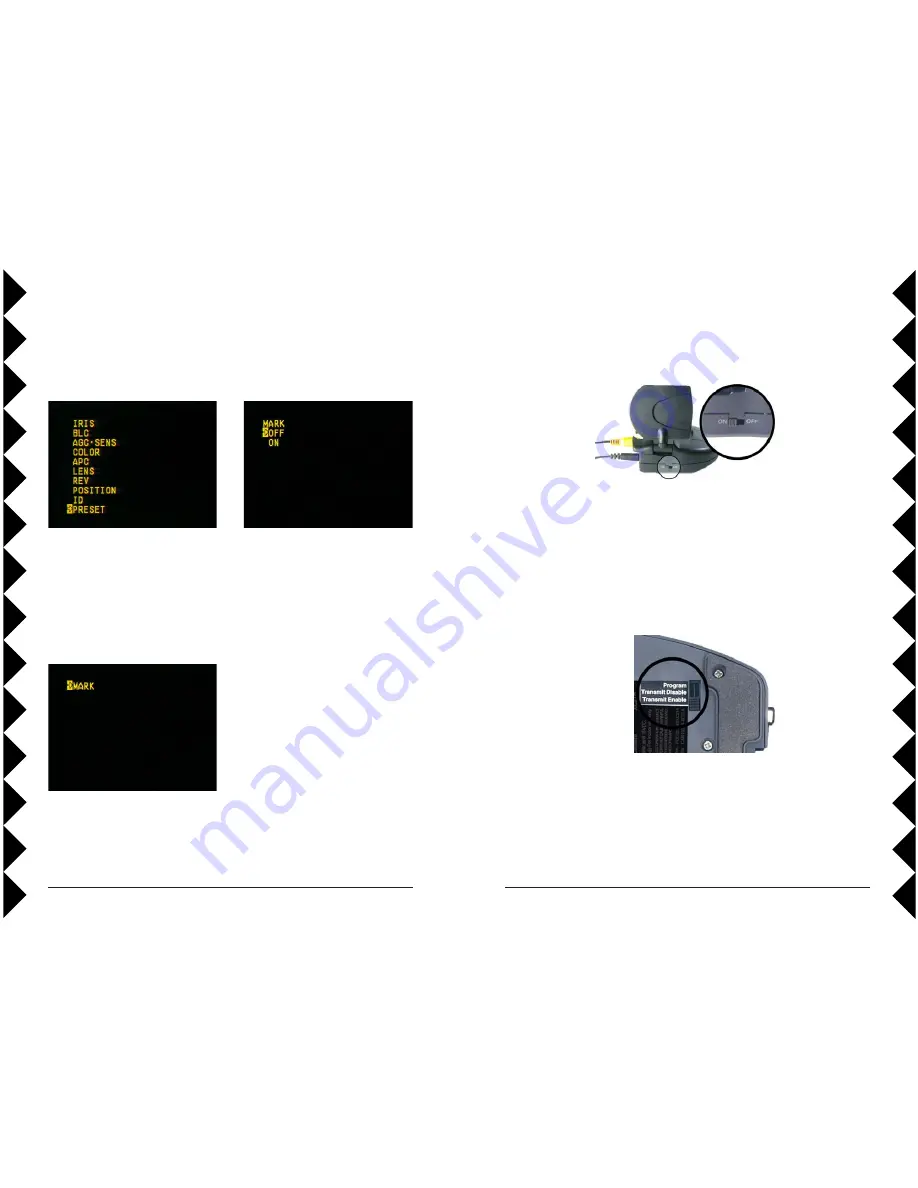
4. Check that the mode switch on the bottom of the camera is set to

Transmit Enable.

Bottom of
camera

5. Follow the setup instructions again (pages 4 through 11), and check that

you have done each step correctly.

6. Make sure that the ABCD switches on the bottom of the camera and the

bottom of the wireless video receiver are set to the same letter (see
pictures on next page).

Advanced Onscreen Menu Options

·

MARK:

 Selecting Mark ON puts a cross-hairs mark on the screen.

Follow the step on page 27 to bring
up the onscreen menu. Then use the
Down arrow to select past the last
item (PRESET), or the Up arrow to
select past the first item (IRIS).

This will display the MARK menu.

Select MARK with the Right Arrow.
Then select OFF or ON with the Up
and Down arrows. Select with the
Right Arrow, and then back out to
the main menu with successive
presses of the Left arrow.

Содержание SENTINEL VK79A

Страница 1: ...OWNER S MANUAL Please keep for future reference MODEL VK79A INCLUDES SENTINEL PAN TILT ZOOM CAMERA XC24A AND DOME WITH REMOTE CONTROL CR15A SENTINEL OUTDOOR PROFESSIONAL PAN TILT ZOOM CAMERA SYSTEM...

Страница 2: ...lt Zoom Camera has superior image quality a high powered zoom and pan and tilt motion You can operate the camera through walls using the supplied remote control It comes with a weather resistant dome...

Страница 3: ...power supply the camera remote the camera mounting bracket a weather resistant dome and the screws to install the bracket A wireless video receiver and it s video cable and power supply shown above bu...

Страница 4: ...Plug its power supply into a standard wall outlet and the other end into the video receiver Basic Camera Setup Insert batteries into the remote Remove the battery cover and put four 4 AAA batteries in...

Страница 5: ...re the power switch on the video receiver is set to ON Basic Camera Setup Connect the video receiver to your TV Connect the video cable into the video out jack on the video receiver and into the video...

Страница 6: ...e picture on your TV Basic Camera Setup Fine tune the antennas Turn on your TV Turn on your TV and select its video input Use the Video or Select buttons on your TV remote control or try channel 0 and...

Страница 7: ...Plug the other end into the camera Remove the protective cover from the camera s lens Select Transmit Disable BASIC CAMERA OPERATION Once you have the camera set up you re ready to start using it It s...

Страница 8: ...sitions in the camera press the desired number button on the remote to move to that position If you press Sweep the camera will automatically switch through all the positions you ve stored Press any o...

Страница 9: ...ht amount of light for your subject If you want to brighten the picture press the Iris Up button to open the iris wider and let more light in To limit the amount of light in the picture press Iris Dow...

Страница 10: ...the outside of the base 4 Attach the camera to the base of the dome using the brass screw on the outside of the dome s base 7 Attach the base of the dome to a ceiling by inserting three screws into th...

Страница 11: ...brass screw on the outside of the dome s base 8 Attach the base of the dome to the mounting bracket Then tightly fasten the dome assembly to the bracket by fixing the brass screw inside the dome 7 Pas...

Страница 12: ...rror image Up and Down arrows flip the image from top to bottom Picture Orientation Vertical Orientation If you choose not to mount the camera upside down Here s how to flip the picture vertically in...

Страница 13: ...5 8 press C3 for Units 9 12 or press C4 for Units 13 16 Once you have changed the group Unit Codes on the remote control you have to reprogram the cameras Follow the Multiple Camera Setup instruction...

Страница 14: ...mera you want to control 3 Press the Right arrow button to bring up the onscreen menu 2 Press and hold Setup until the camera button light stays on Press and hold setup again until the camera button s...

Страница 15: ...n lighting conditions Your options are PEAK This setting controls the reaction of the automatic iris adjustment in relation to the average light level in the picture A higher level of peak sets the ca...

Страница 16: ...the video produced by the camera Set this to higher levels to correct for low levels of blue in your picture or vice versa Advanced Onscreen Menu Options Advanced Onscreen Menu Options Freeze Automat...

Страница 17: ...ow the camera to focus on objects any distance away or a short focal length NEAR if you are using the camera only to view objects relatively close In Manual mode the camera will set focus automaticall...

Страница 18: ...s Or you can do both H REV Reverses the picture horizontally or from left to right Set this to ON if you want to use the camera like a mirror for viewing objects behind you V REV When set to ON this s...

Страница 19: ...e the Up and Down arrows to select the desired position on the screen up top or down bottom Then use the Up and Down arrows to select characters from the screen above selecting each character with the...

Страница 20: ...on the bottom of the camera is set to Transmit Enable Bottom of camera 5 Follow the setup instructions again pages 4 through 11 and check that you have done each step correctly 6 Make sure that the AB...

Страница 21: ...ep 0 and Setup again This will turn off the label Repeat these same steps to turn the label on again For more help with setup please visit http www x10 com support Troubleshooting Troubleshooting If t...

Страница 22: ...dable solution that can keep you safe and secure From a simple remote control that can turn on a lamp to a full blown automation system X10 provides you with all the products you need CAMERA C2 C3 C1...

Страница 23: ...correct the interference by one or more of the following measures Reorient the antenna of the radio TV experiencing the interference Relocate the equipment with respect to the radio TV Move the equip...

Отзывы: