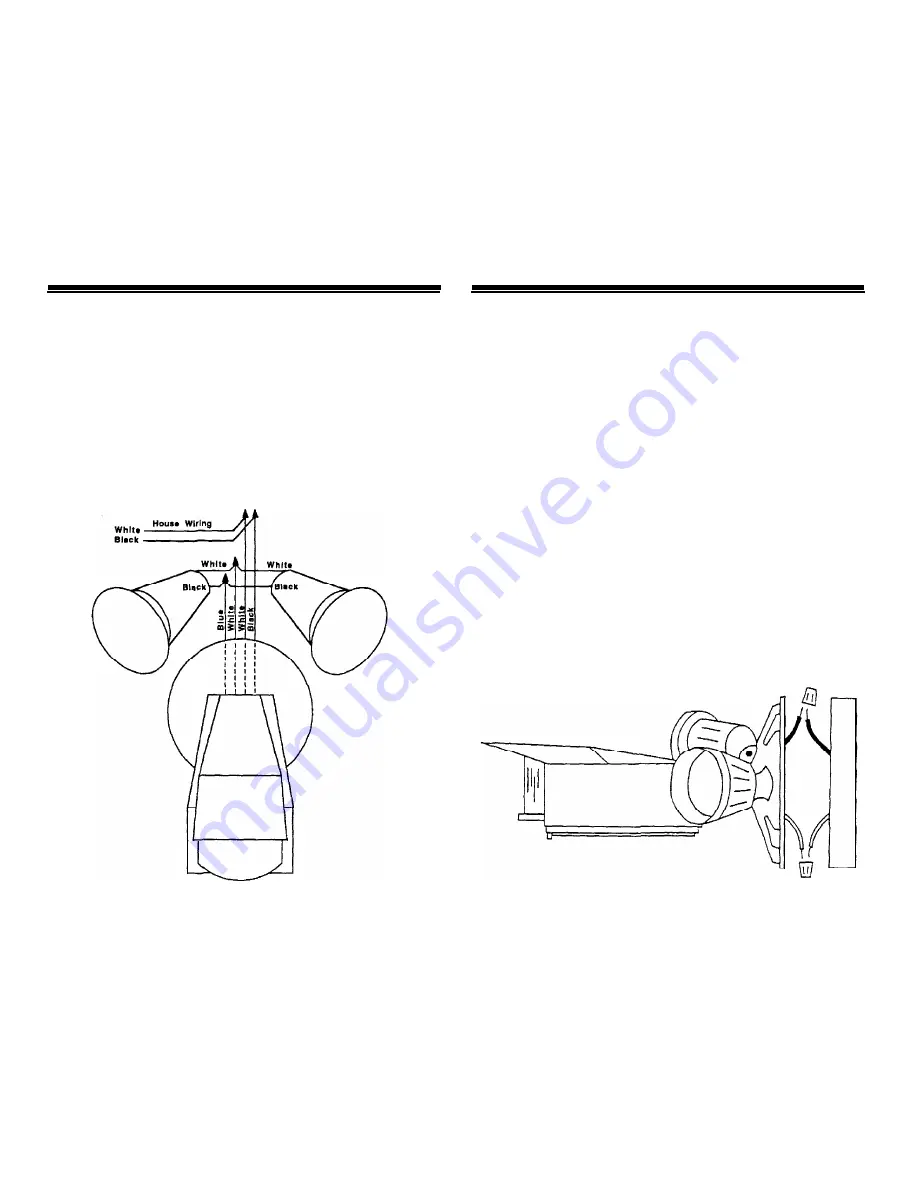
ASSEMBLING THE MOTION DETECTOR INSTALLING THE
MOTION
DETECTOR
1. Screw the base of each lamp holder
into the outer holes of the mounting
plate.
4. Lock the sensor head into place using
the locking ring.
You can install the Motion Detector in a
wall box that is powered all the time or
in a wall box that is powered through a
wall switch. If the wall box is powered
from a wall switch, leave the switch
turned on all the time. Turning off the
switch completely disables your Motion
Detector.
3.
Connect your Motion Detector’s
while wire to the house wiring’s
white wire, using a wire nut
2. Rotate the locking ring on each lamp
holder towards the plate until the
lamp holder is secure against the
plate.
5. Locate each lamp holder’s white wire
and one of the sensor head’s white
wires and connect all three wires to-
gether using one of the supplied wire
nuts.
4. Connect your Motion Detector’s
black wire to the house wiring’s
black wire, using a wire nut.
3.
Screw
the threaded end of the sensor
head into the center hole of the
mounting plate.
6. Locate each lamp holder’s black wire
and connect them to the sensor head’s
blue wire using a wire nut.
Caution: To prevent severe damage to
your Motion Detector, do not connect it
to a dimmer or any kind of remote con-
trolled wall switch module.
Warning: Before making the following
connections, be sure the power to the
junction box is turned off. If the junc-
tion box is powered a serious shock haz-
ard exists.
1. Install the supplied gasket on the
junction box, and route the house
wiring through the gasket.
2. Connect the house wiring’s bare cop-
per ground wire to the junction box’s
ground screw.
5. Secure the mounting plate to the
junction box using the two supplied
screws.
6. Place an insulating ring (supplied)
over the base of each lamp and screw
the lamps into their sockets.
Note: Lamp wattage should not exceed
150 watts each when you use the sup-
plied lamp holders. Your Motion Detec-
tor can power up to 500 watts if you use
it to control a fixture rated at 500 watts.


