background image


B21 

Transport wheel plug 


B22 

Square inner plug 


B23 

Ring protect plug 


B24 

Power buckle   


B25 

Side rail 


B26 

Left side cover 


B27 

Right side cover 


B28 

Bottle bracket 


C Electrical parts   

C1 

AC Motor 


C3 

Invertor 


C4 

Front roller 


C5 

Rear roller 


C6 

Motor belt 

210-J7 

C7 

                  Running belt 


C8 

Running board 


C9 

Incline motor 


C10 

Inductor 


C11 

Filter 


C12 

Handrail incline button 


C13 

Handrail speed button   


C14 

Upper controller 


C15 

Safety key 


C17 

Safety key sensor 


C18 

Cylinder 


C19 

Power line 


C20 

Overload protector   


C21 

Power switch 


C22 

Single line 


C23 

Single line 


C24 

Computer lower wire 

Length 1800mm 

C25 

Computer upper wire 

Length 800mm 

C26 

Outlet   


C27 

Ground line 


C28 

Magnetic ring 


C29 

MP3 Line 


Содержание 3000 Pro Runner

Страница 1: ...USER S MANUAL for 3000 Pro Runner BUILT FOR HEALTH ...

Страница 2: ......

Страница 3: ... 4 Folding unfolding instructions 7 Grounding methods 8 Operation guide 9 Getting started guide 14 Safety exercises 15 Warm up exercises 16 Maintenance instructions 17 Belt adjustment 18 Exploded drawing 19 Parts list 20 Error code and significance 23 Service 25 ...

Страница 4: ...d use the treadmill must have adult on side 9 Always hold the handrails when initially walking or running on the treadmill until you are familiar with the use of the treadmill 10 The treadmill is for indoor equipment do not use outdoor Position the treadmill on a clean level surface Note the treadmill made by special equipment please do not remodel or do others 11 The power cord of motorized tread...

Страница 5: ...ain frame 1set D7 Washer 8PCS D23Half round hex bolt M10 15 4PCS C15 Safety key 1set D36 Allen wrench 80 80 6 1 PC B6 Silicon oil 1 PC D24Half round hex bolt M10 55 4 PCS D 41Screw driver 1PC D40 Screw 4 2 25 6PCS B26 Left side cover 1PC B27 Right side cover 1PC C29 MP3 Line ...

Страница 6: ...EP 1 According to the following steps to lift up the computer bracket Be careful not press the line when folding STEP 2 According to the picture to tight the bolt M10 15 D23 M10 55 D24 and inner washer D7 ...

Страница 7: ...g screw D40 then put on the safety key C15 and insert MP3 line C29 on the computer ATTENTION Must confirm complete assembly as the required above and lock all bolts Do the following operations after checking everything is OK Before you use the treadmill please read the instructions carefully ...

Страница 8: ...e to pull up until you heard click that made by safety casing stuck the pneumatic cylinder UNFOLDING INSTRUCTION Kick the safety sleeve lightly and pull down the machine at the same time as the arrow direction Then the machine will fall down smoothly ...

Страница 9: ...ll local codes and ordinances DANGER Improper connection of the equipment grounding conductor can result in a risk of electric shock Check with a qualified electrician or serviceman if you are in doubt as to whether the product is properly grounded Do not modify the plug provided with the product if it will not fit the outlet Please find a proper outlet installed by a qualified electrician This pr...

Страница 10: ...mill is not running press this button to start speed is 0 8 STOP When the treadmill is running press this button to stop then set program default and then return to manual mode after stopped 1 5 2 PROGRAM BUTTON When the treadmill is not running press this button can circle choose from manual mode to pre set mode P1 P15 U1 U3 and body fat 1 5 3 MODE BUTTON When the treadmill is not running press t...

Страница 11: ... than 2 seconds and it will be up or down automatically 1 5 7 INCLINE QUICK BUTTON Press the incline quick button 3 6 9 to adjust the incline directly when the treadmill is running 1 6 DISPLAY FUNCTION 1 6 1 SPEED Display running speed 1 6 2 TIME Display the running time or countdown time 1 6 3 DISTANCE Display the running total distance or distance countdown 1 6 4 CALORIE Display the calorie or c...

Страница 12: ... 1 2 2 2 2 3 0 P06 SPD 2 4 5 5 6 6 8 8 6 6 8 8 6 9 6 2 INC 0 1 3 4 4 3 3 1 2 1 2 1 2 1 2 0 P07 SPD 2 7 7 9 9 4 4 12 12 4 4 8 8 4 4 2 INC 0 1 1 2 2 3 3 4 4 3 3 2 2 1 1 0 P08 SPD 2 2 6 6 6 8 9 10 11 12 9 5 5 5 3 2 INC 0 1 2 4 2 1 2 4 2 1 2 4 2 1 2 0 P09 SPD 2 4 8 10 2 4 8 10 2 4 10 2 4 10 4 2 INC 0 1 2 3 4 5 6 7 8 9 8 6 4 2 1 0 P10 SPD 2 5 6 7 8 9 10 11 10 9 8 6 7 5 4 2 INC 0 1 2 4 6 6 6 4 4 4 2 2 2...

Страница 13: ...ntdown distance initial setting 1 0km setting range 0 5 99 9 km each step 0 1 Cycle switch order is manual time distance calories 1 11 BODY TESTER FAT At the beginning state press PROGRAM continually to enter FAT body fat test window display FAT Press MODE to enter F1 SEX F2 AGE F3 HEIGHT F4 WEIGHT Press SPEED SPEED to set After setting the computer will display F5 and grasp the hand pulse the win...

Страница 14: ...there is no any action within 10 minutes under IDLE MODE and there is no display and backlit on the computer Press any key to resume the system 1 12 2 Countdown time countdown calorie and countdown distance you just can set one of them at one time press last item to set running the setting parameter is countdown others display normal data 1 12 3 MP3 audio function Insert the MP3 line in the input ...

Страница 15: ...e best way to save time is do 15 20 minutes exercise Warm up 2 minutes by 4 8 km h and adjust the speed to 5 3 km h and 5 8 km h continue do exercise by this two speeds Then add 0 3 km h per 2mins speed increase until you feel breathing quickened but not breathe hard Keep this speed to do exercise if feels uncomfortable please reduce 0 3 km h Leave 4 minutes to reduce speed at last If you fell it ...

Страница 16: ...t continually to do exercise If you often use treadmill you can choose normal walk speed or jog speed If you have no experience or can t make sure the best testing speed you can reference below standard Speed 1 3 0 km weak constitution people Speed 3 0 4 5 km sedentary or not often exercise people Speed 4 5 6 0 km walking quickly people Speed 6 0 7 5 km fast walk people Speed 7 5 9 0 km jogger Spe...

Страница 17: ...r hands Keeping for 10 to 15 seconds and relax Repeat 3 times for each leg See picture 2 3 Crus and Feet Tendon Stretches Standing with two hands on the wall or tree one leg behind Keeping your legs straight and the heel on the ground tilt to the wall or tree Keep 10 to 15 seconds and relax Repeat 3 times for each leg See picture 3 4 Quadriceps Stretches Keeping your balance with your left hand ho...

Страница 18: ...G Always unplug the treadmill from the electrical outlet before removing the motor cover At least once a year remove the motor cover and vacuum under the motor cover This treadmill s walking belt and deck are equipped with a pre lubricated low maintenance deck system The belt deck friction may play a major role in the function and life of your treadmill thus requiring periodic lubrication We recom...

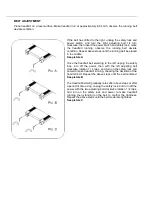
Страница 19: ...ill belt swerving to the left unplug the safety lock turn off the power then with the left adjusting bolt clockwise rotation 1 4 laps and turn on the safety lock and power to make treadmill running checking the deviation of the treadmill belt Repeat the above steps until the belt centered See picture B The treadmill belt will gradually relax after above steps or after a period of time using unplug...

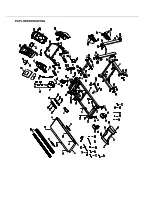
Страница 20: ...EXPLODED DRAWING ...

Страница 21: ...tic Parts No Description Spec QTY B1L Left computer bracket 1 B1R Right computer bracket 1 B2 Computer bottom panel 1 B3 Computer board 1 B4 Air cushion 2 B5 Bookcase 1 B6 Silicon oil 1 B7 Handrail foam 2 B8 Inner plug 2 B9 Overlay 1 B10 End cap 2 B11 Cushion 2 B12 Cushion 4 B13 Transport wheel 2 B14 Motor side cover 2 B15 Left rear cover 1 B16 Right rear cover 1 B17 Motor cover 1 B18 Limited cush...

Страница 22: ...lt 210 J7 1 C7 Running belt 1 C8 Running board 1 C9 Incline motor 1 C10 Inductor C11 Filter C12 Handrail incline button 2 C13 Handrail speed button 2 C14 Upper controller 1 C15 Safety key 1 C17 Safety key sensor 1 C18 Cylinder 1 C19 Power line 1 C20 Overload protector 1 C21 Power switch 1 C22 Single line 3 C23 Single line 1 C24 Computer lower wire Length 1800mm 1 C25 Computer upper wire Length 800...

Страница 23: ...6 D17 Self tapping head bolt ST2 9 16 4 D19 Hex round screw M8 80 1 D21 Bolt M5 10 5 D23 Half round hex bolt M10 15 4 D24 Half round hex bolt M10 55 4 D25 Half round hex bolt M10 60 4 D27 Half round hex bolt M10 20 2 D28 Half round hex bolt M8 50 2 D29 Self tapping head bolt ST4 2 40 4 D30 Self tapping head bolt ST4 2 50 4 D31 Self tapping head bolt ST4 2 19 2 D32 bolt M5 15 3 D33 Half round hex b...

Страница 24: ...still displays E03 3 Change the inverter E05 Inverter over current faulty 1 Power on after power off for 20 seconds if it still displays E05 then go on the second step 2 Check if the roller bearing is broken or the running board and running belt are lack of lubrication then go to next step if it still displays E05 3 Change the inverter E07 Overload protection 1 Power on after power off for 20 seco...

Страница 25: ...nected well and then go to next step If it still displays E09 2 Change the inverter If it still displays E09 3 Change the incline motor No display in computer 1 Check if the power line is connected well or the switch is on or the fuse is burnt or not 2 Check if the lines are connected well between the computer and controller 3 Inverter or computer is broken ...

Страница 26: ... ordering spare parts or any errors and omissions We would like you to contact us before contacting the store so we can offer you the best help Please visit our website www xerfit fi here you will find information about the products and user manuals in Finnish and English On our website you can find a contact form and this gives us the information we need to assist you as efficiently as possible ...

Отзывы: