17
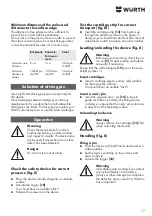
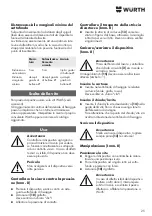
Minimum distances of the axles and
distances to the surface edge
The distance to free edges must be sufficient to
prevent the pin from lateral penetration.
Do not drive in the pins too close in order to prevent
them from comming loose from their fixing position
in case the material breakes out or tears away.
Brickwork Concrete,
Ferro-con-
crete
Steel
Minimum axle
distance
5 cm
5 cm
3-fold pin
shaft Ø
Minimum
distance to
edges
10-fold pin
shaft Ø
10-fold pin
shaft Ø
5-fold pin
shaft Ø
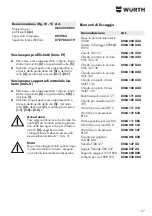
Selection of driving pin
Use only Würth driving pins (see accessories) for
this device.
Since fastening material undergoes continuous
development, it is possible that not all admissible
driving pins are listed. For this purpose contact your
Würth customer service or use the latest catalogue.
Operation
Warning
Check the device daily for correct
functioning before you start working
and inspect it visually. The device may
not be used if any technical or visible
defect has been detected.
Danger
Do not aim the tool at others.
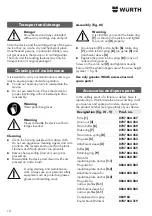
Check the safety device for correct
pressure (fig.
II)
■
Press the device unloaded against a suitabale
surface.
■
Actuate the trigger
[10]
You shoud hear an audible "click"!
■
Release the pressure on the device.
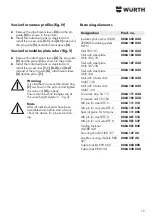
Test the cartridge strip for correct
transport (fig. III)
■
Insert the cartridge strip
[13]
from bottom up
through the handle as shown in the figure. In
doing so, you should hear and feel how the indi-
vidual items snatch into place one after another.
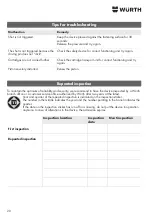
Loading/unloading the device (fig.
II)
Warning
Before you start working, check the un-
ion nut
[2]
for tight seating and tighten
manually, if necessary.
Ensure that the white triangles
[15]
are at the same
height (symbol
▹◃
).
Insert cartridges
■
Insert a cartridge (green, yellow, red) suitable
for the respective surface.
You should hear an audible "click"!
Insert a nail / pin
■
Insert the required nail / pin
[14]
in the pin
guide such that it is hold by the fixing device.
In doing so, ensure that the nail / pin point aims
in direction of the fastening surface.
Unloading the device
Warning
Always remove the cartridges
[13]
first
when unloading the device!
Handling (fig.
II)
Firing a pin
■
Hold the device with both hands and stand in a
stable position.
■
Set the device vertically on the surface and
press on firmly.
■
Actuate the trigger
[10]
.
Warning
Immediately stop working if you detect
any visible defects on the device
(cracks or other damage) and replace
the defective part or send it to Würth to
have it repaired.


