


26
5 ORSY
®
Flex Regalsystem Regaltiefe 500 mm
Bauteileübersicht:
2
7
9
20
22
27
Pos.
Bezeichnung
Art.-Nr.
1
Grundgestell 500 mm
0961 092 040
2
Rückwand
0961 092 037
3
Seitenwand
0961 092 034
4
Tür 1/1
0961 092 004
5
Tür Quertraverse
6
Fachboden Refillomat
0961 092 024
7
Fachboden Kartusche
0961 092 023
8
Fachboden 5 LTR. Kanister
0961 092 026
9
Fachboden 20 LTR Kanister
0961 092 027
10
Auffangwanne
0961 092 066
11
Grundgestell Gewindestange
0961 092 040
12
Fachboden Gewindestangen
0961 092 025
13
Fachboden Bodenschale
14
Fachboden 500 mm
0961 092 006
15
Fachboden Kartonage
0961 092 022
15.1
Trennleiste
0961 092 125
16
Fachboden universal
0961 092 009
17
Fachboden ZWB Schloss
0961 092 014
18
Fachboden ZWB Tür
0961 092 119
Содержание ORSY Flex 350
Страница 2: ...2 DE 3 40 GB 41 78 IT 79 116 FR 117 154 NL 155 192 ...
Страница 8: ...8 Fachboden Montage Abb 1 Abb 2 Der Fachboden muss im Grundgestell eingehängt werden Siehe Abb 1 6 ...
Страница 9: ...9 Abb 3 A Abb 4 ...
Страница 10: ...10 A Abb 5 A Abb 6 ...
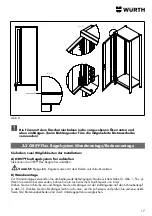
Страница 11: ...11 Rückwand Montage A A 1 1 Abb 1 Die Rückwand in die vorgesehenen Führungen von oben einführen ...
Страница 13: ...13 Seitenwand Montage A 1 2 A Abb 1 A 1 2 B 1 3 Verbindungselement Schraube oder Niet Abb 2 ...
Страница 14: ...14 Tür Montage B Abb 1 Die Quertraverse oben einstecken und verschrauben Inkl Montagesatz ...
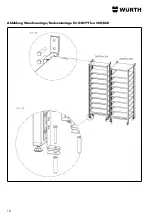
Страница 18: ...18 Abbildung Wandmontage Bodenmontage für ORSY Flex 500 680 ...
Страница 19: ...19 Aufbauschema Bodenmontage ...
Страница 20: ...20 Abbildung Wandmontage Bodenmontage für ORSY Flex 350 830 ...
Страница 21: ...21 Montage Verbindungselemente Reihenmontage inkl Montagesatz ...
Страница 22: ...22 Möglichkeit 2 Verbindungselemente bei Seitenteil inkl Montagesatz ...
Страница 23: ...23 Montage Verbindungselemente Rücken an Rücken Inkl Montagesatz ...
Страница 29: ...29 Inkl Montagesatz ...
Страница 36: ...36 Schritt 2 Führungsschiene einhängen Die Führungsschiene passend zur Schubladenhöhe einhängen ...
Страница 38: ...38 Schritt 4 Schloss einbauen Klick A 1 2 Schloss in die vorgesehene Bohrung einbauen ...
Страница 39: ...39 Schritt 5 Schubladen einhängen Die Schubladen müssen in die Führungsschiene eingehängt werden Schritt 6 ...
Страница 46: ...46 Shelf mounting Figure 1 Figure 2 The shelf must be hooked into the base frame See fig 1 6 ...
Страница 47: ...47 Fig 3 A Fig 4 ...
Страница 48: ...48 A Fig 5 A Fig 6 ...
Страница 49: ...49 Rear panel mounting A A 1 1 Fig 1 Insert the rear panel into the provided guides from above ...
Страница 51: ...51 Side panel mounting A 1 2 A Fig 1 A 1 2 B 1 3 Connecting element screw or rivet Fig 2 ...
Страница 52: ...52 Door mounting B Fig 1 Insert the crossbar at the top and screw it in place Assembly kit included ...
Страница 56: ...56 Figure wall mounting floor mounting for ORSY Flex 500 680 ...
Страница 57: ...57 Layout diagram floor mounting ...
Страница 58: ...58 Figure wall mounting floor mounting for ORSY Flex 350 830 ...
Страница 59: ...59 Mounting Connecting elements Row mounting incl assembly kit ...
Страница 60: ...60 Option 2 Connecting elements for side panel including assembly kit ...
Страница 61: ...61 Mounting fasteners back to back Assembly kit included ...
Страница 67: ...67 Assembly kit included ...
Страница 74: ...74 Step 2 Hook in the guide rail Hook in the guide rail so that it matches the drawer height ...
Страница 76: ...76 Step 4 Install the lock Click A 1 2 Install the lock in the provided space ...
Страница 77: ...77 Step 5 Hook in the drawers The drawers must be hooked into the guide rail Step 6 ...
Страница 84: ...84 Montaggio scaffalature Fig 1 Fig 2 Il ripiano deve essere agganciato al telaio di base Vedere fig 1 6 ...
Страница 85: ...85 Fig 3 A Fig 4 ...
Страница 86: ...86 A Fig 5 A Fig 6 ...
Страница 87: ...87 Montaggio pannello posteriore A A 1 1 Fig 1 Inserire il pannello posteriore nelle guide fornite dall alto ...
Страница 89: ...89 Montaggio pannello laterale A 1 2 A Fig 1 A 1 2 B 1 3 Elemento di connessione vite o rivetto Fig 2 ...
Страница 94: ...94 Figura montaggio a parete montaggio a pavimento per ORSY Flex 500 680 ...
Страница 95: ...95 Schema di montaggio a pavimento ...
Страница 96: ...96 Figura montaggio a parete montaggio a pavimento per ORSY Flex 350 830 ...
Страница 97: ...97 Montaggio di elementi di collegamento montaggio in linea incluso kit di montaggio ...
Страница 98: ...98 Opzione 2 elementi di collegamento per la sezione laterale incluso il set di montaggio ...
Страница 99: ...99 Montaggio di elementi di collegamento schiena contro schiena Incluso il set di montaggio ...
Страница 105: ...105 Incluso il set di montaggio ...
Страница 112: ...112 Passo 2 Incorporare la guida Appendere il binario di guida secondo l altezza del cassetto ...
Страница 114: ...114 Passo 4 Inserire la serratura Cliccare su A 1 2 Installare la serratura nel foro previsto ...
Страница 115: ...115 Passo 5 Appendere i cassetti I cassetti devono essere agganciati alla guida Passo 6 ...
Страница 122: ...122 Assemblage des étagères Image 1 Image 2 L étagère doit être accrochée au cadre de base Voir Fig 1 6 ...
Страница 123: ...123 Image 3 Image 4 ...
Страница 124: ...124 Image 5 Image 6 ...
Страница 125: ...125 Paroi arrière Image 1 Insérez la paroi arrière dans les guides fournis par le haut ...
Страница 127: ...127 Montage paroi latérale Image 1 Image 2 ...
Страница 128: ...128 Montage de porte Image 1 Insérez la barre transversale en haut et vissez la Kit de montage inclus ...
Страница 132: ...132 Figure de montage mural pour système d étagères ORSY Flex 500 et 680 ...
Страница 133: ...133 Schéma de montage montage au sol ...
Страница 134: ...134 Figure de montage mural pour système d étagères ORSY Flex 350 et 830 ...
Страница 135: ...135 Attaches de montage montage en rangée kit de montage inclus ...
Страница 136: ...136 Option 2 attaches pour le panneau latéral kit de montage inclus ...
Страница 137: ...137 Attaches de montage dos à dos Kit de montage inclus ...
Страница 143: ...143 Kit de montage inclus ...
Страница 144: ...144 5 2 2 Options composants chimiques Tenez compte des étiquettes de référence pour pos 3 4 ...
Страница 150: ...150 Étape 2 Accrochez dans le rail de guidage Accrochez le rail de guidage à la hauteur du tiroir ...
Страница 152: ...152 Étape 4 Montage de la serrure Installez la serrure dans le trou prévu à cet effet ...
Страница 153: ...153 Étape 5 Mise en place des tiroirs Les tiroirs doivent être accrochés dans le rail de guidage Étape 6 ...
Страница 160: ...160 Installatie van de plank Fig 1 Fig 2 De plank moet in het onderstel worden gehaakt Zie Fig 1 6 ...
Страница 161: ...161 Fig 3 Fig 4 ...
Страница 162: ...162 Fig 5 Fig 6 ...
Страница 163: ...163 Installatie van de achterwand Fig 1 Schuif de achterwand in de geleiders van bovenaf ...
Страница 165: ...165 Installatie van de zijwand Fig 1 Fig 2 ...
Страница 166: ...166 Installatie van de deur Fig 1 Plaats de dwarsbalk bovenaan en schroef deze vast Incl Montageset ...
Страница 170: ...170 Illustratie wand vloermontage voor ORSY Flex Rekkensysteem 500 en 680 ...
Страница 171: ...171 Montageschema vloermontage ...
Страница 172: ...172 Illustratie wand vloermontage voor ORSY Flex Rekkensysteem 350 en 830 ...
Страница 173: ...173 Montage van verbindingselementen rijmontage inclusief montage set ...
Страница 174: ...174 Optie 2 verbindingselementen voor zijgedeelte inclusief montage set ...
Страница 175: ...175 Montage van verbindingselementen rug aan rug Incl Montage set ...
Страница 181: ...181 Incl Montage set ...
Страница 188: ...188 Stap 2 De geleiderail inhangen Hang de geleiderail in overeenstemming met de hoogte van de lade ...
Страница 190: ...190 Stap 4 Slot inbouwen Klik A 1 2 Installeer het slot in het daarvoor bestemde gat ...
Страница 191: ...191 Stap 5 De lades inhangen De lades moeten in de geleiderail worden gehaakt Stap 6 ...
Страница 193: ...193 ...
Страница 194: ...194 ...
Страница 195: ......


