background image

Belt Sander 

ENG

OPERATING 

INSTRUCTIONS

1. ON/OFF SWITCH

Depress to start and release to stop your tool.

2. SWITCH LOCK-ON BUTTON

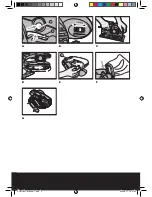
Depress  on/off  switch  (1)  then  lock  on  button 
(2)  (See  A). Your  tool  is  now  locked  on  for 
continuous  use. To  switch  off  your  tool  just 
depress and release the on/off switch.

3. VARIABLE SPEED CONTROL DIAL 

Adjust  the  variable  speed  control  dial  (3) 
to  increase  or  decrease  the  speed  (See  B) 
according  to  the  material  and  sanding  belt 
specification to be used (also possible during 
no  load  operation).  See  the  table  below  for 
general  guidance  on  speed  selection.  Avoid 
prolonged use at very low speed as this may 
damage your sander’s motor.

Material

Speed selection Belt Grit

Solid Wood

5-6

80

Veneer

2-4

150

Chipboard

1-5

60/80

Plastics

2-5

100

Steel

5-6

80

Paint Removal

6

40/60

Balsa Wood

1-3

100

Acrylic

1-2

100

4. HAND GRIP AREAS

Always hold your belt sander firmly with both 
hands when operating (See C). 

5. CHANGING A SANDING BELT

WARNING!  Remove  the  main  plug  from  the 
socket  before  changing  sanding  belt.  Pull  the 
lever  (5)  to  release  the  belt  tension.  Remove 
and  fit  a  new  belt  over  both  rollers  (See  D). 
Ensure the direction of rotation arrows on the 
belt  and  the  sander  are  the  same.  Close  the 
lever to tension the belt.

6. BELT CENTERING CONTROL

WARNING!  Wear  eye  protection 

before carrying out a belt centering 

adjustment.

Turn the machine upside down, hold it firmly 
with one hand, start the motor and release the 
switch immediately after observing tracking of 
sanding belt. If abrasive belt runs outward, turn 
tracking  adjustment  knob  counter-clockwise 
and clockwise if belt runs inward (See E). Adjust 
the belt until the outer edge of the belt is even 
with the outer edge of the base-plate (9). Belt 
life  will  be  greatly  increased  by  keeping  the 
tracking adjustment set properly.

7. DUST BAG

You must use the dust collection bag provided 
to  collect  the  dust  produced  during  sanding. 
The  dust  collection  bag  plastic  bracket  slides 
down onto the dust outlet on the belt sander 
(See  F). When  the  dust  collection  bag  is  full, 
remove and empty by opening the zip on the 
dust bag (7).

8. DRIVE BELT REPLACEMENT.

WARNING!  Remove  the  main  plug 

from the socket before carrying out 

a drive belt replacement. 

Remove the two 

screws  and  the  belt  cover  as  shown(See  G). 
Carefully cut the drive belt if not already broken 
and remove from your belt sander. Fit your new 
drive belt around the large pulley. Then install 
onto the small pulley by rotating clockwise and 
pushing the drive belt shown around the small 
pulley at the same time. The drive belt will be a 
tight fit. Fit the belt cover and two screws. 

WORKING HINTS FOR 

YOUR BELT SANDER

If your power tool becomes too hot, especially 
when  used  at  low  speed,  set  the  speed  to 
maximum and run with no load for 2-3 minutes 
to  cool  the  motor. Avoid  prolonged  usage  at 
very  low  speed.  Always  use  a  sanding  belt 
suited to the material you wish to sand. Always 
ensure the work-piece is firmly held or clamped 
to  prevent  movement.  Support  large  panels 
close to the sanding area. Any movement of the 
material may affect the quality of the sanding 
finish.  Start  your  sander  before  sanding  and 
turn  off  only  after  stopping  sanding.  For  best 
results sand wood in the direction of the grain. 
Do not start sanding without the sanding belt 

11

10

RU-WU661-M-060817.indd   10

2006-8-17   16:27:39

Содержание WU661

Страница 1: ...WU661 Belt Sander ENG Машина шлифовальная ленточная RUS Pag 06 Pag 13 RU WU661 M 060817 indd 1 2006 8 17 16 27 30 ...

Страница 2: ...RU WU661 M 060817 indd 2 2006 8 17 16 27 30 ...

Страница 3: ...RU WU661 M 060817 indd 3 2006 8 17 16 27 30 ...

Страница 4: ...RU WU661 M 060817 indd 4 2006 8 17 16 27 31 ...

Страница 5: ... A B C D E F G RU WU661 M 060817 indd 5 2006 8 17 16 27 32 ...

Страница 6: ...ighted sound pressure 89dB A A weighted sound power 100dB A Wear ear protection when sound pressure is over 85dB A Typical weighted vibration 2 81m s2 ACCESSORIES Dust bag 1pc Sanding belt 1pc Included in the machine Use sanding belt with the following specification 76mm x 457mm We recommend that you buy all your accessories from the store where you purchased the tool Use good quality accessories m...

Страница 7: ... a Stay alert watch what you are doing and use common sense when operating a power tool Do not use a power tool while you are tired or under the influence of drugs alcohol or medication A moment of inattention while operating power tools may result in serious personal injury b Use safety equipment Always wear eye protection Safety equipment such as dust mask non skid safety shoes hard hat or hearin...

Страница 8: ... and shock the operator ADDITIONAL SPECIFIC SAFETY INSTRUCTIONS FOR BELT SANDER Remove the plug from the socket before carrying out any adjustment servicing or maintenance 1 Fully unwind cable drum extensions to avoid potential overheating 2 When an extension cable is required you must ensure it has the correct ampere rating for your power tool and is in a safe electrical condition 3 Ensure your m...

Страница 9: ...y products Arsenic and chromium from chemically treated lumber Your risk from these exposures varies depending upon how often you do this type of work To reduce your exposure to these chemicals Work in a well ventilated area Work with approved safety equipment such as those dust masks that are specially designed to filter microscopic particles SYMBOLS 09 Read the manual Warning Double insulation We...

Страница 10: ...ter clockwise and clockwise if belt runs inward See E Adjust the belt until the outer edge of the belt is even with the outer edge of the base plate 9 Belt life will be greatly increased by keeping the tracking adjustment set properly 7 DUST BAG You must use the dust collection bag provided to collect the dust produced during sanding The dust collection bag plastic bracket slides down onto the dus...

Страница 11: ... period of 12 months from the date of purchase We guarantee to repair or replace all defective parts free of charge repair products subject to fair wear and tear free of charge or at our discretion replace the unit free of charge to ensure minimum inconvenience to the customer Your warranty is subject to the following conditions Proof of purchase date and a valid receipt is produced The product ha...

Страница 12: ... Belt Sander Type WU661 Complies with the following Directives EC Machinery Directive 98 37 EC EC Low Voltage Directive 73 23 EEC amended by 93 68 EEC EC Electromagnetic Compatibility Directive 89 336 EEC amended by 93 68 EEC Standards conform to EN55014 1 EN55014 2 EN61000 3 2 EN61000 3 3 EN60745 1 EN60745 2 11 2006 01 01 Jacky Zhou POSITEC Quality Manager RU WU661 M 060817 indd 12 2006 8 17 16 2...

Страница 13: ...нту со следующими характеристиками 76mm x 457mm Рекомендуется приобретать все принадлежности в том же магазине где был куплен инструмент Используйте качественные принадлежности общеизвестной торговой марки Более подробные рекомендации указаны в разделе Рекомендации по использованию ленточной шлифовальной машины этой инструкции или на упаковке принадлежностей Помощь и консультацию можно также получ...

Страница 14: ...тротоком г Правильно обращайтесь с электрокабелем Никогда не используйте кабель для переноски электроинструмента а также не тяните за кабель для выключения из розетки Держите кабель на безопасном расстоянии от источников тепла масла острых кромок и движущихся частей Поврежденные или запутанные кабели повышают риск поражения электротоком д При работе с электроинструментом вне помещений используйте ...

Страница 15: ...яйте инструмент на предмет смещения или заедания движущихся частей поломки деталей или любых иных неисправностей могущих повлиять на работу электроинструмента В случае повреждения следует отремонтировать электроинструмент перед применением Многие несчастные случаи вызваны плохим уходом за электроинструментом е Режущий инструмент должен быть заточенными чистым Приподдержании режущих инструментов в ...

Страница 16: ...ьзуйте порванную или изношенную бумагу 13 Не шлифуйте материалы содержащие асбест Это опасно для Вашего здоровья 14 Не пейте и не ешьте вблизи рабочей области шлифования 15 Не допускайте посторонних в область работы без респиратора 16 Повозможности изолируйтерабочуюобласть для ограничения распространения пыли 17 Всегда надевайте респиратор 18 Эта шлифовальная машина предназначена только для сухого...

Страница 17: ...регулировка скорости также возможна на холостом ходу Смотрите ниже таблицу для общего руководства на выбору скорости Избегайте длительного использования на очень низкой скорости поскольку это может повредить двигатель шлифовальной машины Материал Положение регулятора скорости Зернистость шлифовальной ленты Твердое дерево 5 6 80 Фанера 2 4 150 ДСП 1 5 60 80 Пластик 2 5 100 Сталь 5 6 80 Удаление кра...

Страница 18: ...малый шкив вращая большой шкив по часовой стрелке и одновременно натягивая ремень на малый шкив Ремень двигателя должен быть хорошо натянут Установите кожух ремня и два винта РЕКОМЕНДАЦИИ ПО ИСПОЛЬЗОВАНИЮ ЛЕНТОЧНОЙ ШЛИФОВАЛЬНОЙ МАШИНЫ Если электроинструмент перегрелся особенно если он использовался на низкой скорости установите регулятор скорости в максимальное положении и дайте ему поработать без...

Страница 19: ...й и неправильным обращением с инструментом Гарантия не распространяется на сменные детали и расходные материалы При первых признаках неисправности электроинструмента его дальнейшая эксплуатация запрещена В таких случаях необходимо обратиться в ближайшую гарантийную мастерскую ДЕКЛАРАЦИЯ СООТВЕТСТВИЯ Мы POSITEC Power Tools Suzhou Co Ltd No 11 Yangqing Road Loufeng Area Su zhou Industrial Park Jiang...

Страница 20: ...RU WU661 M 060817 indd 20 2006 8 17 16 27 53 ...

Отзывы: