background image

8

Cordless lawn mower 

WG784E WG785E 

INTENDED USE

This product is intended for domestic lawn mowing.

ChARGER SAFETY RULES

1.  Plug charger directly into an electrical outlet. DO 

NOT ABUSE THE CORD. Never carry charger by 
cord. Do not disconnect the charger from the outlet 
or mower by pulling it by the cord.

2. 

CAuTIoN: 

To reduce the risk of fire, electrical 

shock, or personal injury do not attempt to use 

this charger with any other product.

  Likewise, do not attempt to charge the battery with 

any other charger.

3.  Do not service mower with charger or safety key 

installed.

4.  Do not operate a damaged charger. Replace 

damaged cords or charger immediately at an 
authorized WORX service center.

5.  Always charge the mower in a dry area protected 

from the weather. Do not expose the mower or 
charger to rain. Do not charge in wet locations. Do 
not charge mower when temperature is above 104°F 
(40°C) or below 41°F (5°C).

6.  Keep the mower and charger away from water, 

heat sources, (Such as radiators, heaters, stoves...
etc.) flames, or chemicals. Be careful not to damage 
the charger cord, by keeping cord away from sharp 
edges.

ChARGING PROCEDURE

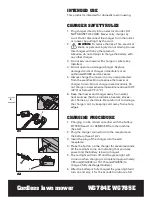
1.  Charging can be carried out either with the battery 

FITTED (See A1) or REMOVED from the machine 
(See A2).

2.  Plug the charger connector into the receptacle on 

the battery. (See A1,A2). 

3.  Insert the plug of the charger into the wall 

receptacle.

4.  Press the button  on the charger for several seconds 

till the red light come on indicating that you have 
power and the battery is being charged. 

5.  The red light will turn off and the green light will 

come on when charging is complete (approximately 
7-9hours(WG784E) or 10-12hours(WG785E) to 
charge a fully discharged battery)

6.  After the battery is fully charged the green light will 

turn on and stay it for 15 seconds to indicate a full 

13

11

A1

A2

Содержание WG784E

Страница 1: ...Cordless lawn mower WG784E WG785E SAFETY AND OPERATING MANUAL ...

Страница 2: ...see that the blades blade bolts and cutter assembly are not worn or damaged Replace worn or damaged blades and bolts in sets to preserve balance d On multi bladed machines take care as rotating one blade can cause other blades to rotate Operation a Mow only in daylight or in good artificial light b Avoid operating the equipment in wet grass where feasible c Always be sure of your footing on slopes...

Страница 3: ...s has to be connected first The other connection is to be made to the chassis remote from the battery and fuel line The battery charger is then to be connected to the supply mains 5 After charging disconnect the battery charger from the supply mains Then remove the chassis connection and then the battery connection 6 Do not charge a leaking battery 7 Do not use chargers for works other than those ...

Страница 4: ...tely stopped before touching them Beware of sharp blades Blades continue to rotate after the motor is switched off Remove plug from mains before maintenance or if cord is damaged Keep the supply flexible cord away form the blades Do not expose to rain or water Do not burn Do not dispose of batteries Return exhausted batteries to your local collection or recycling point C tick mark SYMBOLS Only use...

Страница 5: ...5 Cordless lawn mower WG784E WG785E 1 6 7 8 9 10 11 12 2 3 4 5 ...

Страница 6: ...ss collection bag 5 Work mode dial 6 Safety key 7 Upper handle 8 Lock cam lever 9 Lower handle 10 Safety flap 11 Battery pack 12 Motor cover 13 Charger see A2 14 Mulch insert see H 15 Blade bolt See P1 16 Blade see P1 Not all the accessories illustrated or described are included in standard delivery ...

Страница 7: ...del WA3720 WA3720 Charger rating Input AC 220 240V 50 60Hz Output 29 5Vdc 1 0A Input AC 220 240V 50 60Hz Output 29 5Vdc 1 0A Machine weight 20kg 23kg ACCESSORY Battery pack 1 Charger 1 Grass collection bag 1 Mulching insert 1 Lock cam lever 2 We recommend that you purchase your accessories from the same store that sold you the tool Use good quality accessories marked with a well known brand name C...

Страница 8: ... charge in wet locations Do not charge mower when temperature is above 104 F 40 C or below 41 F 5 C 6 Keep the mower and charger away from water heat sources Such as radiators heaters stoves etc flames or chemicals Be careful not to damage the charger cord by keeping cord away from sharp edges CHARGING PROCEDURE 1 Charging can be carried out either with the battery FITTED See A1 or REMOVED from th...

Страница 9: ...hs during storage For optimal battery life and performance the battery should be fully charged after each use Store the battery in a cool dry location The battery can be safely stored down to 14 F 10 C The battery does not need to be fully discharged before recharging Initially 2 to 3 charging cycles may be required after purchase to achieve maximum run time capacity ADDITIONAL BATTERIES can be ob...

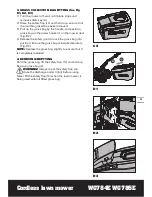
Страница 10: ...ower handle Insert the cable into the clips ensuring there is enough cable slack Fig B5 2 GRASS COLLECTION BAG ASSEMBLY Connect the grass box handle to the box top as shown in F ig C1 C4 Step 1 Press the front of the handle briefly Fig C2 Step 2 Then push it forward Fig C2 Step 3 Push down the back of the handle Fig C2 Step 4 Finally clip the plastic clips over the metal frame Fig C3 Warning Don t...

Страница 11: ...er hooks a on the mower deck Fig D2 4 Release the safety guard to lock the grass bag into position Ensure the grass bag is installed securely Fig D3 NOTE Depress the grass bag slightly to ensure that it is completely installed 4 REMOVING EMPTYING Hold the grass bag lift the safety flap 10 and hold up Remove grass bag 4 Warning Always check the safety flap can close the discharge outlet tightly bef...

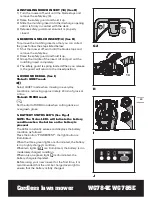
Страница 12: ... Be careful not to drop the battery onto your foot or on the ground when removing it FITTING BATTERY Put the battery into the battery container make sure the battery is fitted correctly See F2 OPERATION 1 STARTING AND STOPPING See Fig G1 G2 Warning The blade continues to rotate for a few seconds after the machine is switched off Allow the motor blade to stop rotating before switching on again Do n...

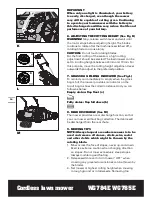
Страница 13: ...rd will return to the closed position 4 WORK MODE DIAL See I Status1 QUIET mode Select QUIET mode when mowing in everyday conditions removing approximately 20mm of grass at a time Status2 Turbo mode Set the dial toTURBO mode when cutting dense or overgrown grass 5 BATTERY STATUS LED S See Fig J NOTE The Status LED s will indicate the battery condition when the button on the battery is pressed The ...

Страница 14: ...ferred position 7 GRASS BAG FILLING INDICATOR See Fig L To remind you immediately to empty when the grass bag is full the mower provides an indicator on the top of bag to show the collection status And you can follow as below Empty status flap float a Fully status flap fall down b 8 REAR DISCHARGE See M The mower provides a rear discharge function so that you can mower without bag collection The d...

Страница 15: ... will biodegrade quickly to provide nutrients to the lawn Please review the following recommendations for optimum mulching performance 1 Avoid mowing when the grass is wet from rain or dew Wet grass may form clumps which interfere with the mulching action and reduce runtime The best time to mow grass is in the late afternoon when the grass is dry and the newly cut area will not be exposed to direc...

Страница 16: ... are all undamaged and are correctly attached to mower Carry out any necessary maintenance or repairs before operating mower If the mower should happen to fail despite regular maintenance please call our customer helpline for advice BLADE SHARPENING KEEP BLADE SHARP FOR BEST MOWER PERFORMANCE A DULL BLADE DOES NOT CUT GRASS CLEANLY OR MULCH PROPERLY WEAR PROPER EYE PROTECTION WHILE REMOVING SHARPE...

Страница 17: ...years which ever is the sooner regardless of condition Follow these procedures to remove and replace the blade You will need garden gloves not provided and a spanner wrench not provided to remove the blade Hold the blade 16 and unscrew the blade bolt 15 counter clockwise using a spanner wrench and then remove blade To re assemble position the blade 16 with the cutting edges towards the ground Then...

Страница 18: ......

Страница 19: ......

Страница 20: ...Copyright 2010 Positec All Rights Reserved ...

Отзывы: