


6
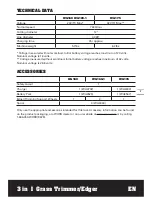
3 in 1 Grass Trimmer/Edger
EN
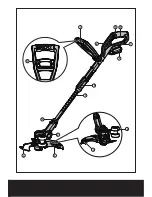
1. REaR HaNdlE
2. BaTTERy PaCk
3. TElESCoPiC SHaFT
4. PivoT HEad loCkiNG kNoB
5. SaFETy GuaRd
6. FlowER GuaRd/EdGER GuidE
7. auxiliaRy HaNdlE
8. TElESCoPiC SHaFT adjuSTmENT TRiGGER
9. loCk oFF BuTToN
10. oN/oFF SwiTCH
11. auxiliaRy HaNdlE loCkiNG lEvER
12. EdGER/TRimmiNG SuPPoRT wHEElS
13. liNE CuTTER
14. lowER SHaFT CouPliNG
15. uPPER SHaFT
16. moToR HouSiNG oF TRimmER HEad
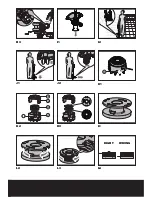
17. liNE FEEd BuTToN (See Fig. k1)
18 SPool CaP CovER (See Fig. k2)
19 CaP RElEaSE laTCH (See Fig. k2)
20. SPool (See Fig. k2)
21. CuTTiNG HEad (See Fig. k2)
22. EyElET (See Fig. k2)
Not all the accessories illustrated or described are included in standard delivery.
Содержание WG160
Страница 2: ......
Страница 3: ...4 6 7 9 10 2 1 5 8 3 14 15 13 12 11...
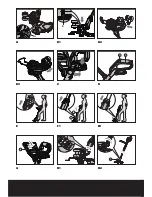
Страница 4: ...b 9 a 10 14 11 15 16 A B1 B2 B3 C D E F1 F2 G H1 H2...
Страница 5: ...22 18 19 20 21 17 RIGHT WRONG H3 I1 I2 J1 J2 K1 K2 K3 L1 L2 L3 L4...
Страница 35: ......


