Worx WG151 Скачать руководство пользователя страница 42

Battery charger 

EN

7

6

7

6

SAFETY INSTRUCTIONS

WArNINg: Some dust created by 

power sanding, sawing, grinding, 

drilling and other construction activities 

contains chemicals known to the state of 

California to cause cancer, birth defects 

or other reproductive harm. Some 

examples of these chemicals are:

• 

Lead from lead-based paints;

• 

Crystalline silica from bricks and 

cement and other masonry products 

and 

• 

Arsenic and chromium from 

chemically-treated lumber.

your risk from these exposures varies, 

depending on how often you do this type 

of work. to reduce your exposure to 

these chemical: 

• 

Work in a well ventilated area, 

• 

Work with approved safety 

equipment, such as those dust 

masks that are specially designed to 

filter out microscopic particles.

WArNINg: rEAd ANd 

uNdErStANd All INStruCtIoNS. 

Failure to follow all instructions listed 

below may result in electric shock, fire 

and / or serious personal injury.

NotE: Before using battery charger, read 

all instructions and cautionary markings 

in this manual, on battery charging 

stand, battery pack, and product using 

battery pack to prevent misuse of the 

products and possible injury or damage.

WArNINg: to reduce the risk 

of electric shock or damage to 

the battery charger and battery pack, 

charge only the specifically designated 

battery pack that was included with this 

charger. Charging other types of battery 

packs may cause them to burst, causing 

personal injury and damage.

1.  do not use the charger outdoors or 

expose to wet or damp conditions. 

Water entering charging stand will 
increase the risk of electric shock.

2.  use of an attachment with 

this battery charger that is not 

recommended may result in a risk 

of fire, electric shock, or injury to 

persons.

3.  do not abuse the cord on the battery 

charger. Never carry the charger by 

its power cord.

 Never pull the power 

cord to remove the transformer from 
the power outlet. Damage to the cord or 
charger could occur and create an electric 
shock hazard. Keep cord away from heat, 
oil, sharp edges or moving parts. Replace 
damaged cords immediately. Damaged 
cords increase the risk of electric shock.

4.  Make sure cord is located so that it 

will not be stepped on, tripped over, 

come in contact with sharp edges or 

moving parts, heat, oil, or otherwise 

subjected to damage or stress.

 This 

will reduce the risk of accidental falls, 
which could cause injury, and damage 
to the cord which could result in electric 
shock.

5.  keep cord and battery charger away 

from heat to prevent damage to 

housing or internal parts.

6.  do not let gasoline, oils, petroleum-

based products, etc. come in contact 

with plastic parts. 

They contain 

chemicals which can damage, weaken or 
destroy plastic.

7.  An extension cord should not be 

used unless absolutely necessary. 

Use of improper extension cord could 
result in a risk of fire and electric shock. 
If an extension cord must be used, make 
sure: 

a)  That pins on plug of extension cord are 

the same number, size and shape as 
those of transformer on charger, 

b)  That extension cord is properly wired and 

in good electrical condition, and

c)  That you use a proper extension cord.
 

oNly

 use cords listed by Underwriters 

Laboratories (UL) and/or Canadian 
Standard Association (CSA). Other 
extension cords can cause a drop in 
line voltage, resulting in a loss of power 
and overheating of charger. An AWG 
(American Wire Gauge) size of at least 14-

Содержание WG151

Страница 1: ...PLiNE NumBER 1 866 354 woRx 9679 HELPLiNE NumBER 2 in 1 Cordless Li ion Grass Trimmer Edger EN Taille haie tondeuse 2 en 1 sans fil Li ion F Podadora bordeadora de c sped sin cables 2 en 1 con bater a...

Страница 2: ......

Страница 3: ......

Страница 4: ...8 9 6 7 4 3 2 10 5 1...

Страница 5: ...c d 11 12 13 14 15 17 b 19 18 20 16 a F1 F2 B E G A D C H1 H2 I J K1 K2 L...

Страница 6: ...6 11 12 13 14 15 17 16 H2 I J K1 K2 L M...

Страница 7: ...7 Flower guard 8 Edger wheel 9 Line Cutter 10 Battery pack 11 Trimmer head cover See Fig K2 12 Cap release latch See Fig K2 13 Spool See Fig K2 14 Trimmer head See Fig K2 15 Eyelet See Fig K2 16 Line...

Страница 8: ...arger 1 battery pack 1 edger wheel 1 wall mounts 1 TOOL REQUIRED FOR ASSEMBLY Srewdriver 1 We recommend that you purchase your accessories from the same store that sold you the tool Use good quality a...

Страница 9: ...ged in appliance with finger on switch Be sure switch is off when plugging in 8 Don t Force Appliance It will do the job better and with less likelihood of a risk of injury at the rate for which it wa...

Страница 10: ...in a fire The cell may explode Check with local codes for possible special disposal instructions 3 Do not open or mutilate the battery ies Released electrolyte is corrosive and may cause damage to th...

Страница 11: ...ging Allow time for the battery to cool down before recharging 3 TO REMOVE OR INSTALL BATTERY PACK See Fig C Depress the battery release button to remove battery pack from your trimmer After rechargin...

Страница 12: ...t its own pace Do not force trimmer line into work area Edging See Fig J Change the tool from trimming to edging mode by putting one foot on the motor housing portion of the trimmer head 20 while grip...

Страница 13: ...Warning Take approximately 10ft 3m of line Insert 5 8 15mm of line into the spool holes and wind line in the direction of the arrows on the top of the spool YourTrimmer is designed to use only line w...

Страница 14: ...ort term Grass too high Battery defective Fully charge battery also see HOWTO CHARGEYOUR BATTERY in charger manual Cut in stages Replace the battery Machine does not cut Line broken Battery not fully...

Страница 15: ...de cordon de coupe 10 Bloc piles 11 Couvercle de la t te de coupe Voir Fig K2 12 M canisme de d verrouillage du couvercle Voir Fig K2 13 Bobine Voir Fig K2 14 T te de coupe Voir Fig K2 15 Oeillet Voir...

Страница 16: ...rde de s curit 1 Chargeur 1 Bloc piles 1 Roue de coupe bordures 1 Installation murale 1 OUTIL REQUIS POUR L ASSEMBLAGE Tournevis 1 Nous recommandons d acheter tous les accessoires dans le magasin o l...

Страница 17: ...op ration est poussi reuse 6 Utilisez le bon appareil N utilisez pas l appareil pour tout autre travail que pour celui auquel il est destin 7 vitez les d marrages non intentionnels Ne transportez pas...

Страница 18: ...te ou une explosion s applique aux produits fonctionnant avec plus d une batterie primaire rempla able 5 Evitez les d marrages accidentels N ins rez pas la batterie avec le doigt pos sur l interrupteu...

Страница 19: ...cyclage ou de collecte de votre localit RETRAIT DE LA PILE ET PR PARATION POUR LE RECYCLAGE Pour pr server les ressources naturelles veuillez recycler ou jeter les piles correctement Le produit utilis...

Страница 20: ...ot g e contre une d charge importante Lorsque la batterie est vide la machine s teint gr ce un circuit de protection La poign e de l outil s arr te de tourner Dans un environnement chaud ou apr s une...

Страница 21: ...ement dans la t te de coupe et pourraient causer de s rieuses blessures Ne jamais utiliser d autres mat riaux tels que fils ficelle ou corde parce qu ils peuvent casser durant la tonte et causer de s...

Страница 22: ...t de la bobine libres de d bris Pour remettre le couvercle pressez le fermement vers le support de la bobine Changement de la bobine du cordon de coupe Mettre le coupe herbe l arr t et retirer la batt...

Страница 23: ...s enfants Gardez les fentes de ventilation du moteur propres Gardez tous les contr les de l appareil libres de poussi re D PANNAGE Le tableau suivant d crit les v rifications et les interventions que...

Страница 24: ...rbes Voyant lumineux de la batterie ne s teignant pas Imposssible de charger la batterie Batterie mal mise Vert de gris sur les contacts batterie Batterie d fectueuse Remettre correctement la batterie...

Страница 25: ...ueda bordeadora 9 Cuchilla del hilo 10 Paquete de Baterias 11 Cubierta del cabezal de corte Ver Fig K2 12 Pestillo para extracci n de la tapa Ver Fig K2 13 Bobina Ver Fig K2 14 Cabezal de corte Ver Fi...

Страница 26: ...da protectora de seguridad 1 Cargador 1 Bater a 1 Rueda bordeadora 1 Montaje de pared 1 HERRAMIENTA NECESARIA PARA EL ARMADO Destornillador 1 Recomendamos que usted compre todos los accesorios en el m...

Страница 27: ...stente Emplee protecci n adecuada para contener el cabello largo 5 Utilice gafas de seguridad Emplee siempre m scara para la cara o m scara anti polvo en operaciones donde se emite mucho polvo 6 Utili...

Страница 28: ...correcta Si se insertan las bater as en direcci n opuesta podr a producirse una fuga o explosi n Aplicable a productos que empleen m s de una bater a principal sustituible de forma independiente 5 Evi...

Страница 29: ...ANTES DE USAR SU DESMALEZADORA INHAL MBRICA Su bater a est DESCARGADA y debe cargarla antes de usarla El cargador de bater a suministrado est dise ado para la bater a de Li Ion instalada en la herrami...

Страница 30: ...bezal de corte hacia abajo Coloque un pie sobre la carcasa del motor sostenga el mango principal y aplique la fuerza adecuada para realizar el ajuste como indica la Fig H1 Ajuste el ngulo del cabezal...

Страница 31: ...hilo Una vez que el hilo ha sido cortado a la longitud correcta el golpeteo se detendr y el motor de la bordeadora alcanzar la velocidad m xima Para abastecer mayor longitud de hilo detenga completame...

Страница 32: ...rese siempre de que el soporte est fijado con firmeza a la pared De lo contrario podr a generarse un accidente causando da os corporales serios b Almacenamiento de la bordeadora de c sped Ver Fig M Aj...

Страница 33: ...Colocaci n del conjunto de la bobina y l nea El tiempo de corte por carga de la bater a es demasiado bajo No se utiliz la bater a durante un per odo de tiempo extenso o se la carg s lo durante poco ti...

Страница 34: ...r de bater as da ado Inserte el enchufe por completo en el tomacorriente Compruebe la tensi n de la alimentaci n Haga revisar el cargador de bater as por un agente de postventa autorizado La alimentac...

Страница 35: ...35...

Страница 36: ...Designed in Italy Made in China Con u en Italie Fabriqu en Chine Dise ado en Italia Fabricado en China Copyright 2010 Positec All Rights Reserved...

Страница 37: ...Battery charger EN Chargeur F Cargador ES Pag 05 Pag 11 Pag 17 WA3728 hElPlINE NuMBEr 1 866 354 WorX 9679 hElPlINE NuMBEr...

Страница 38: ......

Страница 39: ......

Страница 40: ...4 A B 1 5 2 4 3 2 1 1 2 2...

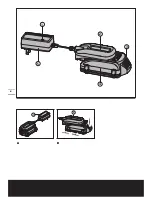
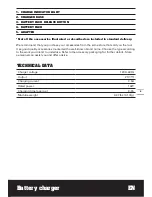
Страница 41: ...utton 4 Battery pack 5 Adapter Not all the accessories illustrated or described are included in standard delivery We recommend that you purchase your accessories from the same store that sold you the...

Страница 42: ...of an attachment with this battery charger that is not recommended may result in a risk of fire electric shock or injury to persons 3 Do not abuse the cord on the battery charger Never carry the char...

Страница 43: ...a risk of electric shock or fire 11 Disconnect battery charger from the power supply when not in use This will reduce the risk of electric shock or damage if metal items should fall into the opening i...

Страница 44: ...TENSION CORDS USE PROPER EXTENSION CORD Make sure your extension cord is in good condition When using an extension cord be sure to use one heavy enough to carry the current your product will draw An u...

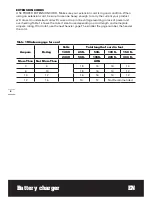
Страница 45: ...to reach full charge When charging is completed unplug the charger and remove the battery pack NOTE This charger is designed to detect some problems that can arise with battery pack see table below L...

Страница 46: ...battery packs life Additionally the battery pack should be charged at least once a year PROBLEM SOLUTION 1 I CANNOT FIT THE BATTERY INTO THE BATTERY CHARGER WHY The battery can be inserted into the c...

Страница 47: ...Les accessoires illustr s ou d crits ne sont pas tous compris dans le cadre de la livraison standard Nous vous recommandons d acheter tous vos accessoires du m me magasin qui vous a vendu l outil N u...

Страница 48: ...uer une explosion des blessures ou des d g ts mat riels 1 N utilisez pas le chargeur l ext rieur ni ne l exposez un environnement humide ou mouill Si de l eau entre dans le chargeur les risques d lect...

Страница 49: ...ait provoquer des courts circuits et des lectrocutions Faites r parer les cordons ou outils endommag s dans un centre de r paration qualifi 9 N utilisez pas le chargeur de batterie s il a re u un coup...

Страница 50: ...ssurez vous que votre cordon prolongateur est en bonne condition Lorsque vous utilisez un cordon prolongateur assurez vous d en utiliser un capable de soutenir l intensit du courant que tire votre pro...

Страница 51: ...ur et son voyant lumineux 1 s allumera en vert Mettez ensuite la base du chargeur 2 sur le bloc de batterie pour effectuer les connexions le voyant 1 deviendra rouge pour indiquer que le chargement a...

Страница 52: ...le bloc batterie n est pas utilis pendant de longues p riodes il est pr f rable de s assurer qu il est entrepos dans les conditions ad quates Faire en sorte qu il soit moiti charg ou pleine charge av...

Страница 53: ...baterias 4 Paquete de Baterias 5 Adaptador No todos los accesorios ilustrados o descritos se incluyen junto con el producto est ndar Le recomendamos que compre todos los accesorios en la tienda donde...

Страница 54: ...causa de r fagas provocando lesiones personales y da os 1 No utilice el cargador en exteriores ni lo exponga a situaciones con humedad excesiva Si penetra agua en el soporte de carga aumentar el ries...

Страница 55: ...da ado de alg n otro modo Ll velo a un centro de servicio autorizado para que puedan comprobarlo y determinar si se encuentra en buen estado de funcionamiento 10 No desmonte el cargador de bater as Ll...

Страница 56: ...Utilice cables de extensi n apropiados Cerci rese de que su cable prolongador est en buenas condiciones Aseg rese de utilizar un prolongador lo suficientemente resistente como para soportar la corrie...

Страница 57: ...la luz 1 se encender de color rojo para indicar que se inici la carga hasta que la bater a est totalmente cargada Una bater a descargada a temperatura ambiente normal demorar aproximadamente 3 5 hora...

Страница 58: ...cargada por la mitad o totalmente cargada antes de almacenarla Se deber almacenar la bater a en un rea que mantenga una temperatura de aproximadamente 65 F y 75 F 18 y 24 C La exposici n prolongada a...

Страница 59: ......
Страница 60: ...Designed in Italy Made in China Con u en Italie Fabriqu en Chine Dise ado en Italia Fabricado en China Copyright 2010 Positec All Rights Reserved...

Отзывы: