Worx WG117 Скачать руководство пользователя страница 12

13

12

2-in-1 Grass Trimmer/Edger

EN

foot and pull upward on the Telescopic shaft 
(6). Then rotate the Telescopic shaft clockwise 

90 degrees (See Fig. E3) and release; the Shaft 

will be locked in position automatically 
(see Fig. e4).

4. adJuSTING THE auxIlIaRy HaNdlE 

(See Fig. F)

1) The auxiliary handle’s bracket can be moved 
up or down on the shaft and the auxiliary 
handle itself can be moved forward or 
backward into 4 different locked positions 
(see Fig. F).
2) When the handle is in desired position, turn 
knob and tighten securely.

5. aTTaCHING ExTENSIoN CoRd

(See Fig. G)

An extension cord retainer is built into the 
Rear Handle (1) that prevents the cord from 
coming unplugged. To use this feature, simply 
double the extension cord about 8 inches 
(203mm) from the end, forming a small loop.  
Insert this loop into the slot on the back of the 
handle. Hook the end of the loop over the tab.  
Gently tug on the cord to insure that it is firmly 
retained in the trimmer’s handle. Plug the 
receptacle end of the extension cord into the 
Plug Insert (3) in the trimmer. 
 

6. adJuSTMENT oF TRIMMER HEad 

aNGlE (See Fig. H1,H2)

To adjust the trimmer head angle downwards, 
put one foot on the motor housing, then 
grip the Rear Auxiliary handles, and apply 

adequate force to adjust, as shown in Fig. H1.

To adjust the trimmer head angle upwards, 
put one foot on the safety Guard (4), then 
grip the Rear and Auxiliary handles and apply 

adequate force to adjust, as shown in Fig. H2.

7. uSING THE oN/oFF TRIGGER


Press and hold the on/off trigger to start the 
trimmer. Release to stop.

8. TRIMMING

Hold the bottom of the trimmer head just above 
the ground and at a slight angle. Allow only the 
tip of line to make contact with the grass. Let 

the trimmer line work at its own pace; do not 

force the trimmer line into the work area.

9. EdGING 

First, rotate the Rear Handle (1) 90 degree 
clockwise (see “Main Handle Rotation”, 
Fig. e3 & e4).
Adjust the trimmer head angle to be the 
lowest horizontal setting (see “Adjust the 
trimmer head angle to the lowest horizontal 
setting”, Fig. H1). Then position the edger 
Wheel (8) on the ground for edge mode 
(see Fig. I). There are two white lines, located 
on each end of the safety Guard (4), that show 
the cutting plane of the trimmer line. Align 
these marks with the edge of your lawn.

while edging, allow the tip of the line 

to make contact. do not force the line. 

The wheel helps to prevent the unit from 

touching the ground. Take extra caution 

while edging as objects can be thrown 

from the trimmer line.

10. auToMaTIC lINE FEEd SySTEM


When initially switching on the trimmer, a 
small length of line is fed out.
A ‘clattering’ noise will be heard for a short 
time. This is normal and is caused by the line 
being cut by the line cutter. Once the line is 
cut to the correct length, the ‘clattering’ noise 
will stop and the trimmer motor will run at full 
speed.
To feed more line, stop the trimmer 
completely, then restart, allowing the motor 
to reach full speed.  Repeat this until you hear 
the ‘clattering’ noise of the line cutting. (Do not 
repeat this procedure more than 6 times)

11. MaNually FEEdING THE lINE

(See Fig. J) 

Press and release the Line Feed Button (15) 

(See Fig. J) whilst gently pulling out on one of 

the lines until it has reached the line cutter.

When the required amount of line is fed out, 

gently pull on the second line (there is no need 
to press the Line Feed Button again).  If the line 
extends past the line cutter, too much line has 
been fed out.
If too much line is fed out, remove the spool 

cap and click the spool counter-clockwise until 

the line is at the desired length.

Содержание WG117

Страница 1: ...WG1 17 HElPlINE NuMBER 1 866 354 woRx 9679 HElPlINE NuMBER P06 P14 P23 2 in 1 Grass Trimmer Edger Coupe gazon Taille bordure 2 en 1 2 en 1 Cortadora de cesped Ribeteadora EN F ES...

Страница 2: ......

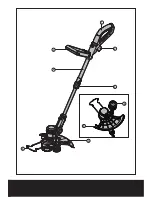
Страница 3: ...8 9 2 1 3 4 5 6 7...

Страница 4: ...a b I II A B C1 C2 D E1 E2 E3 E4 F G H1...

Страница 5: ...15 10 11 12 13 14 RIGHT WRONG H2 I J K L1 L2 L3 L4...

Страница 6: ...6 Telescopic Shaft 7 Auxiliary Handle 8 Edger Wheel 9 Line Cutter 10 Cutting Head Cover See Fig K 11 Cap Release Latch See Fig K 12 Spool See Fig K 13 Cutting Head See Fig K 14 Eyelet See Fig K 15 Lin...

Страница 7: ...meter 14 Line diameter 0 065 Line length 2x16ft Machine weight 6 2 lbs Accessories Safety guard 1 Auxiliary handle 1 Edger wheel 1 Flower guard 1 Only use the appropriate accessories intended for this...

Страница 8: ...ll outlet only one way If the plug does not fit fully into the wall outlet reverse the plug If the plug still does not fit contact a qualified electrician to install the proper wall outlet Do not chan...

Страница 9: ...ng and balance at all times o Stay alert Watch what you are doing Use common sense Do not operate appliance when you are tired p Disconnect appliance Disconnect the appliance from the power supply whe...

Страница 10: ...10 2 in 1 Grass Trimmer Edger EN 4 CULTIVATORS GRASS SHEARS a Keep hands away from blades Save these instructions SYMBOLS Edging Trimming...

Страница 11: ...ry handle to your desired working position OPERATING INSTRUCTIONS Warning The cutting head continues to rotate after the trimmer has been switched off Wait until it stops before laying the trimmer dow...

Страница 12: ...ith the grass Let the trimmer line work at its own pace do not force the trimmer line into the work area 9 EDGING First rotate the Rear Handle 1 90 degree clockwise See Main Handle Rotation Fig E3 E4...

Страница 13: ...s in the upper section of the Spool 12 See Fig L1 Wind the line in the direction of the arrows on the top of the Spool Repeat process with separate piece of line on lower section of Spool See Fig L2 L...

Страница 14: ...e s curit 8 Roue De Coupe Bordures 9 Coupeur De Cordon De Coupe 10 Couvercle De La T te De Coupe Voir Fig K 11 M canisme De D verrouillage Du Couvercle Voir Fig K 12 Bobine Voir Fig K 13 T te De Coupe...

Страница 15: ...coupe 0 065po 1 65mm Longueur des fils 2x5m 2x16ft Poids de la machine 2 8kg 6 2 lbs ACCESSOIRES Garde de s curit 1 Poign e auxiliaire 1 Roue de coupe bordures 1 Garde D Espacement 1 N utilisez que le...

Страница 16: ...la fiche ne s accouple toujours pas utilisez une rallonge lectrique polaris e Une rallonge lectrique polaris e n cessite une prise murale polaris e Cette fiche entre seulement d une seule fa on la pr...

Страница 17: ...les caract ristiques d un produit de 240Volts Figure 1 M THODE POUR S CURISER LA RALLONGE LECTRIQUE rallonge lectrique cordon lectrique de l appareil A ATTACHEZ LA RALLONGE LECTRIQUE TEL QU ILLUSTR B...

Страница 18: ...placez si endommag s Gardez les poign es s ches propres et libres d huile et de graisse s V rifier les pi ces endommag es Avant d employer l appareil une garde ou autre pi ce endommag e devrait tre so...

Страница 19: ...position de travail souhait e INSTRUCTIONS D OP RATION AVERTISSEMENT La t te coupante continue de tourner apr s avoir teint l alimentation de la tondeuse attendez que le moteur soit compl tement arr t...

Страница 20: ...z l g rement sur la rallonge pour vous assurer qu elle est fermement retenue dans la poign e de l outil Branchez la prise lectrique de la rallonge dans la fiche 3 de l outil 6 AJUSTEMENT DE LA T TE DE...

Страница 21: ...ez les d bris du couvercle de la t te de coupe et nettoyez l int rieur de la t te de coupe Appuyez fermement sur le porte bobine pour remettre le couvercle de la t te de coupe Assurez vous qu il soit...

Страница 22: ...et accessoires de rechange recommand s par les fabricants N utilisez jamais d eau ou de produits chimiques pour nettoyer votre coupe bordures Nettoyez fond avec un linge sec Rangez toujours votre cou...

Страница 23: ...6 Mango Telesc Pico 7 Mango Auxiliar 8 Rueda Bordeadora 9 Cuchilla Del Hilo 10 Cubierta Del Cabezal De Corte Ver Fig k 11 Pestillo Para Extracci N De La Tapa Ver Fig k 12 Bobina Ver Fig k 13 Cabezal D...

Страница 24: ...tud del hilo 2x16pies 2x5m Peso de la m quina 6 2 libras 2 8kg Accesorios Guarda protectora de seguridad 1 Mango auxiliar 1 Rueda bordeadora 1 Guarda espaciadora 1 S lo utilice los accesorios apropiad...

Страница 25: ...ngador polarizado El enchufe de la herramienta se inserta en el cable prolongador polarizado de un nico modo Si no encaja completamente invierta el enchufe Si a n as no se inserta adquiera un prolonga...

Страница 26: ...12 No recomendado NOTA S lo las partes aplicables de la Tabla deben ser tenidas en cuenta Por ejemplo para un producto de 120V no se necesita tener en cuenta lo especificado para 240V Figura 1 M TODO...

Страница 27: ...dadosamente antes de cualquier uso futuro de la herramienta a fin de determinar si funcionar n correctamente y realizar n la funci n prevista Compruebe que las piezas m viles se encuentren alineadas y...

Страница 28: ...la posici n de trabajo deseada FUNCIONAMIENTO ADVERTENCIA La cabeza de corte contin a girando luego de haber apagado la bordeadora Espere a que se detenga y luego suelte la herramienta Siempre use pro...

Страница 29: ...dad sostenga el mango principal y aplique la fuerza adecuada para realizar el ajuste como indica la Fig H2 7 Gatillo de encendido apagado Para poner en funcionamiento la bordeadora presione y sostenga...

Страница 30: ...cortadora est dise ada para el empleo de hilos de un di metro m ximo de 1 65mm Emplee hilo de nylon nicamente IMPORTANTE Siempre enrolle el hilo comenzando por la parte superior de la bobina 14 PARA E...

Страница 31: ......

Страница 32: ...Designed in Italy Made in China Con u en Italie Fabriqu en Chine Dise ado en Italia Fabricado en China Copyright 2012 Positec All Rights Reserved...

Отзывы: