background image

15

Cordless Lawn Mower 


EN

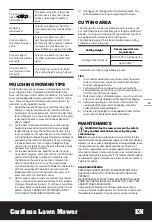
Only one green 
light ( 

 ) is 

illuminated.

The battery level of at least one 
battery pack is very low. Please 
check and charge the battery 
pack.

No light is 
illuminated.

At least one battery is not fully 
installed or battery may be defec-
tive.

Only one light is 
flashing twice per 
cycle.

At least one battery is over 
discharged (please refer to the 
battery charge condition), please 
recharge the two batteries at 
once before use again or storage.

Only one light is 
flashing three times 
per cycle.

At least one battery is hot, wait 
for them cool down before start 
again.

Only one light is 
flashing four times 
per cycle.

The machine is over load. Raise 
the cutting height or push slowly.

MULCHING MOWING TIPS

While mulching, your new mower is designed to cut the 
grass clippings into small pieces and distribute them 
back into the lawn. Under normal conditions, the mulched 
grass will biodegrade quickly and deliver nutrients to the 
lawn. Please review the following recommendations for 
optimum mulching performance.
1) 

Avoid mowing when the grass is wet from rain or dew. 
Wet grass may form clumps which interfere with the 
mulching action and reduce the runtime. The best time 
to mow the grass is in the late afternoon when the grass 
is dry and the newly cut area will not be exposed to 
direct sunlight.

2) 

For the best mulching performance, set the cutting 
height to remove about one third of the grass blade 
length, ideally no more than 40mm at one time. If the 
lawn is overgrown, it may be necessary to increase the 
cutting height to reduce the pushing effort and prevent 
overloading the motor. For extremely heavy mulching, 
it is advisable to first cut at a high cut height setting, 
and then re-cut to the final cut height. Otherwise, make 
narrower cuts and mow slowly.

3) 

For the best performance, keep the mower housing 
free of built-up grass. From time to time turn off mower 
and wait for the blades to come to a complete stop. 
Then Remove  the safety key and turn mower on its 
side. Using an object such as a stick, wipe out any 
accumulation of grass around the blade area. Be careful 
of the sharp edges of the blade. Ensure to clean the 
blade area often when cutting wet or new grass and 
every time after the machine is used.

4) 

Certain types of grass or grass conditions may require 
that an area be mulched a second time to fully disperse 
the grass throughout the lawn. If cutting a second time, 
it is advisable to cut perpendicular (across) the first cut 
pattern. DO NOT CHANGE CUT PATTERN IN ANY WAY 
THAT WOULD CAUSE MOWING DOWN A HILL.

5) 

Change your cutting pattern from week to week. This 
will help prevent matting and graining of the lawn.

CUTTING AREA

The cutting area can be affected by several factors, such 
as cutting height, lawn humidity, grass length and density. 
Besides, starting and stopping the mower too many times 
during operation will reduce the cutting area.
The table below gives the relationship between cutting 
conditions and cutting area.

Cutting Height

Recommend lot size 

(maximum)

Cutting off 8cm to 6cm

With 2*20V / 4.0Ah batteries

up to 500m

2

 *

* Used with two fully charged battery packs.

TIPS:

1) 

It is recommended to mow your lawn more frequently, 
walk at normal pace, and not to start/stop the mower 
too often during operation.

2) 

For best performance, please ensure use two fully 
charged battery packs at the same time and always cut 
off 1/3 or less of the grass height.

3) 

Walk slowly when cutting long grass, so as to have more 
effective cutting and properly discharge the clippings.

4) 

Avoid cutting wet grass, otherwise it will stick to the 
underside of the deck and the clippings cannot be 
collected or discharged properly.

5) 

A higher cutting height shall be applied to new or thick 
grass and it will extend the battery duration.

MAINTENANCE

WARNING:


Stop the mower, remove the safety 

key and batteries before removing the grass 

collection bag.
Note:

 To ensure long and reliable service, perform the fol-

lowing maintenance procedures regularly. Check for obvious 
defects such as a loose, dislodged or a damaged blade, loose 
fittings, and worn or damaged components. Check that 
the covers and guards are all undamaged and are correctly 
attached to mower. Carry out any necessary maintenance or 
repairs before operating mower.  If the mower should happen 
to fail despite regular maintenance, please call our customer 
helpline for advice.   

BLADE SHARPENING

KEEP BLADE SHARP FOR BEST MOWER PERFORMANCE. A 
DULL BLADE DOES NOT CUT GRASS CLEANLY OR MULCH 
PROPERLY.
WEAR PROPER EYE PROTECTION WHILE REMOVING, SHARP-
ENING, AND INSTALLING BLADE. ENSURE THAT SAFETY KEY 
AND BATTERIES ARE REMOVED.
Sharpening the blade twice during a mowing season is 
usually sufficient under normal circumstances. Sand causes 
the blade to dull quickly. If your lawn has sandy soil, more 

Содержание Nitro WG748E

Страница 1: ...erba senza fili Cortac sped a bater a Corta relva sem fios Snoerloze graasmaaier Ledningsfri pl neklipper Batteridrevet gressklipper Sladdl s gr sklippare Bezprzewodowa kosiarka do trawnik w Vezet kme...

Страница 2: ...l original Oorspronkelijke gebruiksaanwijzing Original brugsanvisning Original driftsinstruks Bruksanvisning i original Instrukcja oryginalna Eredeti haszn lati utas t s Instruc iuni originale P vodn...

Страница 3: ...10 11 12 9 8 7 6 1 2 3 4 5...

Страница 4: ...2 1 1 C2 C3 A1 A2 C1 B 1 2...

Страница 5: ...F2 G1 D1 D2 F1 E 1 2 1 2 13 14 100 0...

Страница 6: ...J G2 H I2 I1 1 2 7 80mm 6 70mm 5 60mm 4 50mm 3 40mm 2 30mm 1 20mm 15 K1 1 1 2...

Страница 7: ...M 1 M 2 M 3 N1 N2 K2 M L 17 18 16...

Страница 8: ...e supervised to ensure that they do not play with the appliance The appliance is only to be used with the power supply unit provided with the appliance IMPORTANT READ CAREFULLY BEFORE USE KEEP FOR FUT...

Страница 9: ...ively steep slopes h use extreme caution when reversing or pulling the lawnmower towards you i stop the blade s if the lawnmower has to be tilted for transportation when crossing surfaces other than g...

Страница 10: ...en any loose parts Maintenance and storage a keep all nuts bolts and screws tight to be sure the equipment is in safe working condition b check the grass cacher frequently for wear or deterioration c...

Страница 11: ...e battery pack terminals with a clean dry cloth if they become dirty h Battery pack needs to be charged before use Always refer to this instruction and use the correct charging procedure i Do not main...

Страница 12: ...zardous for the environment and for human health since they contain hazardous substances Waste electrical products should not be disposed of with household waste Please recycle where facilities exist...

Страница 13: ...RMATION Typical weighted vibration ah 2 5 m s2 Uncertainty K 1 5 m s2 WARNING Thevibrationemissionvalueduringactual useofthepowertoolcandifferfromthedeclared valuedependingonthewaysinwhichthetoolisuse...

Страница 14: ...details can be found in charger s manual See Fig G2 OPERATION Power indicator light See details in BATTERY STATUS part IMPORTANT When only one light is illuminated your battery is overly discharged ev...

Страница 15: ...typesofgrassorgrassconditionsmayrequire thatanareabemulchedasecondtimetofullydisperse thegrassthroughoutthelawn Ifcuttinga secondtime itisadvisabletocutperpendicular across thefirstcut pattern DONOTCH...

Страница 16: ...laceotherobjects ontopofthemachine Toaidstorage PressandholdQuick releasebutton andfold theHandlebar ENVIRONMENTAL PROTECTION Wasteelectricalproductsmustnotbedisposedof withhouseholdwaste Pleaserecycl...

Страница 17: ...Do not cut off more than 1 3 of total length B Check blade for sharpness Always keep blade sharp 10 Low or diminished run time after many uses A Return to Authorized Service location may need new bat...

Страница 18: ...benutzt zu werden es sei denn sie werden durch eine f r ihre Sicherheit zust ndige Person beaufsichtigt oder erhielten von ihr Anweisungen wie das Ger t zu benutzen ist Kinder sollten beaufsichtigt w...

Страница 19: ...tz auswechseln um Unwuchten zu vermeiden Tauschen Sie besch digte und unleserliche Etiketten aus Betrieb a Nur bei Tageslicht oder gutem k nstlichen Licht m hen b Nach M glichkeit nicht in nassem Gras...

Страница 20: ...g entfernt worden ist und die Klingen vollst ndig zum Stillstand gekommen sind o Starten Sie den Rasenm her nicht wenn Sie vor der Auslass ffnung stehen p Transportieren Sie den Rasenm her nicht wenn...

Страница 21: ...n dass sich die Klingen noch immer bewegen lassen auch wenn die Stromquelle schon ausgeschaltet ist SICHERHEIT HINWEISE F R AKKUPACK a Zellen bzw Akkupack nicht zerlegen ffnen oder zerdr cken b Akkupa...

Страница 22: ...fladen lassen j Nach l ngerer Lagerung des Ger tes ist es eventuell notwendig die Zellen oder das Akkupack mehrere Male aufzuladen und zu entladen um eine optimale Leistung zu erhalten k Nur mit dem v...

Страница 23: ...dem normalen Haushaltsm ll entsorgt werden sondern sollten nach M glichkeit zu einer Recyclingstelle gebracht werden Ihre zust ndigen Beh rden oder Ihr Fachh ndler geben Ihnen hierzu gerne Auskunft Sc...

Страница 24: ...2 Unsicherheit K 1 5 m s2 WARNUNG DerVibrationsemissionswertkann w hrenddestats chlichenGebrauchsdes ElektrowerkzeugsvomangegebenenWertabweichen je nachdem wiedasWerkzeuggem folgendenBeispielen undwei...

Страница 25: ...wird ungeladen geliefert Der Akku muss vor der ersten Nutzung vollst ndig geladen werden Laden Sie die beiden Akkus stets gleichzeitig auf Weitere Details finden Sie im Handbuch des Ladeger ts Siehe...

Страница 26: ...chnitth hezu schneiden OderSiek nnenengereSchnittemachen undlangsamm hen 3 F reineoptimale LeistungsolltenSie das Geh use desRasenm hers freivonangesammeltem Gras halten StellenSie manchmaldenRasenm h...

Страница 27: ...omZustand Ihreklinge sobald Sie50StundenmitIhrgem hthabenodersp testensnach 2Jahren Jenachdem wasfr hereintritt FolgenSiediesenArbeitss chritten umIhreKlingeherauszunehmenundzuersetzen Siebrauchendaf...

Страница 28: ...eitsschl ssel und die Batterien Kippen Sie den Rasenm her auf die Seite und berpr fen Sie ob das Messer verbogen oder besch digt ist Ersetzen Sie ein besch digtes Messer ggf durch ein Ersatzmesser von...

Страница 29: ...dem Ladeger t und lassen Sie diesen auf 42 C oder weniger abk hlen KONFORMIT TSERKL RUNG Wir Positec Germany GmbH Postfach 32 02 16 50796 Cologne Germany Erkl ren im Namen von Positec dass das Produk...

Страница 30: ...que l op rateur ou l utilisateur est responsable des accidents et des dangers survenant d autres personnes ou leurs biens Pr paration a Porter toujours des chaussures de s curit et des pantalons long...

Страница 31: ...i est absolument n cessaire et soulevez uniquement la partie distante de l utilisateur m Ne pas mettre les mains ou les pieds pr s ou sous les pi ces en mouvement Pour les faucheuses rotatives conserv...

Страница 32: ...a source d alimentation est coup e les lames peuvent encore tre d plac es MISES EN GARDE CONCERNANT LA BATTERIE a La batterie et les piles secondaires ne doivent pas tre ouvertes d mont es ou broy es...

Страница 33: ...re n cessaire de charger et d charger la batterie et les piles plusieurs reprises avant que celles ci ne retrouvent leur capacit maximale k N utilisez pas d autre chargeur que celui sp cifi par WorxNI...

Страница 34: ...locales ou votre revendeur pour obtenir des renseignements sur l organisation de la collecte Portez des gants de protection Retirez la batterie de la prise avant de proc der tout ajustement r vision o...

Страница 35: ...outil lectrique peut diff rerdelavaleur d clar e selonlamani re dont l outilest utilis selonlesexemplessuivantsetd autresvariationssur lamani redontl outilestutilis Commentl outil est utilis et quels...

Страница 36: ...compl tement charg e avant la premi re tonte Rechargez toujours compl tement les deux batteries en m me temps Pour plus d informations reportez vous au manuel du chargeur Voir Fig G2 FONCTIONNEMENT Vo...

Страница 37: ...erensuite lataillefinale Autrement fairedescoupesplus troitesettondre lentement 3 Pourunmeilleurfonctionnement maintenezla tondeuseexempted accumulationd herbe Arr tezde tempsentempslatondeuseetattend...

Страница 38: ...placezvotrelameenapr s50heuresdetonteoutous les2ans selonlaconditionquiser aliseleplust t Suivezcesproc durespourretireretremplacerlalame Vous avezbesoindegantsdejardin nonfournis etd unecl fourche no...

Страница 39: ...les batteries Faites pivoter la lame de 180 degr s puis r installez la Si la tondeuse vibre toujours confiez la un Centre de r paration agr 6 Le voyant du chargeur de batterie ne s allume pas A V rif...

Страница 40: ...ATTENZIONE assolutamente necessario leggere attentamente tutte le istruzioni Eventuali errori nell adempimento delle istruzioni qui di seguito riportate potranno causare scosse elettriche incendi e o...

Страница 41: ...ente sono responsabili di incidenti o rischi che dovessero verificarsi ai danni di terzi o delle propriet Operazioni preliminari a Durante il lavoro indossare sempre calzature robuste e pantaloni lung...

Страница 42: ...il motore attenendosi alle istruzioni e mantenendo i piedi a distanza di sicurezza dagli attrezzi da taglio l Avviando il motore evitare di ribaltare lateralmente il tosaerba Tuttavia qualora ci fosse...

Страница 43: ...curezza sostituire le parti usurate o danneggiate Utilizzare solo accessori e parti di ricambio originali d Prestare attenzione durante la regolazione della macchina per impedire che le dita rimangano...

Страница 44: ...ricato prima dell uso Utilizzare sempre il caricatore corretto e consultare le istruzioni i Non lasciare un pacco batteria in carica se non in uso j Dopo lunghi periodi di conservazione potrebbe esser...

Страница 45: ...e I prodotti elettrici non possono essere gettati tra i rifiuti domestici L apparecchio da rottamare deve essere portato al centro di riciclaggio per un corretto trattamento Controllare con le autorit...

Страница 46: ...91 6 dB A KwA 3 0 dB A Indossare protezione per le orecchie INFORMAZIONISULLA VIBRAZIONE Vibrazione ponderata tipica ah 2 5 m s2 Incertezza K 1 5 m s2 AVVERTENZA Ilvaloredellevibrazioniemesse durantei...

Страница 47: ...dicatore luminoso Vedi Fig G1 Caricamento del pacco batteria NOTA il pacco batteria viene spedito scarico La batteria deve essere completamente carica prima del primo taglio Caricare sempre completame...

Страница 48: ...asiaccumuli nell alloggiamento Ditantointantospegnere iltagliaerbaedattenderechelalamasiarresti completamente Quinditoglierelachiavettadi sicurezzaecapovolgereiltagliaerba Aiutandosicon unbastoncino e...

Страница 49: ...amaruotandoloinsensoantiorarioconlachiave poi rimuoverelalama Perrimontare metterelalamaconillatoaffilatoversoil basso Serrarebeneildadodellalama IMMAGAZZINAMENTO VediFig K1 K2 Arrestareiltosaerbaerim...

Страница 50: ...matura quando si usa il sacco B Condotto intasato Rilasciare il pulsante di sicurezza per spegnere il tosaerba Rimuovere la chiave di sicurezza e le batterie Eliminare lo sfalcio dal condotto C Troppa...

Страница 51: ...sultas Este aparato no ha sido dise ado para su uso por personas incluyendo ni os con capacidades f sicas sensoriales o mentales reducidas o falta de experiencia y conocimientos a menos que lo hagan b...

Страница 52: ...eparaci n a Siempre use calzado resistente y pantalones largos cuando efect e el corte de c sped No utilice la herramienta cuando est descalzo o use sandalias b Inspeccione bien toda la zona en la que...

Страница 53: ...ejados de la s cuchilla s l No incline la herramienta para encender el motor a menos que la misma requiera de ello para arrancar En este caso no la incline m s de lo absolutamente necesario y levante...

Страница 54: ...ice solamente partes sustituibles y accesorios genuinos d Tenga cuidado durante el ajuste de la m quina para evitar que sus dedos queden atrapados entre las cuchillas m viles y las partes fijas de la...

Страница 55: ...lique el procedimiento de carga adecuado i No deje la bater a carg ndose durante prolongados per odos de tiempo cuando no se utilice j Despu s de prolongados per odos de almacenamiento puede que sea n...

Страница 56: ...enen sustancias peligrosas y pueden ser perjudiciales para el medioambiente y para la salud de las personas Los residuos de aparatos el ctricos y electr nicos no deben depositarse en la basura dom sti...

Страница 57: ...de ayudar y aconsejar INFORMACI NSOBREELRUIDO Nivel de presi n ac stica de ponderaci n LpA 78 4 dB A KpA 3 0 dB A Nivel de potencia ac stica de ponderaci n LwA 91 6 dB A KwA 3 0 dB A Utilice protecci...

Страница 58: ...F1 F2 Comprobaci n del nivel de carga de la bater a NOTA La Fig G1 solo es aplicable a la bater a con indicador de la bater a V ase la fig G1 Cargar la bater a NOTA la bater a se entrega descargada y...

Страница 59: ...ecortefinal Sinolohaceas haga cortesm sestrechosycorteelc spedlentamente 3 Paraconseguirelmejorrendimiento mantenga elcompartimientodecortac spedlibredehierba acumulada Apagueelcortac spedcadaciertoti...

Страница 60: ...chillahacialaizquierdautilizandounallave yextraigalacuchillaacontinuaci n Para volvera montarla coloquelacuchillaconlosbordes cortantes orientadoshaciaelsuelo Aprieteentoncesfirme mentelatuercadelacuc...

Страница 61: ...iento para apagar la segadora Retirar la llave de seguridad y las bater as Gire la cuchilla 180 grados y vuelva a colocarla Si el cortac sped sigue vibrando env elo a un centro de mantenimiento autori...

Страница 62: ...ach 32 02 16 50796 Cologne Germany En nombre de Positec declaran que el producto Descripci n Cortac sped sin cables WorxNITRO Modelo WG748E WG748E X 7 denominaciones de maquinaria representantes de Co...

Страница 63: ...de perigo que afectem outras pessoas ou os bens destas Prepara o a Ao cortar a relva use sempre cal ado forte e cal as compridas N o utilize este equipamento descal o ou com cal ado aberto b Inspecci...

Страница 64: ...m falta como por exemplo se os deflectores e ou os apanha relva n o estiverem colocados no devido lugar k Ligue o motor seguindo as instru es e com os p s afastados das l minas l N o incline o equipam...

Страница 65: ...e parafusos apertados para ter a certeza de que o equipamento est em condi es de ser utilizado de forma segura b Verifique regularmente o apanha relva para ver se este est desgastado ou apresenta algu...

Страница 66: ...uantidades abundantes de gua e procure aconselhamento m dico f Mantenha a bateria limpa e seca g Limpe os terminais da bateria com um pano limpo e seco em caso de sujidade h A bateria necessita de ser...

Страница 67: ...ionado com a recolha separada de todos os conjuntos de baterias e o conjunto de bateria Ser reciclada ou desmantelada para reduzir o impacto no meio ambiente Os conjuntos de baterias podem ser perigos...

Страница 68: ...Recomendamos lhe que compre todos os acess rios no fornecedor onde tenha adquirido a ferramenta Escolha o grau de acordo com o trabalho que pretende empreender Para mais pormenores consulte a embalag...

Страница 69: ...chave de seguran a antes de instalar o m dulo da bateria NOTA Esta m quina s funciona quando as baterias separadas estiverem instaladas Recomenda se que use baterias com o mesmo valor de AH e que carr...

Страница 70: ...stivermolhada dachuvaoudevido quedadeorvalho Arelva molhadapodecolar seuma outraeinterferircom aopera odemulchingreduzindotamb motempo defuncionamentodocorta relva Amelhoralturapara cortarrelva aofimd...

Страница 71: ...a 2 Afieal minamantendoo ngulodecorteoriginal 3 Afieasarestasdecortedeambososladosdal minae sempreemquantidadesiguaisdeambososlados NOTA 1 Certifique sedequeocortadorderelvaest desligado Removaachavee...

Страница 72: ...relva Verifique se todas as rodas giram livremente 5 O cortador emite ru do e vibra o anormais A Liberte a al a de opera o para desligar o cortador de relva Remova a chave de seguran a e as baterias...

Страница 73: ...bH Postfach 32 02 16 50796 Cologne Germany Em nome da Positec declara que o produto Descri o Corta relva sem fios da WorxNITRO Tipo WG748E WG748E X 7 designa o de aparelho mec nico representativo de C...

Страница 74: ...voor ongevallen en schade die ontstaan met andere personen en hun eigendommen Voorbereiding a Draag bij het maaien altijd stevige schoenen en een lange broek Gebruik dit apparaat niet wanneer u op blo...

Страница 75: ...Kantel het apparaat nooit bij het inschakelen van de motor behalve wanneer het apparaat gekanteld moet worden om gestart te worden Kantel het apparaat in dat geval niet meer dan absoluut noodzakelijk...

Страница 76: ...accessoires d Wees voorzichtig bij het instellen van de machine zodat er geen vingers bekneld raken tussen de bewegende onderdelen en de vaste delen van de machine e Laat de grasmaaier volledig afkoel...

Страница 77: ...iste laadinstructies i Laat accupacks niet langdurig opladen als ze niet worden gebruikt j Na een lange opslagperiode kan het nodig zijn het accupack enkele keren op te laden en te ontladen voor een o...

Страница 78: ...en gevaarlijk zijn voor het milieu en de menselijke gezondheid omdat ze gevaarlijke stoffen bevatten Afgedankte elektrische producten mogen niet bij het normale huisafval terechtkomen Breng deze produ...

Страница 79: ...WAARSCHUWING De trillingsemissiewaarde tijdens het feitelijke gebruik van dit elektrisch gereedschap kan afwijken van de opgegeven waarde afhankelijk van de wijze waarop het gereedschap wordt gebruik...

Страница 80: ...n het accupack OPMERKING Fig G1 is alleen geschikt voor het accupack met indicatielampje voor de accu Zie Fig G1 Laden van het accupack OPMERKING het accupack wordt onopgeladen geleverd Voor de eerste...

Страница 81: ...eerdemaaierop zijnkant Ukuntnumeteenstokalhetopgehooptegras weghalen Pasopvoordescherpekantenvanhetmes Maakdemaaiervaakschooninvochtiglentegrasen bovendiensteedsnaiedergebruik 4 Bijsommigegrassoortene...

Страница 82: ...idssleutelen batterijen Maakdebuitenkantvandemachinegoedschoon metbehulpvaneenzachteborsteleneendoek Gebruik geenwater oplosmiddelenofpoetsmiddelen Verwijderal hetgrasenandereresten metnameuitdeventil...

Страница 83: ...Verwijder de mulchplaat als u hem inpakt B De grasopvang zit verstopt Laat de bedieningsbeugel los om de maaier uit te schakelen Verwijder de veiligheidssleutel en de batterijen Haal het gemaaide gras...

Страница 84: ...remtidig reference Dette redskab m ikke bruges af personer herunder b rn med nedsatte fysiske sensoriske eller mentale evner eller med manglende erfaring og viden medmindre brugen foreg r under opsyn...

Страница 85: ...det eller b rer bne sandaler b Gennemf r en grundig inspektion af det omr de hvor maskinen skal anvendes og fjern alle sten pinde tr d ben og andre fremmedlegemer c F r brug skal du altid udf re en vi...

Страница 86: ...dder under de bev gelige dele For rotorpl neklippere skal du altid holde dig fra udkastnings bningen n R r ikke ved kniven f r afmonteringsmekanismen er fjernet Og kniven st r fuldst ndigt stille o T...

Страница 87: ...sluttes Batteris t m ikke opbevares lemf ldigt i en kasse eller skuffe hvor de kan kortslutte hinanden eller kortsluttes af ledende genstande N r batteris ttet ikke er i brug skal det holdes v k fra a...

Страница 88: ...nes fra udstyret n r det ikke er i brug p Bortskaffes p en milj rigtig m de q Bland ikke batterier af forskellig fremstilling kapacitet st rrelse eller type i enheden r Hold batteriet v k fra mikrob l...

Страница 89: ...FIG N1 17 BLAD SE FIG N1 18 DELER SE FIG N1 Illustreret eller beskrevet tilbeh r er kun delvis indeholdt i leverancen TEKNISK DATA Type WG74XE WG748E X 7 udpegning af maski ner repr sentant for ledni...

Страница 90: ...redage BETJENINGSVEJLEDNING NOTER F rdubrugerdettev rkt j l s instruktionsbogenomhyggeligt BEREGNET ANVENDELSE Detteprodukterberegnettilprivatpl neklipning SAMLING BETJENING HANDLING BILLEDE MONTERING...

Страница 91: ...nen er overbelastet H v klippeh jden eller skub langsomt TIPS OM GR SKLIPNING MED BIOKLIP N r der anvendes bioklip er den nye pl neklipper beregnet til at klippe gr safsklippet i sm stumper og fordele...

Страница 92: ...pl nenersandetibunden kandetv ren dvendigtatslibe knivenoftere UDSKIFTSTRAKSBUGGEDEELLERBESKADIGEDEKNIVE N RKNIVESSLIBES SeL 1 S rgfor atknivenforbliveribalance 2 Slibknivenidenoprindeligesk revinkel...

Страница 93: ...For g klippeh jde for at reducere maskinens tr k i gr sset Kontroller at alle hjul drejer frit 5 Pl neklipperen st jer unormalt meget og vibrerer A Frig r betjeningsb jlen for at slukke for pl neklipp...

Страница 94: ...toriseret til at udarbejde den tekniske fil Navn MarcelFilz Adresse Positec Germany GmbH Postfach 32 02 16 50796 Cologne Germany 2021 10 11 AllenDing Vicechef Ingeni r Test Certificering PositecTechno...

Страница 95: ...g fjern alle steiner grener bein og andre fremmedlegemer c F r bruk m du alltid unders ke maskinen for se om skj rekniven knivboltene og skj remonteringen ikke er slitt eller skadet Bytt slitte eller...

Страница 96: ...en p Ikke transporter gressklipperen n r str mmen er p q Stopp gressklipperen og fjern deaktiveringsenheten Forsikre deg om at alle bevegelige deler har stoppet helt opp Alltid n r maskinen blir forla...

Страница 97: ...slutning av batteriet kan for rsake skader eller brann c Ikke utsett celler eller batteripakke for varme eller ild Unng oppbevaring i direkte sollys d Ikke utsett celler eller batteripakke for mekanis...

Страница 98: ...s riktig kan batteriet komme inn i vannsyklusen noe som kan for rsake skade p kosystemet Ikke kast brukte batterier som usortert kommunalt avfall Ikke brenn Litium ion batteri Dette produktet er merke...

Страница 99: ...n belastning Batterispenningen n r maksimum 20 V ved oppstart Merkespenningen er 18 V Kategori Type Kapasitet 20V Batteri WA3014 4 0 Ah 20V Lader WA3883 4 0 A Vi anbefaler at du kj per alt ekstrautsty...

Страница 100: ...ugg Se figur E Tilpassing fjerning av batteriet Sett inn sikkerhetsn kkelen f r du installerer batteripakken MERK Denne maskinen vil bare kj re n r det er installert sp batterier Det anbefales bruke d...

Страница 101: ...enskru avgressklipperog venttilknivenharfullstendigstoppet Deretterfrigj r sikkerhetsn kkeloglegggressklipperoverp enside Vedbrukavengjenstandsomforeksempelenpinne skraputeventuellegressoppsamlingerik...

Страница 102: ...finnesgresssomerpressetsammeniknivomr detb rdu fjernedetmedetredskapavtreellerplast Oppbevarmaskinenp ett rtsted Ikkesettandretingopp maskinen Forenklerelagring trykkogholdinnehurtigutl serknappen ogf...

Страница 103: ...klippes for mye gress Hev hjulenes klippeh yde for klippe mindre gress Ikke klipp mer enn 1 3 av total lengde B Sjekk om bladet er skarpt Bladet m alltid holdes skarpt 10 Liten eller redusert kj retid...

Страница 104: ...eras s kerhet Barn b r vervakas s att de inte leker med apparaten Apparaten b r endast anv ndas med den str mf rs rjningsenhet den har f rsetts med VIKTIGT L S IGENOM NOGA F RE ANV NDNING SPARA F R KO...

Страница 105: ...rsiktig n r du backar eller drar apparaten mot dig i Stoppa bladen om apparaten ska lutas f r transport n r andra ytor n gr s korsas och n r apparaten transporteras fr n ett omr de till ett annat som...

Страница 106: ...tt apparaten r s ker att arbeta med b Kontrollera gr suppsamlaren regelbundet f r slitage eller f rslitning c Byt ut slitna eller skadade delar av s kerhetssk l Anv nd endast originalreservdelar och t...

Страница 107: ...ladda batteriet korrekt i L t inte batteriet st p laddning n r det inte anv nds j Efter l ng tids anv ndning kan det bli n dv ndigt att ladda och ladda ur batterieet m nga g nger f r att n maximal pre...

Страница 108: ...lokala myndigheter eller terf rs ljare f r tervinningsr d Anv nd skyddshandskar Avl gsna batteriet fr n hylsan innan justeringar service eller underh ll utf rs Avl gsna nyckeln Bladet forts tter att...

Страница 109: ...ochibraskick Beroendep hurtajt tdragethandtaget rochomn gra antivibrationstillbeh ranv nds Verktygetanv ndssomavsett enligtkonstruktionenochde h rinstruktionerna Dettaverktygkanorsakahand arm vibratio...

Страница 110: ...och v nta tills motorn stannar innan du justerar h jden Bladen forts tter att rotera efter att motorn st ngts av ett roterande blad kan orsaka skador Vidr r inte roterande blad Se Fig J F rvaring Se F...

Страница 111: ...med 1 3ellermindre 3 G l ngsammaren rduklipperl ngtgr sf rattf effektivareklippning 4 Undvikattklippav ttgr sd dettafastnarp undersidan vilketledertillminskadeffektivitet 5 Enh greklipph jdb ranv ndas...

Страница 112: ...tterietfulladdat Kopplain laddarenochv ntap attengr n lampat nds B Sl pp driftsreglaget f r att st nga av gr sklipparen Ta bort s kerhetsnyckeln och batterierna V ndp gr sklipparenochkontrollera f lja...

Страница 113: ...erladdas efter kontinuerlig anv ndning Ta ut batteriet ur laddaren och l t det svalna till 42 C eller l gre DEKLARATION OM VERENSST MMELSE Vi Positec Germany GmbH Postfach 32 02 16 50796 Cologne Germa...

Страница 114: ...obnych urz dze c Zaprzesta u ytkowania maszyny gdy w pobli u znajduj si ludzie w szczeg lno ci dzieci lub zwierz ta domowe d Zapami taj e operator lub u ytkownik jest odpowiedzialny za wypadki lub zag...

Страница 115: ...b przekroczenia pod o a innego ni trawa a tak e podczas transportu kosiarki do miejsca pracy nale y wy czy urz dzenie j Nie wolno u ywa urz dzenia z uszkodzonymi os onami lub bez firmowych zabezpiecze...

Страница 116: ...y nie ma uszkodze wymie lub napraw wszelkie uszkodzone cz ci sprawd i dokr wszelkie poluzowane cz ci Konserwacja i przechowywanie a Aby zachowa dobry stan techniczny kosiarki i zapewni bezpiecze stwo...

Страница 117: ...gniw lub modu u akumulatora na dzia anie ciep a lub ognia Unikaj sk adowania w miejscach pod bezpo rednim dzia aniem wiat a s onecznego d Nie nara aj ogniw lub modu u akumulatora na uderzenia mechanic...

Страница 118: ...wymiar w r Akumulatora nie nale y zbli a do r de promieniowania mikrofalowego ani nara a na wysokie ci nienie SYMBOLE Przed rozpocz ciem u ywania tej maszyny nale y przeczyta instrukcje obs ugi Nale y...

Страница 119: ...EZPIECZE STWA 10 PRZYCISK ODCI CIA ZASILANIA 11 PRZYCISK SZYBKIEGO MOCOWANIA 12 ZA LEPKA DO MULCHOWANIA 13 AKUMULATOR PATRZ RYS F2 14 KLUCZ BEZPIECZE STWA PATRZ RYS F2 15 WSKA NIK NA ADOWANIA AKUMULAT...

Страница 120: ...STRZE ENIE W szczeg lno ci oszacowanie poziomu ekspozycji w rzeczywistych warunkach u ywania powinno bra tak e pod uwag wszystkie elementy cyklu dzia ania takie jak czasy wy czenia narz dzia i czas be...

Страница 121: ...wolni pa k oraz poczeka do ca kowitego zatrzymania silnika No e kontynuuj obracanie po wy czeniu urz dzenia obracaj ce si ostrze mo e spowodowa obra enia Nie wolno dotyka obracaj cych si ostrzy Patrz...

Страница 122: ...rymi s wysoko koszenia wilgotno trawnika d ugo d b a trawy oraz g sto trawy Cz ste uruchamianie i wy czenia kosiarki podczas koszenia trawnika ma r wnie wpy w na zmiejszenie wielko ci skoszonej powier...

Страница 123: ...w i zanieczyszczenia szczeg lnie ze szczelin wentyl acyjnych Przekr maszyn na bok i oczy obszar no a Je li w okolicy no a zbior si zbite cz stki trawy usu je drewnianym lub plastykowym narz dziem Masz...

Страница 124: ...duje wy czenie kosiarki Wyj klucz zabezpieczaj cy i akumulatory nast pnie zdemontowa n Obr ci ostrze o 180 stopni i za o y je na miejsce Je li kosiarka nadal drga przekaza kosiark do autoryzowanego ce...

Страница 125: ...EC Procedura oceny zgodno ci zgodna z Aneksem VI Dyrektywy Moc d wi ku 91 6 dB A Deklarowana gwarantowana moc d wi ku 94 dB A Dane jednostki notyfikowanej Nazwa Intertek Deutschland GmbH jednostka not...

Страница 126: ...126 GR a b c d a b c a...

Страница 127: ...127 GR b c d e f g h i j k l m n o p...

Страница 128: ...128 GR q a b c d e f...

Страница 129: ...129 GR a b c d e f g h...

Страница 130: ...130 GR i j k WorxNITRO l m n o p q r...

Страница 131: ...131 GR _ _ 1 2 3 4 5 6 7 8 9 10 11 12 13 F2 14 F2 15 H 16 N1 17 N1 18 N1 WG748E WG748E X 7 WG748E WG748E X...

Страница 132: ...0 min 48 cm 46 cm 200 mm 230 mm 20 80 mm 7 55 L 25 3 kg X 1 999 A Z M1 M9 20 volt 18 volt 20V WA3014 4 0 Ah 20V WA3883 4 0 A LpA 78 4 dB A KpA 3 0 dB A LwA 91 6 dB A KwA 3 0 dB A ah 2 5 m s2 K 1 5 m s...

Страница 133: ...133 GR A1 A2 B C1 C2 C3 D1 D2 E AH AH F1 F2 G1 G1 G2 H I1 I2 J K1 K2 H 2 AH...

Страница 134: ...134 GR 1 2 40 mm 3 4 5 8 6 2 20V 4 0Ah 500m2 1 2 1 3 3 4 5...

Страница 135: ...135 GR L 1 2 3 1 2 M M 1 M 2 M 3 N1 N2 50 2 16 K1 K2 1 A C...

Страница 136: ...136 GR 2 C D 3 C 4 5 180 6 LED 7 LED 8 C D 9 1 3...

Страница 137: ...t illetve tapasztalatlan vagy a k sz l ket nem ismer szem lyek kiv ve ha a biztons guk rt felel s szem ly fel gyelete mellett teszik vagy ha a biztons guk rt felel s szem ly utas t sokat 10 11 LED 42...

Страница 138: ...zelben emberek k l n sen gyermekek vagy llatok vannak d ne feledje hogy a k sz l k zemeltet je vagy haszn l ja felel a m sokat rt balesetek vagy az ket rt k rok miatt El k sz t s a F ny r shoz mindig...

Страница 139: ...va ind tsa el l ne d ntse meg a f ny r t a motor elind t sa k zben kiv ve ha a f ny r t az ind t shoz meg kell d nteni Ebben az esetben csak annyira d ntse meg amennyire mindenk ppen sz ks ges s csak...

Страница 140: ...r gz tett r szek k z e T rol s el tt mindig v rja meg hogy a f ny r leh lj n f A k sek kezel sekor vagy cser jekor tartsa szem el tt hogy a k sek akkor is mozgathat k ha a k sz l k nincs ram alatt AZ...

Страница 141: ...j Hosszan tart t rol st k vet en a maxim lis teljes tm ny el r se rdek ben sz ks ges lehet hogy az akkumul tort t bbsz r felt ltse s lemer tse k Csak a WorxNITRO ltal javasolt t lt vel t ltse fel Kiz...

Страница 142: ...nem dobhat k ki a h ztart si hullad kkal Ha van a k zelben elektromos hullad k gy jt udvar vigye oda a k sz l ket Az jrahasznos t si lehet s gekr l t j koz djon a helyi hat s gokn l vagy a keresked n...

Страница 143: ...g en hogy a szersz mot hogyan haszn lj k Az rt k f gghet az al bbiakt l Hogyan haszn lj k a szersz mot milyen anyagokat v gnak vagy f rnak Az eszk z j llapotban van e megfelel en karbantartj k e Megfe...

Страница 144: ...t ltse fel Tov bbi r szletek a t lt haszn lati tmutat j ban L sd a G2 br t M K D S Akkut lt tts gi llapotjelz af ny r n L sdar szleteketazAKKU LLAPOTA c m fejezetben FONTOS Hacsakegyjelz f nyvil g t a...

Страница 145: ...r r l a f marad kot Id nk nt kapcsolja ki a f ny r t s v rja meg am g a k s forg sa teljesen le nem ll Ezt k vet en h zza ki a biztons gi kulcsot s ford tsa az oldal ra a f ny r t Megfelel seg deszk...

Страница 146: ...a k st A k s elt vol t s hoz s cser j hez k vesse az al bbi l p seket A k sek elt vol t s hoz kerti keszty re s csavarkulcsra van sz ks g nem tartoz kok Gy z dj n meg arr l hogy a biztons gi kulcs s...

Страница 147: ...r t az oldal ra s ellen rizze nem g rb lt e el vagy nem s r lt e meg a k s Ha a k s s r lt cser lje ki k sre Ha a k sh z alja s r lt juttassa el a f ny r t egy m rkaszervizbe B Ha a k sen nincs l tha...

Страница 148: ...sitec Germany GmbH Postfach 32 02 16 50796 Cologne Germany A Positec nev ben kijelenti hogy a term k Le r s WorxNITRO Akkumul toros f ny r T pus WG748E WG748E X 7 a k sz l k jel l se akkumul torral m...

Страница 149: ...pii sau animale de companie d Re ine i c operatorul sau utilizatorul este responsabil pentru accidentele sau pericolele care implic alte persoane sau proprietatea acestora Preg tirea a n timp ce tunde...

Страница 150: ...le de siguran de exemplu deflectoare i sau separatoare de iarb k Porni i cu aten ie motorul conform instruc iunilor cu picioarele la distan de lam l Nu nclina i ma ina de tuns iarba c nd porni i motor...

Страница 151: ...t ca separatorul de iarb s nu fie uzat sau deteriorat c Pentru siguran nlocui i componentele defecte sau uzate Utiliza i doar piese de schimb i accesorii originale d Ave i grij n timpul regl rii ma in...

Страница 152: ...h Acumulatorul trebuie nc rcat nainte de utilizare Consulta i ntotdeauna aceste instruc iuni i utiliza i procedura de nc rcare corect i Nu l sa i acumulatorul la nc rcat dac nu l utiliza i j Dup perio...

Страница 153: ...actul asupra mediului Blocurile de baterii pot fi periculoase pentru mediu i s n tatea uman pentru c ele con in substan e periculoase Produsele electrice nu trebuie depuse la de euri mpreun cu gunoiul...

Страница 154: ...magazin v poate oferi asisten i sfaturi INFORMA II PRIVIND ZGOMOTUL Presiune sonor ponderat A LpA 78 4dB A KpA 3 0 dB A Putere sonor ponderat A LwA 91 6 dB A KwA 3 0 dB A Purta i echipament de protec...

Страница 155: ...utilizat f r sacul de colectare a ierbii Consulta i fig D1 D2 Instalarea fi ei de mulcire Consulta i fig E Fixarea ndep rtarea acumulatorului Introduce i cheia de siguran nainte de a instala acumulat...

Страница 156: ...i ma ina mai ncet SFATURI PENTRU ACOPERIREA CU STRAT PROTECTOR n timp ce acoperi i cu strat protector ma ina de cosit este proiectat s taie iarba tuns n buc i mici i s le distribuie napoi pe gazon n c...

Страница 157: ...a lamei de dou ori n timpul sezonului de cosire este suficient de obicei n circumstan e normale Nisipul cauzeaz tocirea rapid a lamei Dac gazonul con ine sol nisipos poate fi necesar ascu irea mai fre...

Страница 158: ...toat iarba A Acumulatorul a fost nc rcat complet Conecta i nc rc torul i a tepta i aprinderea LED ului verde B Elibera i piedica de func ionare pentru a opri ma ina de tuns gazonul Scoate i cheia de s...

Страница 159: ...rupte acumulatorul se poate supra nc lzi Scoate i acumulatorul din nc rc tor i a tepta i p n se r ce te la o temperatur de maxim 42 Csau la una mai sc zut de at t DECLARA IE DE CONFORMITATE Noi Posite...

Страница 160: ...za jejich bezpe nost nebo je tato osoba mus pou it o bezpe n m pou v n p slu enstv S t mto spot ebi em si nesm hr t d ti Toto za zen m e b t pou ito pouze s nap jec jednotkou kter byla dod na s t mto...

Страница 161: ...it t to seka ky ve vlhk tr v c Na svahu v dy udr ujte pevn postoj d Cho te nikdy neb hejte e P i pr ci s rota n mi seka kami na kole k ch jezd te v dy po vrstevnici svahu nikdy nejezd te nahoru a dol...

Страница 162: ...o lo k pln mu zastaven v ech pohybuj c ch st Kdykoli nech v te tento stroj bez dozoru P ed odstran n m zablokov n P ed kontrolou i t n m a jakoukoli prac na stroji Po n razu do ciz ho p edm tu P ed op...

Страница 163: ...sponek na pap ry minc kl h eb k roub nebo jin ch mal ch kovov ch p edm t kter mohou zp sobit propojen kontakt baterie Zkratov n kontakt baterie m e zp sobit pop leniny nebo po r c Nevystavujte bateri...

Страница 164: ...d pou it m tohoto stroje si p e t te u ivatelskou p ru ku Udr ujte ostatn osoby v bezpe n vzd lenosti Pou vejte pouze ostr no e No e pokra uj v ot en i chv li po vypnut motoru P ed prov d n m dr by vy...

Страница 165: ...K DAJE Typ WG748E WG748E X 7 ozna en strojn ho za zen z stupce pro akumul torov seka ky na tr vu WG748E WG748E X Nap jec nap t 40V Max 2x20V Max Ot ky napr zdno 2800 min ka paluby 48 cm ka ezu 46 cm P...

Страница 166: ...e n stroje rozlo eno do n kolika dn UR EN POU IT POZN MKA P edt m ne za nete n ad pou vat p e t te si pe liv manu l Ur en pou it Tento v robek je ur en pro se en tr vn k na soukrom ch pozemc ch SESTAV...

Страница 167: ...m nabijte sou asn oba akumul tory Blik pouze jedna kontrolka t ikr t za sebou Nejm n jeden akumul tor je p li zah t P ed op tovn m spu t n m za zen po kejte a vychladne Blik pouze jedna kontrolka ty...

Страница 168: ...RAKU ZKONTROLUJTE ZAJIST TE ABY BYL VYJMUT KL a BATERIE V b n ch podm nk ch obvykle sta n brousit dvakr t za sez nu P sek zp sobuje rychl ztupen no e Pokud m te tr vn k na p s it p d m e b t nutn ast...

Страница 169: ...se voln ot ka d kole ko 5 Seka ka je velmi hlu n a vibruje A Provozn krou kovou svorku uvoln te abyste seka ku vypnuli Vyjm te bezpe nostn kl a baterie Oto te seka ku na bok a zkontrolujte n abyste se...

Страница 170: ...a vytvo en technick dokumentace Jm no Marcel Filz Adresa Positec Germany GmbH Postfach 32 02 16 50796 Cologne Germany 2021 10 11 AllenDing Z stupce vrchn konstruk n kancel e Testov n Certifikace Posit...

Страница 171: ...na to e obsluha alebo pou vate zariadenia je zodpovedn za nehody alebo kody ktor hrozia in m osob m alebo ich majetku Pr prava a Pri kosen pou vajte v dy pevn obuv a dlh nohavice So zariaden m neprac...

Страница 172: ...vne nasaden ch zbern ch ko ov k Pri zap nan motora kosa ky postupujte opatrne pod a uveden ch pokynov nohy udr iavajte v bezpe nej vzdialenosti od no a no ov l Pri zap nan motora kosa ku nikdy nenakl...

Страница 173: ...e opotrebovan alebo po koden c Z bezpe nostn ch d vodov vyme te opotrebovan alebo po koden asti Pou vajte v hradne origin lne n hradn diely a pr slu enstvo d Pri nastavovan kosa ky bu te ve mi opatrn...

Страница 174: ...orky bat rie zne isten utrite ich istou a suchou handri kou h Bat ria mus by pred pou it m nabit V dy postupujte pod a uveden ch pokynov a pou vajte spr vny postup nab jania i Nenech vajte bat riu nab...

Страница 175: ...y jednotliv a zlo en akumul tory Preto mus by s oh adom vplyvu na ivotn prostredie po dosl en recyklovan alebo demontovan Akumul tory obsahuj nebezpe n l tky preto m u by nebezpe n pre ivotn prostredi...

Страница 176: ...radie Typ pr slu enstva zvo te pod a typu vykon vanej pr ce al ie podrobnosti n jdete na obale pr slu enstva Pomoc a u ito n rady v m m e poskytn predajca n radia INFORM CIE O HLUKU Meran akustick tla...

Страница 177: ...mul ovacieho krytu Pozrite Obr E Vlo en vytiahnutie akumul tora Pred nain talovan m sady bat ri vlo te bezpe nostn k POZN MKA Tento stroj je mo n spusti len vtedy ak s nain talovan samostatn bat rie O...

Страница 178: ...vystaven priamemu slne n mu iareniu 2 Pre dosiahnutie najlep ieho mul ovacieho v konu nastavte rezn v ku tak aby ste odsekli asi jednu tretinu v ky stebla tr vy ide lne je naraz odsekn nie viac ako 40...

Страница 179: ...upnut ve vodorovn poloze do sv r ku M 3 Ak jeden koniec epele pad smerom nadol opracujte piln kom tento koniec epe je spr vne vyv en ak ani jeden z koncov nepad dolu DR BA EPELE Pozrite Obr N1 N2 Svoj...

Страница 180: ...odovzdajte ju autorizovan mu servisu 6 LED indik tor nab ja ky nesvieti A Skontrolujte pripojenie z str ky B Nab ja ku vyme te 7 Kontrolka LED nab ja ky akumul torov sa neprepne na zelen A Je nutn vy...

Страница 181: ...ozorila in navodila Neupo tevanje opozoril in navodil lahko privede do elektri nega udara in ali resnih po kodb Pred uporabo si pazljivo preberite navodila za varno obratovanje naprave Vsa opozorila i...

Страница 182: ...a a Pri ko nji bodite vedno obuti v vrsto obutev in imejte oble ene dolge hla e Opreme ne uporabljajte bosi ali e imate obute odprte sandale b temeljito preglejte obmo je uporabe opreme in odstranite...

Страница 183: ...agibajte razen e jo morate nagniti zaradi zagona V tem primeru potisnite ro aj navzdol in dvignite od tal tisti del kosilnice ki je obrnjen pro od vas m Poskrbite za to da se roki in nogi ne nahajata...

Страница 184: ...remikajo e se in fiksne dele kosilnice e Pred shranjevanjem naj se kosilnica vedno ohladi f Pri servisiranju rezil upo tevajte da se slednja kljub temu da je motor ugasnjen e vedno lahko premikajo VAR...

Страница 185: ...e iz polnilca j Po dalj em obdobju skladi enja boste za dosego maksimalne zmogljivosti akumulatorja verjetno morali slednjega nekajkrat napolniti in izprazniti k Za polnjenje uporabljajte le polnilnik...

Страница 186: ...dpadnih elektri nih naprav ne smete zavre i skupaj z ostalimi gospodinjskimi odpadki Dostavite jih na mesto za lo eno zbiranje odpadkov Glede podrobnosti se posvetujte z lokalno slu bo za ravnanje z o...

Страница 187: ...janska vrednost emisije vibracij med uporabo stroj ka se lahko razlikuje od navedene kajti nanjo vpliva tudi na in uporabe stroj ka predvsem naslednje okoli ine Na in uporabe stroj ka in materiali v k...

Страница 188: ...za polnilnik Glejte Sliko G2 NA IN UPORABE Indikatornapolnjenosti akumulatorjananapravi Glejtepodrobnostivpoglavju STANJEAKUMULATORJA POMEMBNO Kadarsvetileenalu ka je akumulatorprekomerno izpraznjen e...

Страница 189: ...OSITE TAKO DA BO SE S KOSILNICO POMIKALI NAVPI NO PO POBO JU 5 Vsak teden spreminjajte vzorec ko nje To bo prepre ilo pojavljanje lis na zelenici OBMO JE REZANJA Obmo je rezanja vklju uje ve dejavniko...

Страница 190: ...sprostitev ter zlo ite ro aj VAROVANJE OKOLJA Odpadnihelektri nihnapravnesmetezavre iskupaj zostalimigospodinjskimiodpadki Dostavitejihna mestozalo enozbiranjeodpadkov Gledepodrobnosti seposvetujtezl...

Страница 191: ...ina poko ene trave Dvignite vi ino rezanja in tako zmanj ajte koli ino poko ene trave Ne kosite ve kot 1 3 skupne vi ine trave B Preverite ostrino rezil Poskrbite da bodo rezila vedno ostra 10 Po ve u...

Страница 192: ...Copyright 2021 Positec All Rights Reserved AR01613300 www worx com...

Отзывы: