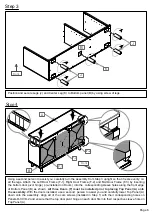
World Market Cortez Woven 608166 Скачать руководство пользователя страница 8

Page 8


Step 6

 Step 7

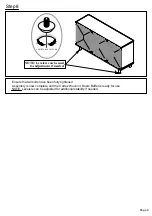
Step 7.1: Insert Shelf Pins (H-5) into the desired hole locations on Left / Right Side panel (D-1/D-2) and Divider

Panel (C).

Step 7.2: Insert Shelf (G/H) into position as shown, making sure they rest evenly on each Shelf Pin (H-5).

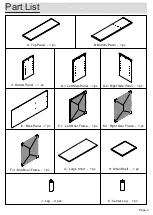
 (H-4) Pan Head Screw x 26

(T-2) Phillips Screwdriver

x26

Attach Back Panel (E) to the back of the storage assembly as shown. Secure the panel using Pan Head Screws

(H-4) and a Phillips head screwdriver (T-2)  (not included).

(H-5) Shelf Pin x 8

G

H

H - 4

T - 2

E

H - 5

Step 7.1

Step 7.2

Front

Содержание Cortez Woven 608166

Страница 1: ...Y QUESTIONS PERTAINING TO THE ASSEMBLY OF THIS FURNITURE PIECE PLEASE CONTACT YOUR NEAREST WORLD MARKET STORE OR CALL OUR TOLL FREE NUMBER 877 967 5362 FOR ASSISTANCE Cortez Woven 3 Door Buffet R Asse...

Страница 2: ...nel 1 pc B Bottom Panel 1 pc D 2 Right Side Panel 1 pc F 1 Left Door Frame 1 pc D 1 Left Side Panel 1 pc C Divider Panel 1 pc G Large Shelf 1 pc H Small Shelf 1 pc J Leg 4 pcs K Center Leg 1 pc F 2 Ri...

Страница 3: ...am lock 15 mm Minifix 1 Pan head Screw 3 5 x 20 mm Shelf Pin 6 Hardware List LABEL DESCRIPTION QTY 1 T 1 T 2 Phillips Screwdriver Not Included 1 PICTURE Allen Key 4 x 110 x 30 mm Tool List H 1 H 2 H 3...

Страница 4: ...t store or our customer service call center 877 967 5362 Assemble on a clean non marring surface packing foam Unpack all hardware bags and components to ensure you have all parts Have 2 adults on hand...

Страница 5: ...ttom Panel B using Connecting Screws H 3 Engage all screws by hand first and then fully tighten them using Allen Key T 1 T 1 Allen key H 3 Connecting Screw x 9 T 2 H 2 Place Top Panel A upside down on...

Страница 6: ...ttom Panel B as shown All three Doors F must be installed prior to placing Top Panel A onto the assembly With the doors installed use a second person to assist you and carefully lower Top Panel A down...

Страница 7: ...1 by turning clockwise using Allen Key T 1 until they are snug DO NOT over tighten Cam Locks T 1 Insert Cam Locks H 1 into the Left Right Side Panels D 1 D 2 and the Divider Panel C following the ori...

Страница 8: ...Shelf G H into position as shown making sure they rest evenly on each Shelf Pin H 5 H 4 Pan Head Screw x 26 T 2 Phillips Screwdriver x26 Attach Back Panel E to the back of the storage assembly as show...

Страница 9: ...ed for adjustment if needed ADJUSTABLE LEVELER Ensure that all bolts have been fully tightened Assembly is now complete and the Cortez Woven 3 Doors Buffet is ready for use NOTE Levelers can be adjust...

Страница 10: ...in direct sunlight Do not place furniture near heating or cooling vents Do not write on furniture without a padded barrier to protect the surface Do not place furniture outside For indoor use only Not...

Страница 11: ...ed by a tipping furniture and the use of the tipping restraint is highly recommended This Anti Tip Kit H 6 is only a deterrent It is not a substitute for proper adult supervision Manufacturer or retai...

Отзывы: