
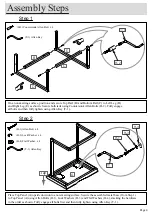


Step 1
Assembly Steps
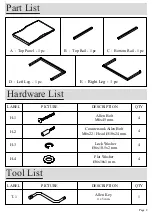
T-1
H-2
(H-2) Countersunk Allen Bolt x 4
(T-1) Allen Key
Step 2
B
C
D
E
(H-1) Allen Bolt x 4
(H-3) Lock Washer x 4
(H-4) Flat Washer x 4
(T-1) Allen Key
T-1
H-1
H-3
H-4
A
Page 4
On a non-marring surface, position and secure Top Rail (B) and Bottom Rail (C) to Left Leg (D)
and Right Leg (E) as shown. Secure both rails using Countersunk Allen Bolts (H-2). Fully engage
all bolts and then fully tighten using Allen Key (T-1).
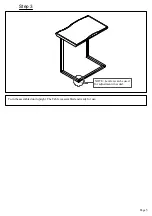
Place Top Panel (A) upside down onto a non-marring surface. Secure the assembled metal base (from Step 1)
to Top Panel (A) using Allen Bolts (H-1), Lock Washers (H-3) and Flat Washers (H-4), stacking the hardware
in the order as shown. Fully engage all bolts first and then fully tighten using Allen Key (T-1).
Top


