background image

7 of 8  

Line of Sight  |  (800) 463-7731  |  los.workriteergo.com

18 

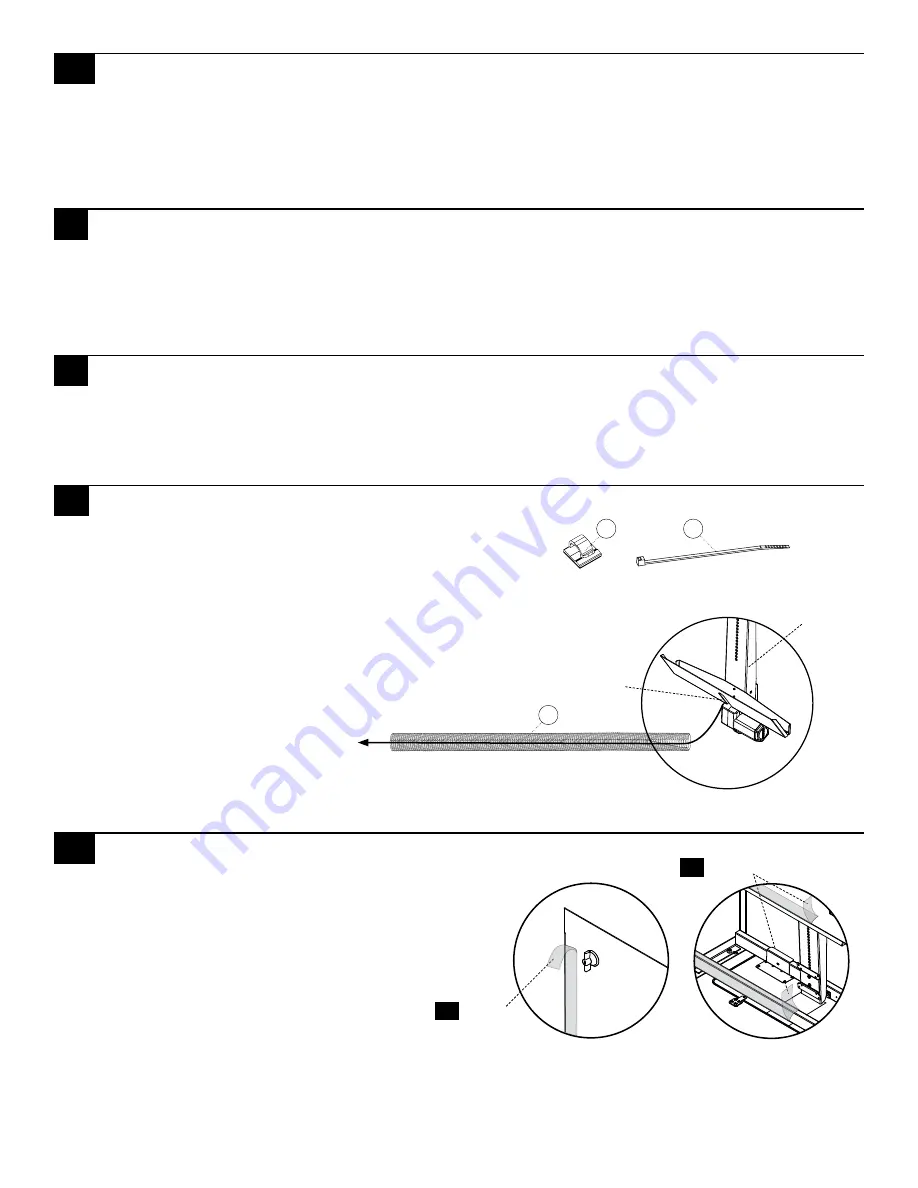
Remove Protective Tape & Replace Front and Rear Panels

18.1 Remove the protective tape on the Panels and Chassis
18.2 Reattach your front and rear panels. You now have a 

complete Workcenter. Finish building all Workcenters 

before proceeding to final room assembly.

15 

 Install Optional Accessories for Your Configuration

With the monitors and power components installed, you will now need to add your optional accessories 

like Worksurface Grommets, Remote Controls and CPU Holders. Follow the instructions with the Optional 

Accessories to complete this step.

16 

 Install Technology for Your Configuration

With all Line of Sight components installed, you will now need to install all the technology components to 

complete your system. Install all computers, peripherals like keyboards and mice, and network cabling to 

complete your installation according to the manufacturers specifications and your specific application.

14 

Install Power Distribution Options for Your Configuration

With the Workcenter built, you will now need to add your power options for your specific configuration. Follow 

the instructions that came with the Power System Options to complete your configuration.

If you did not purchase the Power Track or Power Bar, skip to 

Step 15.

17 

 Manage Cabling

With monitors and technology installed, you'll want to 

start considering all the cabling requirements. 
Note: It is critical that no wires interfere with the travel 

of the Monitor Lift. Use Cable Clips (T) for single wires 

(mouse & keyboard) and Cable Ties (U) for multiple wires 

to fasten all cabling securely out of the way of all moving 

Monitor Lift components.

Use the Wire Loom (V) to 

manage all user cables 

routing from the keyboard 

tray to the CPU. This may 

include keyboard, mouse, 

monitor and data cables.

Remove

Front & Rear 

Panels

Chassis

Remove

18.1

18.2

V

T

U

Keyboard tray 

cable access

Monitor Lift

To CPU

Содержание Line of Sight LOS3-B-M11 Series

Страница 1: ...e vis est enterèe ATENCIÓN Éste producto està cargado con resortes y puede abrise con extrema fuerza cuando se remueve éste tornillo CAUTION Do not opperate without proper counterbalance weights in place Personal injury and or damage could occur MISEENGARDE Ne faites pas fonctionner sans des contrepoids appropriès en place Blessures et ou des dommages pourraient survenir ATENCION No operar sin los...

Страница 2: ...th the four 5 16 18 Locknuts D Threaded studs on the brackets insert through holes in the Chassis and are held in place with the Locknuts Removable Panel Locking Panel 3 Attach Lid Stops to Worksurface Note Build Assembly in a large clean area on carpeting or moving blankets to prevent damaging Worksurface and Lid 3 1 Place Worksurface E and Monitor Bay Lid F upside down on floor Slide Monitor Bay...

Страница 3: ...H four screws per Top Bracket B C 5 2 Note Chassis models over 48 have a Center Support which requires two 10 Phillips Head Screws H into the Center Support 5 3 Attach Monitor Bay Lid to both Monitor Lid Hinges with two 10 Phillips Head Screws H per hinge at the forward location You will finish installing the hinges in Step 10 when workcenter is right side up and you can more easily access the two...

Страница 4: ...ay open with extreme force when screw is removed MISE EN GARDE Le produit est à ressort et peut s ouvrir avec un force extrème lorsque cette vis est enterèe ATENCIÓN Éste producto està cargado con resortes y puede abrise con extrema fuerza cuando se remueve éste tornillo CAUTION Do not opperate without proper counterbalance weights in place Personal injury and or damage could occur MISEENGARDE CAU...

Страница 5: ...tely when released If lid doesn t close completely turn Adjustment Screw counter clockwise slightly until lid closes softly and completely when released 9 Raise Monitor Lift 9 1 Lift Lid fully open 9 2 Press down on PUSH HERE label on top of the Manual Lifts CAUTION Spring loaded mechanism Take care during the first time Monitor Arm is activated With no monitors in the Monitor Mount the mechanism ...

Страница 6: ...crews that came with the monitor for Step 12 1 12 1 Attach VESA Plate M to the back of your VESA compatible Monitor with Spacers O Screws P Q R and Washers S or use the screws that came with your monitor Always use the shortest screws possible so you do not damage your monitor 12 2 Attach the VESA Bracket Monitor Assembly as high as possible on the Monitor Lift using two 20 Button Head Screws N an...

Страница 7: ...ling to complete your installation according to the manufacturers specifications and your specific application 14 Install Power Distribution Options for Your Configuration With the Workcenter built you will now need to add your power options for your specific configuration Follow the instructions that came with the Power System Options to complete your configuration If you did not purchase the Pow...

Страница 8: ...g agents Non abrasive spray cleaning agents Dawn Fantastik Windex Lysol Furniture spray Pledge Stain removers Lestoil Clorox Painted steel parts Clean surfaces regularly with damp cloth If necessary use a spray cleaning agent e g Fantastik sparingly Wipe completely dry with a soft rag using a straight line motion Lightly brush both vertical and horizontal surfaces to prevent dust build up Polished...

Отзывы: