background image

S H A R P E N I N G   S I N G L E - B E V E L   K N I V E S     |     2 3

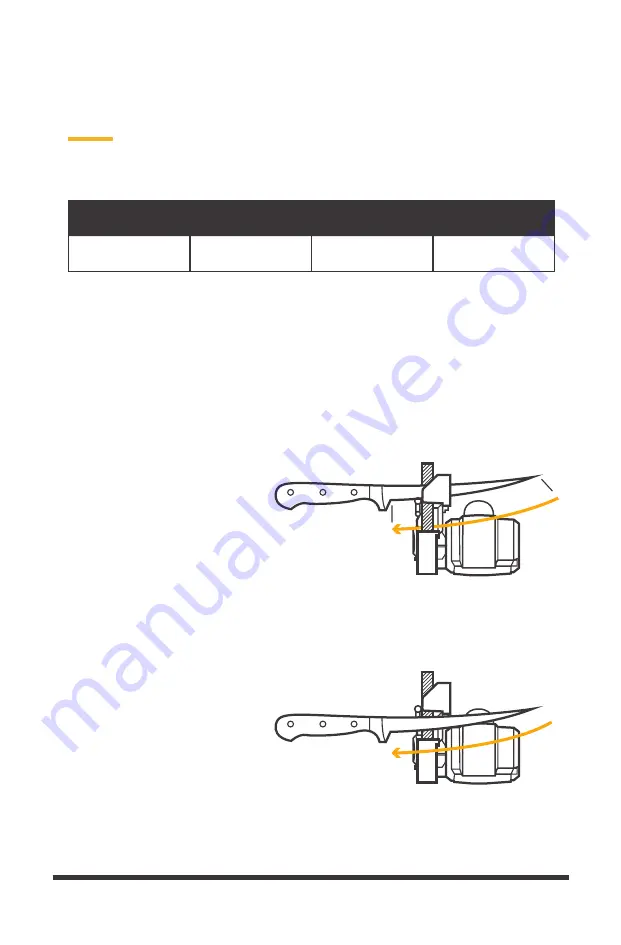
STEP 1

Follow instructions for standard-edged knives on the 
beveled side of the blade 

ONLY

.

Continue until a slight burr develops on the flat side 
(usually 5 strokes.)

STEP 2

Install 

PURPLE BELT


and repeat 

STEP 1

.

STEP 3

Hone flat side of the blade using the serrated guide.

TIP:

 It may be necessary to repeat this alternating 

process of bevel sharpening and back honing to 
achieve the sharpest results (no burr).

SHARPENING SINGLE-BEVEL 

KNIVES

SET UP

BELT

ANGLE GUIDE

EDGE GUIDE

SPEED

RED P220

FLIP UP (20°)

UP

SHARPENING (1)

HEEL

TIP

Содержание WSKTS2-A

Страница 1: ...letzungsgefahrzu verringern muss derBenutzerdieses Handbuchgelesenundverstandenhaben bevor er dasProdukteinsetzt BewahrenSiedieGebrauchsanleitungf rsp teresNachschlagenauf ATTENTION Afind viter tout r...

Страница 2: ...much faster It will work every time If you have questions suggestions or need help with your WORK SHARP unit please contact us Our customer service representatives are here to help We support what we...

Страница 3: ...ERRATED KNIVES 20 SHARPENING KNIVES WITH PARTIAL SERRATIONS 21 SHARPENING GUT HOOKS 22 SHARPENING SINGLE BEVEL KNIVES 23 SHARPENING SCISSORS 24 SHARPENING EDGED TOOLS 25 SHARPENING CUTTING TOOLS 26 SH...

Страница 4: ...WORK SHARP KNIFE TOOL SHARPENER Class II Consumer Product WSKTS2 I WSKTS2 A WSKTS2 E Belt sharpener Manufactured by Work Sharp LLC Maker of Work Sharp and Drill Doctor...

Страница 5: ...ool plugs must match the outlet Never modify the plug in any way Do not use any adapter plugs with earthed grounded power tools Unmodified plugs and matching outlets will reduce risk of electric shock...

Страница 6: ...of tools allow you to become complacent and ignore tool safety principles A careless action can cause severe injury within a fraction of a second 4 POWER TOOL USE AND CARE a Do not force the power to...

Страница 7: ...could give the operator an electric shock WARNING ALWAYS use proper safety glasses EverydayeyeglassesareNOTsafetyglasses Alsouseface ordustmaskifoperationisdusty ALWAYS WEAR CERTIFIED SAFETY EQUIPMENT...

Страница 8: ...te marking 230 VAC only means your tool will operate on standard 230V 50 Hz household power Do not operate AC tools on DC This information is printed on the nameplate Lower voltage will cause loss of...

Страница 9: ...d Identify safety measures to protect the operator that are based on an estimation of exposure in the actual conditions of use taking account of all parts of the operating cycle such as the times when...

Страница 10: ...adds weight and strength F BOLSTER The thick metal portion joining the handle and the blade which adds weight and balance G FINGER GUARD The portion of the bolster that keeps the user s hand from sli...

Страница 11: ...SA0002703 Coarse grit belt for grinding and sharpening most tools P220 RED WSSA0002704 Medium grit belt for knife and scissor sharpening 6000 PURPLE WSSA0002705 Fine grit belt for honing knives ADJUST...

Страница 12: ...ate the cassette up clockwise pressing inward to keep flush with the power base to SHARPEN or GRIND position Do not power the sharpener while in the parked position For grinding applications remove th...

Страница 13: ...ure properly centered on pulleys before powering up Return the Edge Guide to the up position Push tensioner down and rotate clockwise turn to lock in place Flip Edge Guide down and out of the way to m...

Страница 14: ...GUIDE To install align and slide the guide over the fasteners Push until the guide snaps into place To remove pull up on the guide Adjust the angle by pushing the lever on the back of the guide up or...

Страница 15: ...g into the edge guide Solution Use much lighter pressure Using only the weight of the blade for best results STOP ON BELT ANGLE GUIDE EDGE GUIDE Keep the blade against the amber line on Angle Guide Pl...

Страница 16: ...f the belt TIP An 8 knife should take 4 seconds per stroke Continue until a slight burr develops on the opposite side usually 5 10 strokes harder steels may require more strokes PROPER TECHNIQUE Keep...

Страница 17: ...ntil burr is removed 5 strokes per side 10 strokes total RE SHARPENING When re sharpening use the RED BELT until a burr is formed then the PURPLE BELT for 5 strokes per side STEP 2 Repeat step 1 now u...

Страница 18: ...onds per stroke Repeat until a slight burr develops on the opposite side usually 5 10 strokes harder steels may require more strokes PROPER TECHNIQUE Keep the blade in the slot up against the amber li...

Страница 19: ...l burr is removed 5 strokes per side 10 strokes total RE SHARPENING When re sharpening use the RED BELT until a burr is formed then the PURPLE BELT for 5 strokes per side STEP 2 Repeat STEP 1 now usin...

Страница 20: ...against the serrated knife guide at the bolster handle Squeeze power switch pull knife steadily across belt from bolster to tip of blade 8 in knife should take 4 seconds NOTE Serrated knives have a f...

Страница 21: ...ATED KNIVES instructions on the serrated portion of the blade using the serrated knife guide SHARPENING KNIVES WITH PARTIAL SERRATIONS STEP 1 Follow the SHARPENING OUTDOOR KNIVES instructions on the s...

Страница 22: ...ll right side of the belt or you will cut the belt Squeeze power switch hone 2 to 4 seconds STEP 2 Repeat STEP 1 on other side of gut hook SET UP BELT ANGLE GUIDE EDGE GUIDE SPEED PURPLE 6000 REMOVED...

Страница 23: ...de usually 5 strokes STEP 2 Install PURPLE BELT and repeat STEP 1 STEP 3 Hone flat side of the blade using the serrated guide TIP It may be necessary to repeat this alternating process of bevel sharpe...

Страница 24: ...ELT ANGLE GUIDE EDGE GUIDE SPEED PURPLE 6000 SCISSOR UP SHARPENING 1 STEP 1 Place scissor blade in guide slot all the way to the hinge Keep the blade flat on the guide while sharpening STEP 2 Pull sci...

Страница 25: ...G EDGED TOOLS SET UP Rotate Sharpening Cassette into the Grinding position BELT ANGLE GUIDE EDGE GUIDE SPEED GREEN P80 REMOVED DOWN GRINDING 2 SHOVELS HOES AXES PICKAXES POST HOLE DIGGERS OTHER EDGED...

Страница 26: ...TEP 2 Make 2 to 4 strokes or until you are satisfied with the sharpness NOTE Some tools require the anvil to be inserted through the grinding frame opening as shown to allow belt access to the cutting...

Страница 27: ...mower blade following manufacturer s instructions secure blade in bench vise STEP 2 Squeeze power switch grind edge of tool until you are satisfied with the sharpness STEP 3 Unclamp blade rotate 180 a...

Страница 28: ...ANY DETAIL GRINDING TASK The Knife Tool Sharpener is the ideal handheld grinder for small tasks from deburring to polishing BELT ANGLE GUIDE EDGE GUIDE SPEED GREEN P80 REMOVED DOWN GRINDING 2 NOTE Th...

Страница 29: ...Work Sharp s 3 year warranty We stand behind and support our products contact us if you need assistance parts or service Warranty for consumer not industrial or commercial use excludes abrasives Regis...

Страница 30: ...ILWEISE GEZAHNTEM 49 SCH RFEN VON REISSHAKEN 50 SCH RFEN VON EINSEITIG GESCHLIFFENEN MESSERN 51 SCH RFEN VON SCHEREN 52 WERKZEUGE MIT SCHNEIDEN SCH RFEN 53 SCH RFEN VON SCHNEIDWERKZEUGEN 54 SCH RFEN V...

Страница 31: ...en Es wird jedes Mal funktionieren Wenn Sie Fragen oder Anregungen haben oder Hilfe mit Ihrem WORK SHARP Ger t ben tigen wenden Sie sich bitte an uns Unsere Kundenservice Mitarbeiter stehen Ihnen gern...

Страница 32: ...SHARP KNIFE TOOL SHARPENER Bandschleifer Klasse II Verbraucherprodukt WSKTS2 I WSKTS2 A WSKTS2 E Rollenbetriebenes Bandsch rfsystem Hergestellt von Work Sharp LLC Hersteller von WorkSharp und Drill Do...

Страница 33: ...bedienen Ablenkungen k nnen dazu f hren dass Sie die Kontrolle ber das Ger t verlieren 2 ELEKTRISCHE SICHERHEIT a Die Stecker von Elektrowerkzeugen m ssen zur verwendeten Steckdose passen Ver ndern S...

Страница 34: ...kzeugs in unerwarteten Situationen f Kleiden Sie sich arbeitsgem Tragen Sie keine lose Kleidung oder Schmuck Halten Sie Haare Kleidung und Handschuhe von beweglichen Teilen fern Lose Kleidung Schmuck...

Страница 35: ...estimmungsgem en Gebrauch kann zu einer gef hrlichen Situation f hren h Halten Sie Griffe und Grifffl chen trocken sauber und frei von l und Fett Rutschige Griffe und Grifffl chen erm glichen in unerw...

Страница 36: ...nd des Gebrauchs einen geeigneten Geh rschutz Unter bestimmten Bedingungen und je nach Dauer des Gebrauchs kann L rm von diesem Produkt zu Geh rverlust beitragen Halten Sie das Werkzeug immer fest Ver...

Страница 37: ...endungen des Elektrowerkzeugs Wenn allerdings das Elektrowerkzeug f r andere Anwendungen mit abweichenden Einsatzwerkzeugen oder ungen gender Wartung eingesetzt wird kann der Schwingungspegel abweiche...

Страница 38: ...ern und Werkzeugen Leichtes Schleifen von Metall Nur f r Verbraucheranwendungen Das Werkzeug darf nur mit installierter Sch rfkassette verwendet werden NICHT BESTIMMUNGSGEM SSER GEBRAUCH Sch rfen in i...

Страница 39: ...er das Schleifband Ziehen Sie das Messer gerade durch die F hrung und stoppen Sie wenn die Klingenspitze die Mitte des Schleifbands erreicht Bei Klingen mit flachen Kanten siehe unten darf der Klingen...

Страница 40: ...rniges Schleifband zum Schleifen und Sch rfen der meisten Werkzeuge P220 ROT WSSA0002704 Mittelk rniges Schleifband zum Sch rfen von Messern und Scheren 6000 VIOLETT WSSA0002705 Feink rniges Schleifb...

Страница 41: ...rsinn nach oben nach innen dr cken um sie b ndig mit der Motorbasis zu halten um sie in die Sch rf oder Schleifposition zu bringen Schalten Sie den Sch rfer nicht in der Parkposition ein F r Schleifan...

Страница 42: ...den Bandspanner Umdrehung gegen den Uhrzeigersinn um ihn zu l sen Drehen Sie das Schleifband vor dem Einschalten von Hand um sicherzustellen dass es richtig auf den Riemenscheiben zentriert ist Dr ck...

Страница 43: ...nrastet Zum Entfernen ziehen Sie die F hrung nach oben Stellen Sie den Winkel durch Schieben des Hebels auf der R ckseite der F hrung nach oben oder unten ein Der Hebel wird in die Position einrasten...

Страница 44: ...4 Sekunden pro Strich ben tigen Fahren Sie fort bis auf der gegen berliegenden Seite ein leichter Grat entsteht normalerweise 5 10 Striche bei h rteren St hlen k nnen mehr Striche erforderlich sein R...

Страница 45: ...Grat entfernt ist 5 Striche pro Seite insgesamt 10 Striche ERNEUTES SCH RFEN Verwenden Sie zum Nachschleifen das rote Schleifband bis sich ein Grat gebildet hat und dann das violette Schleifband f r...

Страница 46: ...anges Messer sollte 2 Sekunden pro Strich ben tigen Fahren Sie fort bis auf der gegen berliegenden Seite ein leichter Grat entsteht normalerweise 5 10 Striche bei h rteren St hlen k nnen mehr Striche...

Страница 47: ...das violette Schleifband mit 6000er K rnung an Honen Sie das Messer indem Sie nach jedem Strich die Seite wechseln bis der Grat entfernt ist 5 Striche pro Seite insgesamt 10 Striche ERNEUTES SCH RFEN...

Страница 48: ...ie gezahnte Messerf hrung am Kropf Griff Dr cken Sie den Ein Aus Schalter Ziehen Sie das Messer vom Kropf bis zur Klingenspitze gleichm ig ber das Schleifband ein 20 cm langes Messer sollte 4 Sekunden...

Страница 49: ...nweisungen zum SCH RFEN VON GEZAHNTEN MESSERN unter Verwendung der gezahnten Messerf hrung SCH RFEN VON MESSERN MITTEILWEISE GEZAHNTEM SCHLIFF SCHRITT 1 Befolgen Sie auf dem Standardteil der Klinge di...

Страница 50: ...in das Schneidband Dr cken Sie den Ein Aus Schalter Honen Sie f r 2 bis 4 Sekunden SCHRITT 2 Wiederholen Sie SCHRITT 1 auf der anderen Seite des Rei hakens AUFBAU ANMERKUNG Befolgen Sie auf dem Standa...

Страница 51: ...e das VIOLETTE SCHLEIFBAND an und wiederholen Sie SCHRITT 1 SCHRITT 3 Honen Sie die flache Seite der Klinge mit Hilfe der gezahnten F hrung TIPP Um ein optimales Sch rfergebnis zu erzielen ohne Grat k...

Страница 52: ...n Sie das Scherenblatt bis zum Scharnier in den F hrungsschlitz Halten Sie die Klinge w hrend des Sch rfens flach auf der F hrung SCHRITT 2 Ziehen Sie die Schere gleichm ig ber die gesamte L nge der K...

Страница 53: ...AUFBAU Drehen Sie die Sch rfkassette in die Schleifposition SCHAUFELN HACKEN XTE SPITZHACKEN ERDBOHRER UND ANDERE SCHARFE WERKZEUGE SCHRITT 1 Spannen Sie das zu sch rfende Werkzeug fest im Schraubstoc...

Страница 54: ...ie 2 bis 4 Striche oder wiederholen Sie diesen Vorgang bis Sie mit der Sch rfe zufrieden sind ANMERKUNG Bei einigen Werkzeugen muss der Amboss durch die ffnung des Schleifrahmens eingef hrt werden wie...

Страница 55: ...s Herstellers aus und spannen Sie das Messer in einen Schraubstock ein SCHRITT 2 Dr cken Sie den Ein Aus Schalter Schleifen Sie die Schneide des Werkzeugs bis Sie mit der Sch rfe zufrieden sind SCHRIT...

Страница 56: ...Werkzeugsch rfer eignet sich ideal als Handschleifer f r kleine Aufgaben vom Entgraten bis zum Polieren ANMERKUNG Dieses Werkzeug ist nicht f r hohe Beanspruchung vorgesehen berschreiten Sie nicht 30...

Страница 57: ...er unseren Produkten und bieten Supportleistungen kontaktieren Sie uns wenn Sie Hilfe Ersatzteile oder Wartungen ben tigen Schleifmittel sind von der Garantie f r Verbraucher die das Produkt nicht f r...

Страница 58: ...L S 77 AFF TER DES COUTEAUX PARTIELLEMENT DENTEL S 78 AFF TER DES COUTEAUX MUNIS DE CROCHETS VISC RER 79 AFF TER DES COUTEAUX BISEAU UNIQUE 80 AFF TER DES CISEAUX 81 AFF TAGE D OUTILS TRANCHANTS 82 AF...

Страница 59: ...stion ou suggestion ou besoin d aide pour faire fonctionner votre unit WORK SHARP n h sitez pas nous contacter Nos repr sentants de service client le se feront un plaisir de vous aider Nous offrons un...

Страница 60: ...RK SHARP KNIFE TOOL SHARPENER Produit de consummation WSKTS2 I WSKTS2 A WSKTS2 E Syst me d affutage bande abrasive sur poulie motoris e Fabriqu par Work Sharp LLC Farbricant de WorkSharp et Drill Doct...

Страница 61: ...inflammables de gaz ou de poussi res Les outils lectriques produisent des tincelles susceptibles de mettre le feu aux poussi res ou vapeurs c Tenez les enfants et curieux loign s lorsque vous utilise...

Страница 62: ...t l interrupteur est en position marche favorise la survenue d accidents d Retirez toute clavette ou cl de r glage avant de mettre en marche l outil lectrique Laisser une clavette ou une cl attach e u...

Страница 63: ...nant en compte les conditions de travail et les travaux accomplir Utiliser l outil lectrique des fins diff rentes de son utilisation pr vue pourrait entra ner des situations dangereuses h Gardez les p...

Страница 64: ...appropri e durant l utilisation Dans certaines conditions et en cas d utilisation prolong e le bruit mis par ce produit pourra contribuer occasionner une perte auditive Tenez toujours l outil fermeme...

Страница 65: ...e 230 volts ac signifie que votre outil fonctionnera avec un courant alternatif de 50 Hz Cette information sera imprim e sur la plaque signal tique Une faible tension causera une perte de puissance et...

Страница 66: ...e par des particuliers uniquement L outil ne devrait tre utilis que lorsque la cassette d aff tage est install e UTILISATIONS NON PR VUES Applications de meulage ou d aff tage caract re industriel ou...

Страница 67: ...z tout droit le long du guide et arr tez vous lorsque la pointe de la lame atteint le milieu de la courroie Pour les lames tranchants plats voir ci dessous ne relevez pas le manche du couteau Pour les...

Страница 68: ...s grains pour le meulage et l aff tage de la plupart des outils P220 ROUGE WSSA0002704 Courroie grains moyens pour l aff tage des couteaux et ciseaux 6000 VIOLETTE WSSA0002705 Courroie grains fins pou...

Страница 69: ...d une montre en appuyant vers l int rieur pour le maintenir plaqu contre le socle d alimentation jusqu atteindre la position AFF TAGE ou MEULAGE Ne mettez jamais en marche l aff teuse en position arr...

Страница 70: ...inverse des aiguilles d une montre avec le tendeur pour lib rer la courroie Faites tourner la courroie la main afin de vous assurer qu elle est correctement centr e sur les poulies avant toute mise e...

Страница 71: ...nt de la courroie et permet de proc der des travaux de meulage 3 GUIDE D ANGLE Pour installer le guide alignez le et faites le glisser le long des pattes de fixation Poussez jusqu ce que le guide se c...

Страница 72: ...a partie m tallique paisse joignant la poign e et la lame Elle renforce et quilibre le couteau et emp che la main de l utilisateur de glisser G GARDE La partie de la mitre qui emp che la main de l uti...

Страница 73: ...rroie ASTUCE Un couteau de 8 20 cm n cessitera 4 secondes par passe Poursuivez jusqu formation d un l ger morfil sur le c t oppos g n ralement 5 10 passes les aciers plus durs pourront n cessiter dava...

Страница 74: ...ses au total R AFF TAGE Lorsque vous r aff tez utilisez la COURROIE ROUGE jusqu formation d un morfil puis effectuez 5 passes sur chaque face l aide de la COURROIE VIOLETTE TAPE 2 R p tez l tape 1 en...

Страница 75: ...teau droit et vitesse constante du talon jusqu la pointe Arr tez l aff teuse lorsque la pointe de la lame arrive au centre de la courroie ASTUCE Un couteau de 4 10 cm n cessitera 2 secondes par passe...

Страница 76: ...nt les deux faces jusqu disparition du morfil 5 passes par face 10 passes au total R AFF TAGE Lorsque vous r aff tez utilisez la COURROIE ROUGE jusqu formation d un morfil puis effectuez 5 passes sur...

Страница 77: ...e du manche Appuyez sur l interrupteur marche arr t tirez le couteau le long de la courroie vitesse constante du talon jusqu la pointe Un couteau de 8 20 cm devrait n cessiter 4 secondes par passe REM...

Страница 78: ...our la partie dentel e de la lame en utilisant le guide pour lames dentel es AFF TER DES COUTEAUX PARTIELLEMENT DENTEL S TAPE 1 Suivez les instructions de la section AFF TER DES COUTEAUX D EXT RIEUR p...

Страница 79: ...as c t droit de la courroie sous peine de couper celle ci Appuyez sur l interrupteur marche arr t et affinez pendant 2 4 secondes TAPE 2 R p tez L TAPE 1 sur l autre face du crochet visc rer PR PARATI...

Страница 80: ...2 Montez la COURROIE VIOLETTE et r p tez l tape 1 TAPE 3 Affinez la face plate de la lame l aide du guide pour lames dentel es ASTUCE Il pourra tre n cessaire de r p ter cette alternance entre aff ta...

Страница 81: ...acez la lame des ciseaux dans la fente du guide jusqu l articulation Maintenez la lame appuy e sur le guide lors de l aff tage TAPE 2 Tirez les ciseaux vitesse constante le long du guide sur toute la...

Страница 82: ...Pivotez la cassette d aff tage jusqu atteindre la position meulage PELLES BINETTES HACHES PIOCHES B CHES TARI RES ET AUTRES OUTILS TRANCHANTS TAPE 1 Immobilisez fermement l outil aff ter dans un tau d...

Страница 83: ...il TAPE 1 Immobilisez les s cateurs dans un tau d tabli TAPE 2 Effectuez 2 4 passes ou continuez jusqu ce que vous soyez satisfait du r sultat REMARQUE Certains outils n cessitent d ins rer l enclume...

Страница 84: ...s instructions du fabricant puis immobilisez la dans un tau d tabli TAPE 2 Appuyez sur l interrupteur marche arr t et meulez le tranchant de l outil jusqu obtenir un r sultat satisfaisant TAPE 3 Retir...

Страница 85: ...PON AGE DE CARROSSERIE AUTOMOBILE TOUTE T CHE DE MEULAGE PR CISE L aff teuse pour couteaux et outils est l outil de meulage portatif id al pour les petits travaux d barbage et de polissage REMARQUE Ce...

Страница 86: ...frons une assistance compl te sur chacun d eux N h sitez pas nous contacter pour toute demande d assistance de pi ces ou de r paration La garantie s applique aux utilisations par des particuliers et n...

Страница 87: ......

Страница 88: ...Fax 1 541 552 1377 Email info worksharptools com Visit Worksharptools com PP0004575 Rev 0 12 20 WORK SHARP is a registered trademark of Work Sharp LLC WORK SHARP ist ein eingetragenes Warenzeichen Wo...

Отзывы: