be replaced by the manufacturer, their customer service
department or a similarly qualified person.
●
WARNING! Do not operate the charger with a damaged cable,
power cord or plug. Damaged power cords can result in danger to
life due to electric shock.
Appliance-specific safety instructions
● Secure the workpiece. A workpiece securely held by a clamping
device or vice is much safer than one held in your hand.
● Do not rest your hands next to or in front of the appliance and
the area being worked as there is a risk of injury if you slip.
● RISK OF FIRE DUE TO FLYING SPARKS!
Sanding metal causes sparks to be produced. Therefore, make
sure that nobody is at risk and that no combustible materials are
located in the immediate vicinity of where you are working.
►
WARNING! TOXIC VAPOURS!
Working with the tool can produce harmful/ toxic dusts that
represent a health hazard for the person operating the appliance
and for any other people in the area.
►
WARNING! RISKS DUE TO DUST!
When working for extended periods of time on wood and, in
particular, materials that produce dust that is hazardous to health,
connect the appliance to a suitable external dust extraction
appliance. Wear safety goggles and a protective dust mask!
● Provide sufficient ventilation when working on plastics, paints,
lacquers, etc.
● Do not soak the materials or the area to be processed
with liquids containing solvents.
● Never work on moistened materials or damp surfaces.
● Avoid sanding lead paint or other harmful materials.
● Materials containing asbestos must not be processed.
Asbestos is a known carcinogen.
● Avoid contact with the sanding sheet while the
appliance is running.
● Do not use the appliance without a sanding sheet
fitted.
● Never use the appliance for other purposes and only
use original parts/accessories. Using attachments or
accessory tools other than those recommended in the
operating instructions can lead to a risk of injury.
● Always allow the appliance to come to a complete
standstill before putting it down.
● The appliance must always be kept clean, dry and free
from oil or grease.
Original accessories/auxiliary equipment
● Use only the accessories and additional equipment
that are specified in the operating instructions and are
compatible with the appliance.
●
WARNING!
Do not use any accessories that are not
recommended by manufacturer. This can lead to an
electric shock and fire.
OPERATION
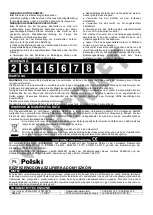
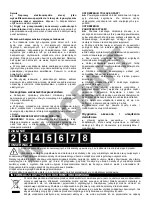
Attaching and removing the sanding sheet (Fig. 2)
WARNING!
● Remove the battery pack before carrying out any work on the
appliance.
● Before fitting a new sanding sheet, remove any dust and dirt
from the sanding plate
1. Attaching the sanding sheet to the sanding plate using the
Velcro.
2. Make sure that the extraction holes on the sanding sheet match
up with those on the sanding plate.
3. To remove the sanding sheets fitted using Velcro, simply pull
the sanding sheet off the sanding plate.
DUST EXTRACTION (Fig. 3)
WARNING! RISK OF FIRE!
There is a risk of fire when working with power tools fitted with a
dust collection box or which can be connected to a vacuum
cleaner via the vacuum cleaner adapter! In unfavourable
conditions, e.g. when sparks are flying while sanding metal or
metal residues in wood, wood dust in the dust sack (or in the
vacuum cleaner dust bag) can spontaneously ignite. This is a
particular risk if the wood dust is mixed with paint residues or
other chemicals and the workpiece has become hot after being
worked for a long time. Therefore, do not allow the workpiece to
overheat and always empty the dust box or the dust bag in the
vacuum cleaner before taking a break from work.
1. Connecting---Slide the dust box onto the appliance as far as
the stop.
2. Removal----Pull the dust box off the appliance.
CAUTION! To achieve optimum dust extraction, the dust
box should be emptied regularly.
Assembly / Disassembly battery pack (Fig. 4)
Align the battery pack slot with the battery foot on the tool, and
then push forward, until completely mounted.
To disassemble it, just keep pressing the red battery pack knob
and pull backward.
Swithing on/ off (Fig. 5)
To switch on the tool, just press the switch knob to
“I” position.
To switch off the tool, just press switch knob to
“0”
position.
Working procedures
1. Switch the appliance on before applying it to the
workpiece.
2. Apply minimal pressure when working.
3. Work at a constant speed.
4. Change the sanding sheets regularly.
5. Never use the same sanding sheet for sanding
different materials (e.g. wood followed by metal).
Optimum sanding results can only be achieved by
using clean sanding sheets.
6. Clean the sanding sheet every once while using a
vacuum cleaner.
7. Sand hard-to-reach places with the front or side
edge of the sanding sheet on the sander plate.
8. Guide the sander over the workpiece in parallel and
use overlapping sanding motions.
After completing the task, lift the appliance from the
workpiece and then switch it off.
Battery Charging (Fig.6)
1. Plug the battery charging into the 230VAC socket;
The power indicator light on green.
2. Slide the battery pack into the slot of battery chrger,
after hear a click, the battery pack was secured. The
power indicator light off, and meanwhile the charging
indicator light on red. The charging process starts.
3. After around 50min to 1hour, the charging indicator
light will off,and meanwhile the power indicator light
green on again. It denotes the charging process is
completely finished.
4. Pull out the charger plug, and then pull off the
battery pack form charger.
Charging tips (Fig.7)
After using, the battery pack probably a little bit hot. In
that case, the battery pack can not be charged in.It need
to have a rest, let it cool down.
Содержание CPMS-S20Li
Страница 2: ......
Страница 3: ......
Страница 13: ......
Страница 23: ......
Страница 39: ...Descriere detaliat CPMS S20Li...
Страница 41: ......
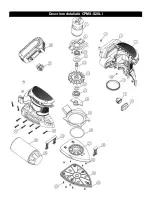
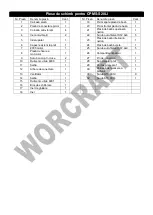
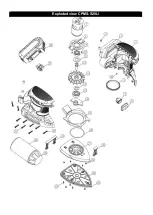
Страница 54: ...Exploded view CPMS S20Li...

