background image

 5 

Handlebars: 

When the bike is unboxed, the stem will be in the folded position on the right-side of the bike. The handle-
bar itself will be secured on the left side, you will need to slide the handlebars into the stem, close the 
clamp and then fold the handlebars into an upright position. Raise the clamp and push it fully home to lock 
the clamp in position, you should feel/hear a definite click when the mechanism locks in place. 

Warning: 

It is critical to ensure that the handlebars are properly secured. If they were to rotate or otherwise move 
unexpectedly during use, it could result in an accident and/or serious injury. If you have any doubts re-
garding the correct configuration of this part (or any other part of the bike), you should take your bike along 
to your nearest bike shop and have them prepare it for you at your cost. 

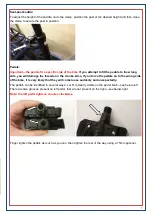
To fold the handlebars, lift the small lever shown above-right  to release the clamp mechanism, and pull 
the clamp downwards and away from the stem. 

There is some adjustment in the height of the handlebars, release the clamp shown below-left, set the 
handlebars to the desired height, and close the clamp to secure them in place. The amount you can raise 
the handlebars is limited by the length of the cables. Avoid raising them to a position where they are 
stressing/stretching the cables. 


Содержание Rambletta

Страница 1: ...support wooshbikes co uk Woosh Rambletta Please read this manual It contains important information regarding your safety and the correct use of the bike Support is available Mon to Fri from 10am to 5p...

Страница 2: ...ith our suppliers to constantly improve quality and ensure that each bike is checked before leaving us not something all mail order electric bike companies do There is however only so much we can offe...

Страница 3: ...ilure to carry out these checks properly could result in serious injury for which Woosh Bikes Ltd will not be held liable If you have any doubts about your own ability to perform the necessary checks...

Страница 4: ...cut the tape seals and then remove any all loose packaging and also the ac cessory box mud guards and battery if it s not already fitted on the bike Then lift the bike out of the car ton and immediat...

Страница 5: ...during use it could result in an accident and or serious injury If you have any doubts re garding the correct configuration of this part or any other part of the bike you should take your bike along...

Страница 6: ...state red battery low green ok blue full indicates the current state of the battery To get a better idea of the battery status use the meter on the display The more segments showing the fuller the ba...

Страница 7: ...reads on the cranks Also if you force the pedals on to the wrong side of the bike it is very likely that they will come loose suddenly and unexpectedly The pedals can be identified in several ways L o...

Страница 8: ...but still check pull on the clamp to ensure it has properly locked It can be stiff to disengage the locking mechanism to make this easier push the clamp towards the tube when unlocking To fold the bik...

Страница 9: ...s achieved Don t forget to re tighten the allen bolt The clamp used for folding the bike can sometimes need adjustment It shouldn t be allowed to work loose but equally some times it can be too tight...

Страница 10: ...e 55 degrees Celsius or extreme humidity Do not use the bike in an environment where temperatures are below minus 5 degrees Celsius Important Although our bikes are checked prior to despatch you must...

Страница 11: ...he base of the lamp and lift the lens reflector clear The bat teries should be oriented as shown below right Operating maintaining the front rear lamps The rear lamp uses 2x AA batteries The on off bu...

Страница 12: ...ssist you up to 15mph 25kph Though of course you can use your own strength power to pedal beyond 15mph if you wish This bike features start assist meaning that when the minus button is held the bike w...

Страница 13: ...bered 13 The nipple is the metal part at the base of the spoke where it joins the wheel rim Give it a quarter turn or so Don t over tighten the nipple as the spoke may then be too rigid and could snap...

Страница 14: ...s essential that you carry out some maintenance regularly to ensure that your bike is both safe and going to last for years to come You must check your spokes as outlined earlier You must regularly ch...

Страница 15: ...ength of time since the bike LCD has been switched on AVG the average speed of the current trip MAX the maximum speed achieved during the current journey To switch between these modes tap the middle b...

Страница 16: ...ified above is in conformity with the listed European Directive s The following table identifies the applied standards and the conformity assessment procedure EMC DIRECTIVE 2004 108 EC OJ DEC 2004 L 3...

Страница 17: ...17...

Страница 18: ...le send us a brief email with a couple of photos illustrating the problem and we ll get back to you as soon as we can usually the same day Support staff are not available at the weekends so any emails...

Отзывы: