Woods PRD6000E Скачать руководство пользователя страница 75

Funzionamento

 11

MAN1260 (09/04/2018)

Eseguire questo controllo con tutti i distanziatori e le molle sopra il braccio della rotella.
Questo posizionerà le rotelle nella posizione più elevata e fornirà l’altezza di taglio più
bassa per la trinciatrice.

1.

Sollevare la trinciatrice con l’impianto idraulico del trattore fino a 406,4 mm (16 in)
nella dimensione C o alla massima altezza del sollevatore del trattore, a seconda
di quale dei due è inferiore.

2.

Ruotare in avanti entrambe le rotelle anteriori e controllare che ci sia spazio tra le
rotelle e gli pneumatici del trattore. 
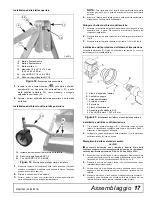
3.

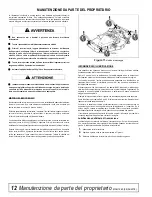
In caso di interferenza sui  modelli  PRD6000E e  PRD7200E, montare le  rotelle
anteriori nella posizione esterna. Se l’interferenza continua, regolare la piastra di
attacco della trinciatrice (E) come mostrato in Figura 8.

NOTA: 

Sul modello PRD8400E, l’ampiezza della rotella non è regolabile; vedere il

manuale dell’operatore  del  trattore  e  regolare  le  ruote  del  trattore  a una  distanza  più
stretta.

ROTELLA ANTERIORE (OPZIONALE)

Le rotelle e le slitte laterali riducono efficacemente lo scalping nella maggior parte dei
casi. Tuttavia, si possono incontrare aree in cui le rotelle e/o le slitte laterali cadono in
depressioni consentendo il contatto della parte centrale della trinciatrice con il suolo e lo
scalpo.  Per  ridurre  al  minimo  lo  scalping  è  possibile  installare  una  rotella  anteriore
opzionale. Vedere pagina 18.

TECNICA OPERATIVA

Arrestare  immediatamente  l’unità  di  alimentazione  e  l’attrezzo  dopo  aver

colpito un ostacolo. Smontare l’unità di alimentazione usando la procedura
adeguata. Ispezionare e riparare eventuali danni prima di riprendere il
funzionamento.

L’energia per azionare la trinciatrice viene fornita dalla pdp del trattore. Azionare la pdp
a  540  giri/min.  Sapere  arrestare  rapidamente  il  trattore  e  la  trinciatrice  in  caso  di
emergenza.

In caso di ostruzione della trinciatrice, con la cinghia che scivola per oltre due secondi,
seguire questi passi:

1.

Spostare  l’attrezzatura  in  un’area  precedentemente  falciata  e  rimuovere  dalla
trinciatrice il materiale accumulato. 

2.

Continuare  per  almeno  due  minuti,  per  consentire  alle  pulegge  di  raffreddarsi.
L’arresto  della  trinciatrice  a  contatto  con  una  pulegge  surriscaldata  scalderà  e
rovinerà la cinghia.

La corretta velocità rispetto al suolo dipenderà dal terreno, dall’altezza, dal tipo e dalla
densità di materiale da tagliare.

In genere, la velocità rispetto al suolo varia da 3,2 a 8 km/h (da 2 a 5 mph). Il materiale
alto e denso deve essere tagliato a una bassa velocità; il materiale sottile e di media
altezza può essere tagliato a una velocità rispetto al suolo più alta.

Azionare sempre la pdp del trattore a 540 giri/min per mantenere una velocità adeguata
delle lame e produrre un taglio pulito.

In  alcuni  casi  gli  pneumatici  del  trattore  potrebbero  calpestare  dell’erba  e  impedire  il
taglio alla stessa altezza dell’area circostante. Quando ciò si verifica, ridurre la velocità
rispetto al suolo, mantenendo nel contempo la pdp a 540 giri/min. La velocità rispetto al
suolo più bassa consentirà all’erba di rimbalzare parzialmente.

In  generale,  altezze  di  taglio  inferiori  offrono  un  taglio  più  uniforme  e  lasciano  meno
tracce di pneumatici. Tuttavia, è meglio tagliare l’erba con maggiore frequenza piuttosto
che con minore frequenza. L’erba corta si deteriora rapidamente con il caldo e invita alla
crescita  delle  erbacce  durante  le  stagioni  della  crescita.  Seguire  le  raccomandazioni
locali per l’altezza di taglio adeguata nella propria area.

Suggerimenti operativi

Ispezionare  e  sgomberare  l’area  da  pietre,  rami  o  altri  oggetti  duri  che

potrebbero essere scagliati, causando lesioni o danni.

Il materiale estremamente alto deve essere tagliato due volte. Impostare la trinciatrice a

un’altezza  di  taglio  più  elevata  per  il  primo  passaggio.  Quindi  tagliare  all’altezza

desiderata, a 90 gradi rispetto al secondo passaggio.

Ricordare che lame affilate producono tagli più puliti e richiedono meno energia.

Analizzare  l’area  da  tagliare  per  determinare  la  procedura  migliore.  Considerare

l’altezza e il tipo di erba e terreno: collinare, piano o accidentato.

Pianificare lo schema di taglio in modo da procedere dritto ogni volta che è possibile.

Tagliare  con  l’erba  non  tagliata  sulla  destra.  Questo  distribuirà  i  ritagli  sopra  l’area

tagliata. 

Funzionamento su terreno irregolare

Non utilizzare o trasportare su pendii ripidi.

Non arrestarsi, partire o cambiare direzione all’improvviso sulle pendenze.

Prestare  la  massima  attenzione  e  ridurre  la  velocità  rispetto  al  suolo  su

pendii e terreni accidentati.

Prestare attenzione ai pericoli nascosti sul terreno durante il funzionamento.

Passare in senso diagonale negli avvallamenti netti ed evitare discese improvvise per

evitare l’ostruzione del trattore e della trinciatrice.
La pratica migliorerà le abilità di manovra su terreni accidentati.

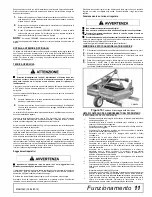
RIMOZIONE E STOCCAGGIO DELLA TRINCIATRICE

1.

Disinnestare la pdp del trattore e sollevare la trinciatrice con l’attacco a tre punti.

2.

Staccare l’albero di trasmissione della trinciatrice dalla pdp del trattore.

3.

Comprimere  al  massimo  l’albero  di  trasmissione  e  conservarlo  nella  staffa

pendente della pdp per evitare contatti con il suolo. 

4.

Prima di uno stoccaggio prolungato, vedere pagina 14 per le istruzioni di pulizia.

5.

Posizionare  i  blocchi  sotto  le  slitte  laterali  della  trinciatrice.  Abbassare  la

falciatrice sui blocchi, staccarla dall’attacco a tre punti del trattore e allontanare

con cautela il trattore dalla trinciatrice.
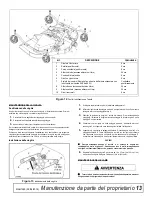
 Figura 10

. Posizione di stoccaggio della trinciatrice

LISTA DI CONTROLLO PRE-FUNZIONAMENTO DEL PROPRIETARIO

(RESPONSABILITÀ DEL PROPRIETARIO)

___

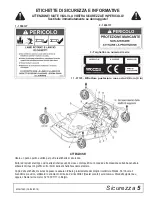
Esaminare e seguire tutte le regole di sicurezza e le istruzioni delle etichette di

sicurezza da pagina 4 a 6.

___

Controllare  che  tutte  le  etichette  di  sicurezza  siano  installate  e  in  buone

condizioni. Sostituirle se danneggiate.

___

Controllare che tutti i ripari e le protezioni siano installati e in buone condizioni.

Sostituirle se danneggiate.

___

Controllare  che  la  protezione  a  catena  sia  in  buone  condizioni  e  sostituire

eventuali trame della catena danneggiate.

___

Controllare  che  tutti  i  bulloni  e  le  coppiglie  siano  installati  e  fissati

correttamente.

___

Controllare  che  le  lame  siano  affilate,  in  buone  condizioni  e  installate

correttamente. Sostituirle se danneggiate.

___

Verificare l’attrezzatura sia collegata in modo corretto e sicuro al trattore.

___

Assicurarsi  che  il  perno  di  bloccaggio  a  molla  o  il  collare  dell’albero  di

trasmissione  scorra  liberamente  e  sia  saldamente  inserito  nella  scanalatura

della pdp del trattore.

___

Assicurarsi  che  le  protezioni  dell’albero  di  trasmissione  e  le  catene  di

protezione  siano  in  buone  condizioni.  Le  protezioni  devono  ruotare

liberamente  sull’albero  di  trasmissione.  Fissare  le  catene  di  protezione  al

trattore e all’attrezzatura come indicato.

___

Ispezionare l’area e rimuovere pietre, rami o altri oggetti duri che potrebbero

essere scagliati, causando lesioni o danni.

___

Non sono ammessi passeggeri.

___

Controllare che tutti i punti di lubrificazione e ingrassare come indicato nelle

“Informazioni di lubrificazione” a pagina 12. Assicurarsi che il giunto scorrevole

della pdp sia lubrificato e che i livelli di fluido della scatole del cambio siano

corretti.

___

Impostare la pdp del trattore a 540 giri/min.

___

Assicurarsi che il sistema ROPS (struttura di protezione anti-ribaltamento) del

trattore o la cabina e la cintura di sicurezza ROPS siano in buone condizioni.

Tenere la cintura di sicurezza allacciata saldamente durante il funzionamento.

___

Prima di avviare il motore, l’operatore deve stare sul sedile del trattore con la

cintura  di  sicurezza  allacciata.  Posizionare  la  trasmissione  in  folle  o

stazionamento, inserire il freno e disinnestare la pdp del trattore.

CM905A

Содержание PRD6000E

Страница 1: ...OPERATOR S MANUAL PREMIER REAR DISCHARGE MOWERS MAN1260 4 09 2018 PRD6000E PRD7200E PRD8400E...

Страница 2: ...ent eu or call 32 10 301111 in Belgium The equipment you have purchased has been carefully engineered and manufactured to provide dependable and satisfactory use Like all mechanical products it will r...

Страница 3: ...ld be able to develop procedures suitable to your particular situation The illustrations and data used in this manual were current at the time of print ing However due to possible inline production ch...

Страница 4: ...use driveline failures due to incor rect spline or incorrect operating length and can result in personal injury or death Look down and to the rear and make sure area is clear before operating in rever...

Страница 5: ...enter through very small scratches or under edges of decals causing them to peel or come off Replacement safety decals can be ordered free from your Woods dealer To locate your nearest dealer check th...

Страница 6: ...6 Safety MAN1260 4 09 2018 SAFETY INSTRUCTIONAL DECALS ATTENTION BECOME ALERT YOUR SAFETY IS INVOLVED Replace Immediately If Damaged 7 18865 8 1004114 9 33347 5 18864 6 18877 10 1003751 4 18866...

Страница 7: ...Declaration of Conformity 7 MAN1260 4 09 2018 Declaration of Conformity...

Страница 8: ...eline raise mower securely block up all cor ners with jackstands and check stability Secure blocking prevents equipment from dropping due to hydraulic leak down hydraulic system failures or mechanical...

Страница 9: ...raise rear of mower move caster adjustment spacers under rear caster arms 9 To raise front of mower move spacers under front caster wheel arms Figure 4 Cutting Height Adjustment Remember measurement a...

Страница 10: ...onfigurations remove the cap screws and nuts and move the arms from one side of the wheel rail to the other Secure with same hardware The rear caster arms should be mounted as shown NOTE The PRD8400E...

Страница 11: ...Extremely tall material should be cut twice Set mower at a higher cutting height for the first pass Then cut at desired height 90 degrees to the first pass Remember sharp blades produce cleaner cuts...

Страница 12: ...lled before working underneath When blocking you must consider overall stability of the unit Just blocking under the unit will not ensure your safety The working surface must be level and solid to sup...

Страница 13: ...as shown 4 Make sure belt is on drive pulley A route around idler F and connect idler spring to lug I on deck 5 Grasp belt between spindle pulley E spring loaded idler F and spindle pulley D Pull spri...

Страница 14: ...elding is designed to reduce the risk of thrown objects The mower deck and protective devices cannot prevent all objects from escaping the blade enclosure in every mowing condition It is possible for...

Страница 15: ...or the second and cut at 90 degrees to first pass Raise rear of mower high enough to permit material to discharge but not so high that conditions listed above occur Grass wet Allow grass to dry before...

Страница 16: ...emove seals from housing Spindle Assembly Refer to Figure 17 Bearing cones and cups are designed to work together It is important to posi tion them so bearing cone taper mates with cup taper 1 Lubrica...

Страница 17: ...and side to side or end play in gear shafts Gearbox Removal from Mower Figure 18 Gearbox Stand Assembly 1 Disconnect and remove the rear driveline from the gearbox 2 Remove vent plug 10 and siphon ge...

Страница 18: ...n to seal cage or damage to seal lip will cause seal to leak 6 Fill gearbox with SAE 80W or 90W gear lube until it runs out the level plug 7 Assemble gearbox and pulley to gearbox stand Attach gearbox...

Страница 19: ...of correct diameter Be careful not to damage seal lip 18 Press oil cap 20 on to cover the rear of housing using a tube of the correct diameter 19 Check gearbox housing for leaks by plugging all holes...

Страница 20: ...journal cross into bearing cup with grease fitting away from shaft Be careful not to disturb needle bearings Insert another bearing cup directly across from first cup and press in as far as possible...

Страница 21: ...draulic leak down hydraulic system failures or mechanical component failures Always wear relatively tight and belted clothing to avoid getting caught in moving parts Wear sturdy rough soled work shoes...

Страница 22: ...32 Rear Driveshaft Installation Install Driveshaft 1 Pull locking collar B back and at the same time push driveline onto gearbox shaft until locking device engages 2 Attach shield anti rotation chain...

Страница 23: ...ghten roller must spin freely Figure 34 Front Roller Installation Quick Hitch Kit Installation Optional NOTE This kit allows mower to only fit on a Category 1 standard quick hitch 1 Make sure that you...

Страница 24: ...sure driveline is properly installed and that spring activated locking pin or collar slides freely and is seated in groove on tractor PTO shaft ___ Show customer the safe proper procedures to be used...

Страница 25: ...BLY 27 28 GEARBOX ASSEMBLY 28 BLADE SPINDLE ASSEMBLY 29 REAR CHAIN SHIELDING ASSEMBLY 30 FRONT ROLLER ASSEMBLY OPTIONAL 30 MULCH KIT OPTIONAL 31 QUICK HITCH KIT OPTIONAL 32 SKID SHOE KIT OPTIONAL 33 P...

Страница 26: ...26 Parts MAN1260 4 09 2018 PRD6000E PRD7200E PRD8400E MAIN FRAME ASSEMBLYPRD6000E PRD7200E DF PRD8400E MAIN FRAME ASSEMBLY 64 COMPLETE DECAL SET 66 SAFETY DECAL SET...

Страница 27: ...4RP 1 Belt Shield Right PRD8400E 26 1014417RP 1 Belt Shield Left PRD6000E or 26 1014418RP 1 Belt Shield Left PRD7200E or 26 52875RP 1 Belt Shield Left PRD8400E 28 1008011 4 Nut 3 8 NC Square w Retaine...

Страница 28: ...Flat 9 1 Pin Cotter B4 x 50 10 57466 2 Snap Ring 11 20895 1 Snap Ring 45 mm 12 57373 1 Spacer 35 3 x 48 x 2 5 13 57328 2 Kit Shim 60 3 x 71 6 14 57468 1 Nut Castle 15 51946 1 Nut Castle M24 x 2 16 573...

Страница 29: ...m 1 14 x 1 50 x 55 10 29899 Bearing Cone 11 52882 Blade Spindle Housing with Cups 12 29898 Bearing Cup 14 52852RP Shaft Blade Spindle 16 1001513KT Blade Kit High Suction 533 4 mm 21 set of 3 PRD6000E...

Страница 30: ...REF PART QTY DESCRIPTION 3 55345RP 1 Shield Chain Plate for PRD6000E only or 3 53554RP 1 Shield Chain Plate for PRD7200E only or 3 52885RP 2 Shield Chain Plate for PRD8400E only 14 6697RP Bolt Carria...

Страница 31: ...proceeding 3 Wear safety glasses or goggles to prevent eye injury while drilling holes 4 Clamp mulching kit in place Make sure baffles are completely closed off by the kit 5 Inspect fit up to confirm...

Страница 32: ...x 15 2 1005401 2 Chain 9 5 mm 3 8 Proof Coil 38 Link 3 1016517 2 Sleeve 23 8 x 36 5 x 49 2 mm 94 x 1 44 x 1 94 4 13563 1 Screw 1 2 NC x 6 HHCS GR5 5 854RP 6 Washer 1 2 Flat 6 29368 1 Sleeve 12 7 x 19...

Страница 33: ...11900RP Nut 1 2 NC Flange Lock Obtain Locally INSTALLATION INSTRUCTIONS 1 Locate and drill three 72 mm 17 32 holes using the dimensions from the drawing and table above 2 Secure skid shoe with three c...

Страница 34: ...1 2 467 634 722 979 1020 1383 Diameter Thread Pitch Millimeters Wrench Size COARSE THREAD FINE THREAD Diameter Thread Pitch Millimeters MARKING ON HEAD MARKING ON HEAD Metric 8 8 Metric 10 9 Metric 8...

Страница 35: ...HHCS Hex Head Cap Screw HT Heat Treated JIC Joint Industry Council 37 Degree Flare LH Left Hand LT Left m Meter mm Millimeter M Male MPa Mega Pascal N Newton NC National Coarse NF National Fine NPSM...

Страница 36: ...y Product 38 Replacement Parts 39 OPERATION Adjustment Cutting Height Chart 9 Tractor Top Link 9 Attaching Mower to Tractor 8 Cutting Height Adjustment 9 Front Caster Arm Configuration 10 Front Caster...

Страница 37: ...bligation under this Warranty is limited to at WOODS option the repair or replacement free of charge of the product if WOODS in its sole discretion deems it to be defective or in noncompliance with th...

Страница 38: ...scretion deems it to be defective or in noncompliance with this Warranty The product must be returned to WOODS with proof of purchase within thirty 30 days after such defect or noncompliance is discov...

Страница 39: ...MANUEL D UTILISATION FAUCHEUSES PREMIER VACUATION ARRI RE MAN1260 4 09 2018 PRD6000E PRD7200E PRD8400E...

Страница 40: ...eurs sur www WoodsEquipment eu ou appelez le 32 10 301111 Belgique L quipement que vous avez achet a t con u et fabriqu avec le plus grand soin pour assurer un usage fiable et satisfaisant Comme tous...

Страница 41: ...instructions pour d terminer les m th odes qui conviennent le mieux sa situation Les illustrations et donn es utilis es dans ce manuel taient valables au moment de l impression mais la machine peut av...

Страница 42: ...est pas quip e d une telle protection le travail doit tre arr t d s que quelqu un s approche moins de 92 m tres 300 ft Cette protection est pr vue pour r duire le risque de projection d objets Le car...

Страница 43: ...ite du circuit hydraulique de d faillances hydrauliques ou m caniques ou du mouvement des leviers de commande l quipement risque de retomber ou de pivoter acci dentellement et de causer des blessures...

Страница 44: ...ou sous les bords des autocollants et les d coller ou s parer Pour trouver votre revendeur le plus proche consultez le localisateur de concessionnaire sur www woodsequipment eu ou appelez 32 10 30111...

Страница 45: ...0 4 09 2018 9 33347EF 5 18864EF 6 18877EF 10 1003751EF 7 18865EF 8 1004114EF 4 18866EF AUTOCOLLANTS S CURIT ET INFORMATIONS ATTENTION FAIRE PREUVE DE VIGILANCE LA S CURIT EN D PEND remplacer imm diate...

Страница 46: ...8 D claration de Conformit MAN1260 4 09 2018 Declaration of Conformity...

Страница 47: ...illes et en v rifier la stabilit L immobilisation de l quipement en position relev e l emp che de retomber en cas de fuite ou d autre d fail lance du circuit hydraulique ou des composants m caniques N...

Страница 48: ...m me niveau que l arri re ou l g rement plus bas 7 Moduler la hauteur de coupe en r glant les roulettes guides avant et arri re 8 Pour relever l arri re de la faucheuse d placer les pi ces d cartemen...

Страница 49: ...r gler en deux positions La Figure 8 illustre les deux configurations possibles pour les bras de roulette guide avant pour PRD6000E et PRD7200E La position int rieure permet d utiliser le bord ext rie...

Страница 50: ...2 8 Km h 2 5 mph Le mat riau haut et fourni doit tre fauch basse vitesse tandis que le mat riau fin et de taille moyenne peut tre fauch vitesse plus lev e Toujours faire tourner la PDF du tracteur 540...

Страница 51: ...ibrement et se cale fermement dans la can nelure de la PDF du tracteur ___ V rifier que les carters et cha nes d arrimage d arbre de transmission sont en bon tat Les carters doivent pivoter librement...

Страница 52: ...stabilit g n rale de l unit immobilis e Il ne suffit pas de caler l unit sur des b quilles pour assurer la s curit des personnes La surface de travail doit tre horizontale et ferme pour soutenir le p...

Страница 53: ...oie 1 D crocher le ressort de tendeur H de la patte de fixation du carter I 2 Faire glisser la courroie sous la poulie d entra nement A et par dessus le bras tendeur Faire passer la courroie autour de...

Страница 54: ...6 mm 1 32 in 1 16 in doit tre laiss 5 Ne pas aff ter le dos PROTECTION DE CHA NE Full chain shielding must be installed when operating in populated areas or other areas where thrown objects could inju...

Страница 55: ...fois provoquer les conditions ci dessus Herbe humide Laisser l herbe s cher avant de la faucher Ralentir la vitesse de d placement du tracteur mais pas la vitesse de la PDF PROBL ME CAUSE POSSIBLE SOL...

Страница 56: ...du corps et correctement retenus afin d viter qu ils soient saisis par des pi ces en mouvement Porter des chaussures de travail solides semelle paisse et un quipement protecteur sur les yeux les chev...

Страница 57: ...ement arri re Pose d arbre d entra nement 1 Tirer le collier de blocage B en arri re tout en poussant l arbre de transmission sur l arbre de la bo te d engrenages jusqu ce que le dispositif de blocage...

Страница 58: ...oit pouvoir tourner librement Pose de kit d attelage rapide en option Remarque Ce kit permet de raccorder la faucheuse un attelage rapide standard de cat gorie 1 uniquement 1 MVeiller utiliser un des...

Страница 59: ...rer que l arbre de transmission est correctement install et que son axe ou collier de blocage ressort coulisse librement et se cale fermement dans la cannelure de l arbre de la PDF du tracteur ___ D m...

Страница 60: ...in 306 416 474 642 669 907 1 in 1 1 2 in 467 634 722 979 1020 1383 A TABLEAU DES COUPLES DE SERRAGE POUR S RIE SAE Identification des t tes de boulon SAE SAE cat gorie 2 pas de tirets SAE cat gorie 5...

Страница 61: ...e CV V locit constante CCW Sens inverse des aiguilles d une montre CW Sens des aiguilles d une montre F Femelle GA Calibre GR 5 etc Cat gorie 5 etc HHCS Boulon hexagonal HT Tremp JIC Joint Industry Co...

Страница 62: ...errage de boulonnerie 22 Listes de contr le du concessionnaire la livraison responsabilit du concessionnaire 21 Avant la livraison responsabilit du concession naire 21 S curit Autocollants s curit et...

Страница 63: ...que ledit vice ou d faut de conformit a t d couvert ou aurait d l tre achemin par l interm diaire du concessionnaire ou distributeur chez qui l achat a t fait WOODS est tenu d effectuer la r paration...

Страница 64: ...aire du concessionnaire ou distributeur chez qui l achat a t fait WOODS est tenu d effectuer la r paration ou le remplacement dans des d lais raisonnables apr s sa r ception du produit IL N EXISTE AUC...

Страница 65: ...TRINCIATRICI A SCARICO POSTERIORE DI PRIMA QUALIT MAN1260 09 04 2018 PRD6000E PRD7200E PRD8400E...

Страница 66: ...er Locator sul sito www WoodsEquipment eu oppure chiamare il numero 32 10 301111 in Belgio L attrezzatura acquistata stata accuratamente progettata e realizzata per garantire un utilizzo sicuro e sodd...

Страница 67: ...li Tuttavia sulla base dell esperienza e di queste istruzioni l operatore dovrebbe essere in grado di stabilire le proce dure adatte a ogni situazione particolare Le figure e i dati utilizzati in ques...

Страница 68: ...di trasmissione della presa di potenza direttamente all albero cardanico dell unit di alimentazione Non usare mai manicotti o alberi di adattatori Gli adattatori possono causare guasti all albero di...

Страница 69: ...tto i bordi delle etichette facendole staccare Copie delle etichette di sicurezza possono essere ordinate gratuitamente dal proprio rivenditore Woods Per trovare il rivenditore pi vicino utilizzare lo...

Страница 70: ...09 04 2018 ETICHETTE DI SICUREZZA E INFORMATIVE ATTENZIONE SIATE VIGILI LA VOSTRA SICUREZZA IN PERICOLO Sostituire immediatamente se danneggiate 7 18865IT 8 1004114IT 9 33347IT 5 18864IT 6 18877IT 10...

Страница 71: ...Dichiarazione di conformit 7 MAN1260 09 04 2018 Dichiarazione di conformit...

Страница 72: ...tori e verificare la stabilit Il blocco sicuro impedisce all attrezzatura di cadere a causa di perdite idrauliche guasti al sistema idraulico o problemi dei componenti meccanici Tenere tutte le person...

Страница 73: ...trice spostare i distanziatori di regolazione delle rotelle sotto i bracci delle rotelle posteriori 9 Per sollevare la parte anteriore della trinciatrice spostare i distanziatori sotto i bracci delle...

Страница 74: ...spostare i bracci da un lato altro del binario della ruota Fissare con gli stessi bulloni I bracci delle rotelle posteriori devono essere montati come mostrato NOTA I bracci delle rotelle anteriori di...

Страница 75: ...ndi tagliare all altezza desiderata a 90 gradi rispetto al secondo passaggio Ricordare che lame affilate producono tagli pi puliti e richiedono meno energia Analizzare l area da tagliare per determina...

Страница 76: ...trinciatrice quattro in totale Durante il bloccaggio occorre considerare la stabilit generale dell unit Il semplice blocco sotto l unit non garanzia di sicurezza L area di lavoro deve essere piana e...

Страница 77: ...a D come mostrato 4 Assicurarsi che la cinghia sia sulla puleggia motrice A indirizzarla intorno al tendicinghia F e collegare la molla tendicinghia all aletta I sull apparato 5 Agganciare la cinghia...

Страница 78: ...schio di oggetti scagliati L apparato falciante e i dispositivi di protezione non possono impedire a tutti gli oggetti di sfuggire al sistema di lame in ogni condizione di taglio possibile che gli ogg...

Страница 79: ...alto da permettere lo scarico del materiale ma non cos in alto al punto da verificarsi le condizioni sopra elencate Erba bagnata Far asciugare l erba prima di falciarla Rallentare la velocit rispetto...

Страница 80: ...lativamente stretti e allacciati per evi tare che rimangano impigliati nelle parti mobili Indossare scarpe da lavoro resistenti e con suola ruvida e dispositivi di protezione per occhi capelli mani or...

Страница 81: ...4 Figura 20 Installazione dell albero di trasmissione posteriore Installazione dell albero di trasmissione 1 Tirare indietro l anello di serraggio B e allo stesso tempo spingere l albero di trasmissio...

Страница 82: ...riore Installazione del kit di attacco rapido Opzionale NOTA Questo kit consente alla trinciatrice di adattarsi solo a un attacco rapido standard di Categoria 1 1 Assicurarsi di utilizzare uno dei due...

Страница 83: ...to correttamente e che il perno di bloccaggio a molla o il collare scorra liberamente e sia inserito nella scanalatura sull albero cardanico del trattore ___ Mostrare al cliente le corrette procedure...

Страница 84: ...192 261 297 403 420 569 7 8 in 1 5 16 in 306 416 474 642 669 907 1 in 1 1 2 in 467 634 722 979 1020 1383 Diametro e passo filettatura millimetri Dimensio ni chiave FILETTATURAA PASSO GROSSO FILETTATU...

Страница 85: ...camente JIC Filettatura Joint Industry Council con svasatura di 37 LH Lato sinistro SX Sinistra m Metri mm Millimetri M Maschio MPa Mega Pascal N Newton NC Filettatura a passo grosso NF Filettatura a...

Страница 86: ...ione Tabella altezza di taglio 9 Biella superiore del trattore 9 Collegamento della trinciatrice al trattore 8 Regolazione dell altezza di taglio 9 Configurazione del braccio della rotella anteriore 1...

Страница 87: ...roduttori L obbligo di WOODS ai sensi della presente Garanzia si limita a discrezione della stessa alla riparazione o alla sostituzione a titolo gratuito del prodotto qualora l azienda a sua esclusiva...

Страница 88: ...sua esclusiva discrezione lo ritenga difettoso o non conforme alla presente Garanzia Il prodotto deve essere restituito a WOODS insieme alla prova d acquisto entro trenta 30 giorni dal momento in cui...

Страница 89: ...HOCHWERTIGE M HER MIT R CKSEITIGEM AUSWURF MAN1260 09 04 2018 PRD6000E PRD7200E PRD8400E...

Страница 90: ...32 10 301111 in Belgien Die von Ihnen erworbenen Ger te wurden sorgf ltig entwickelt und hergestellt um einen zuverl ssigen und zufriedenstellenden Einsatz zu gew hrleisten Wie alle mechanischen Produ...

Страница 91: ...diese Anweisungen in der Lage sein Verfahren zu entwickeln die f r Ihre Situation passen Die in diesem Handbuch verwendeten Abbildungen und Daten waren zum Zeitpunkt der Drucklegung aktuell Aufgrund...

Страница 92: ...ls Zwischenmuffen oder Adapterwellen Adapter k nnen Ausf lle des Antriebsstrangs aufgrund von falscher Verzahnung oder L nge verursachen und zu Verletzungen oder zum Tod f hren Schauen Sie nach unten...

Страница 93: ...n durch kleine Kratzer oder unter die Kanten der Aufkleber dringen und diese abl sen Ersatzaufkleber k nnen kostenlos bei Ihrem Woods H ndler bestellt werden Um einen H ndler in Ihrer N he zu finden n...

Страница 94: ...AN1260 09 04 2018 SICHERHEITS UND ANWEISUNGSAUFKLEBER ACHTUNG AUFMERKSAM LESEN ES BETRIFFT IHRE SICHERHEIT Bei Besch digung sofort ersetzen 7 18865GE 8 1004114GE 9 33347GE 5 18864GE 6 18877GE 10 10037...

Страница 95: ...Konformit tserkl rung 7 MAN1260 09 04 2018 Konformit tserkl rung...

Страница 96: ...icher mit Unterstellb cken auf und pr fen Sie die Stabilit t Sicheres Aufbocken verhindert das Herunterfallen von Ger ten aufgrund von Hydraulikleckagen Ausf llen des Hydrauliksystems oder von mechani...

Страница 97: ...M hers anzuheben legen Sie Abstandshalter unter die hinteren Haltearme der Laufrolle 9 Um die Vorderseite des M hers anzuheben legen Sie Abstandshalter unter die vorderen Haltearme der Laufrolle Abbil...

Страница 98: ...rauben und Muttern und versetzen Sie die Arme von einer Seite der Radschiene zur anderen Sichern Sie es mit dem gleichen Montagematerial Die hinteren Rollenarme sollten wie abgebildet montiert werden...

Страница 99: ...ng erneut Nicht vergessen Scharfe Klingen sorgen f r einen sauberen Schnitt und belasten das Arbeitsger t weniger Checken Sie den zu schneidenden Bereich um das beste Verfahren zu bestimmen Ber cksich...

Страница 100: ...sgesamt vier installiert werden bevor darunter gearbeitet wird Beim Aufbocken m ssen Sie die Gesamtstabilit t des Ger tes ber cksichtigen Ein einfaches Aufbocken auf Unterstellb cken garantiert Ihre S...

Страница 101: ...C und die Riemenscheibe D 4 Vergewissern Sie sich dass sich der Riemen auf der Antriebsriemenscheibe A befindet f hren Sie ihn um die Umlenkrolle F herum und verbinden Sie die Spannfeder mit der Decks...

Страница 102: ...fahren durch weggeschleuderte Gegenst nde reduzieren Das M hwerk und die Schutzvorrichtungen k nnen nicht in jedem M hzustand das Entweichen aller Gegenst nde aus dem Messergeh use verhindern Es ist m...

Страница 103: ...Gras nass Gras vor dem M hen trocknen lassen Fahrgeschwindigkeit des Traktors reduzieren und gleichzeitig den Motor bei voller Drehzahl des Traktorzapfens betreiben PROBLEM M GLICHE URSACHE L SUNG Ver...

Страница 104: ...m zu vermeiden dass Sie sich in beweglichen Teilen verfangen Tragen Sie robuste Arbeitsschuhe mit grober Sohle und Schutzausr stung f r Augen Haare H nde Ohren und Kopf sowie gegebenenfalls Atemschutz...

Страница 105: ...nterlegscheiben 4 am Abbildung 20Getriebe 1 Abbildung 20 Montage der Antriebswelle Installation der Antriebswelle 1 Ziehen Sie den Schlie ring B zur ck w hrend Sie gleichzeitig den Antriebsstrang auf...

Страница 106: ...e Installieren der Schnell Anh ngerkupplung Optional HINWEIS Dieses Set erm glicht die nur Befestigung des M hers an einer standardm igen Schnell Anh ngerkupplung der Kategorie 1 1 Benutzen Sie eine d...

Страница 107: ...iert ist und dass der federbet tigte Sicherungsstift oder Schlie ring frei gleitet und in der Nut der Traktorzapfwelle sitzt ___ Zeigen Sie dem Kunden die sicheren und ordnungsgem en Verfahren f r das...

Страница 108: ...230 240 325 3 4 in 1 1 8 in 192 261 297 403 420 569 7 8 in 1 5 16 in 306 416 474 642 669 907 1 in 1 1 2 in 467 634 722 979 1020 1383 Durchmesser und Gewinde Millimeter Schrauben schl ssel GROBGEWINDE...

Страница 109: ...t ndiges Gewinde GA Gauge GR 5 etc Grad 5 usw HHCS Sechskantschraube HT Hitzebehandelt JIC Joint Industry Council 37 Grad Flare LH Linke Hand LT Links m Meter mm Millimeter M Au engewinde MPa Megapasc...

Страница 110: ...ng Produkt 38 Ersatzteile 39 BETRIEB Anpassung Schnitth hentabelle 9 Obere Traktor Verbindungsstange 9 Befestigung des M hers am Traktor 8 Einstellen der Schnitth he 9 Einrichten des vorderen Laufroll...

Страница 111: ...Verpflichtung von WOODS im Rahmen dieser Garantie beschr nkt sich nach Wahl von WOODS auf die kostenlose Reparatur oder den kostenlosen Ersatz des Produkts wenn WOODS es nach eigenem Ermessen f r feh...

Страница 112: ...ieser Garantie h lt Das Produkt muss innerhalb von drei ig 30 Tagen nach Entdeckung eines solchen Mangels oder einer solchen Nichteinhaltung an WOODS ber den H ndler oder Lieferanten ber den der Kauf...

Страница 113: ...PRINCIPAL CORTADORAS DE DESCARGA TRASERA MAN1260 09 4 2018 PRD6000E PRD7200E PRD8400E...

Страница 114: ...dsEquipment eu o llame al 32 10 301111 de B lgica El equipo que ha comprado ha sido dise ado y fabricado cuidadosamente para proporcionar un uso fiable y satisfactorio Como todos los productos mec nic...

Страница 115: ...deber a poder desarrollar los procedimientos adecuados para su situaci n espec fica Tanto las ilustraciones como los datos usados en este manual estaban actualizados en el momento de la impresi n Sin...

Страница 116: ...a toma de fuerza de la unidad el ctrica Nunca use manguitos ni ejes adaptadores Los adaptadores pueden provocar fallos en la transmisi n debido a un acanalado incorrecto o una longitud de funcionamien...

Страница 117: ...peque os o por debajo de los bordes de las pegatinas haciendo que se despeguen o se salgan Puede solicitar a su distribuidor de Woods pegatinas de seguridad nuevas de forma gratuita Para localizar a...

Страница 118: ...4 2018 PEGATINAS INSTRUCTIVAS Y DE SEGURIDAD ATENCI N PRESTE ATENCI N SU SEGURIDAD EST EN JUEGO Reempl celas inmediatamente si est n da adas 7 18865CSP 8 1004114CSP 9 33347CSP 5 18864CSP 6 18877CSP 10...

Страница 119: ...Declaraci n de conformidad 7 MAN1260 09 4 2018 Declaraci n de conformidad...

Страница 120: ...e de forma segura todas las esquinas con pies de apoyo y revise la estabilidad Bloquearlas de forma segura evita que el equipo se caiga debido a p rdidas de compresi n del sistema hidr ulico fallos de...

Страница 121: ...a los espaciadores de ajuste de los brazos de las ruedas pivotantes traseras 9 Para elevar el frontal del cortac sped mueva los espaciadores debajo de los brazos de las ruedas pivotantes delanteras Fi...

Страница 122: ...guraciones quite los tornillos de casquete y tuercas y mueva los brazos de un lado del riel de la rueda al otro Asegure con los mismos accesorios Los brazos de las ruedas pivotantes traseras deber an...

Страница 123: ...ura deseada a 90 grados en la primera pasada Recuerde las cuchillas afiladas producen un corte mas limpio y usan menos energ a Antes de entrar en una zona anal cela para determinar la mejor forma de p...

Страница 124: ...tro en total antes de trabajar debajo Tenga en cuenta la estabilidad general de la unidad al bloquearla Utilizar nicamente el bloqueo inferior de la unidad no garantiza su seguridad La superficie de t...

Страница 125: ...ea D tal como se muestra 4 Aseg rese de que el cintur n est en la polea de transmisi n A p selo alrededor de la polea gu a F y conecte el resorte del eje a la leng eta I en la plataforma 5 Sujete el c...

Страница 126: ...ta protecci n est dise ada para reducir el riesgo de que salgan objetos despedidos La plataforma del cortac sped y los dispositivos protectores no pueden evitar que todos los objetos salgan despedidos...

Страница 127: ...mer pase Levante la parte trasera del cortac sped lo suficiente para permitir que se descargue el material pero no tanto como para que ocurran las condiciones mencionadas anteriormente Hierba h meda D...

Страница 128: ...nicos Use siempre vestimenta relativamente ajustada y cerrada para evitar que quede atrapada en las piezas m viles Use calzado de trabajo resistente y con suela antideslizante equipos de protecci n pa...

Страница 129: ...20 Instalaci n del eje conductor trasero Instale el eje conductor 1 Tire del collar n de bloqueo B y al mismo tiempo empuje la transmisi n hacia los ejes de la caja de cambios hasta que el dispositivo...

Страница 130: ...girar libremente Figura 22 Instalaci n del rodillo delantero Instalaci n del juego de enganche r pido opcional NOTA Este juego permite que el cortac sped encaje nicamente con un enganche r pido est nd...

Страница 131: ...arse de que la transmisi n est bien instalada y de que la barra de seguridad de muelle o el collar n se deslizan libremente y est asentada en la ranura o en el eje de la toma de fuerza del tractor ___...

Страница 132: ...261 297 403 420 569 7 8 1 5 16 306 416 474 642 669 907 1 1 1 2 467 634 722 979 1020 1383 Di metro y paso de rosca mil metros Tama o de la llave inglesa ROSCA GRUESA ROSCA FINA Di metro y paso de rosca...

Страница 133: ...5 etc HHCS Tornillo con cabeza hexagonal HT Tratamiento t rmico JIC Joint Industry Council Consejo Conjunto Industrial Abocinado de 37 grados LH A la izquierda LT Izquierdo m Metro mm Mil metro M Mac...

Страница 134: ...te 9 Fijaci n del acoplamiento superior del tractor 9 Acoplamiento del cortac sped al tractor 8 Ajuste de la altura de corte 9 Configuraci n del brazo de la rueda pivotante delantera 10 Comprobaci n d...

Страница 135: ...da uno de sus respectivos fabricantes Esta garant a solo obligar a WOODS a la reparaci n o sustituci n sin coste del producto si WOODS en su criterio exclusivo estima que el producto est defectuoso o...

Страница 136: ...to est defectuoso o no cumple con esta garant a El producto se debe devolver a WOODS junto con un justificante de su compra en un plazo de treinta 30 d as despu s de que tal defecto o incumplimiento s...

Отзывы: