background image

Funcionamiento

 9

MAN1255 (19/3/2018)

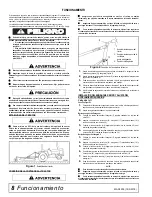
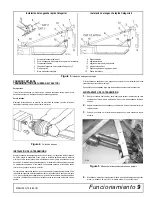
 Figura 3

Instalación del enganche rápido

CONEXIÓN Y RETIRADA 

TRANSMISIÓN (TOMA DE FUERZA DEL TRACTOR)

Para instalar:

Tire del collarín de bloqueo y, al mismo tiempo, empuje la transmisión hacia el eje de la caja

de cambios hasta que el dispositivo de bloqueo quede enganchado.

Para la retirada:

Mantenga la transmisión en su posición, tire del collarín de bloqueo, y deslice la línea de

transmisión fuera del eje de la toma de fuerza del tractor.

 Figura 4

Collarín de bloqueo

INSTALACIÓN DE LA TRANSMISIÓN

Acople la cortadora al enganche de tres puntos del tractor (o al enganche rápido si dispone
de  él)  No  acople  la  transmisión.  Eleve  y  baje  la  cortadora  para  determinar  la  distancia
máxima y mínima entre el eje de la toma de fuerza del tractor y el eje de entrada de la caja
de cambios. Si la distancia es demasiado grande, la transmisión será demasiado corta para
un  acoplamiento  adecuado.  Si  la  distancia  es  demasiado  pequeña,  la  transmisión  puede
tocar el fondo y dañar el cortador o el tractor.

La longitud de la transmisión debe ser lo suficientemente larga para ofrecer al menos 1/3 de
la longitud de enganche de la transmisión durante el funcionamiento. Debe haber al menos
101,6 mm (4 pulgadas) de acoplamiento en el punto de funcionamiento más bajo posible de
la cuchilla. La transmisión no debe tocar el fondo cuando se encuentre en la altura máxima
posible.

Si la transmisión es demasiado corta, póngase en contacto con su distribuidor de Woods
para obtener una transmisión más larga.

Si la transmisión es demasiado larga, siga las instrucciones para acortar la transmisión.

ACORTAMIENTO DE LA TRANSMISIÓN

1.

Mueva  la  cortadora  hacia  arriba  y  hacia  abajo  para  obtener  la  distancia  más  corta
posible entre el eje de la toma de fuerza del tractor y el eje de entrada de la caja de
cambios.

2.

Separe la transmisión en dos mitades y conéctelas a la toma de fuerza del tractor y la
caja de cambios.

3.

Coloque  las  mitades  de  la  transmisión  paralelas  entre  sí  para  determinar  cuánto
acortarla. 

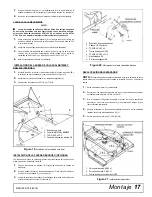
 Figura 5

Mitades de la transmisión colocadas en paralelo

4.

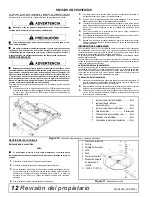
Mida desde el extremo del escudo superior hasta la base de la campana en el escudo
inferior (A). Añada 34,69 mm (1-9/16 in) a la dimensión (A). Consulte Figura 6.

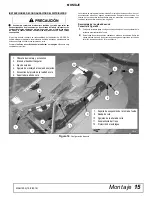
Instalación del enganche rápido Categoría I

Instalación del enganche rápido Categoría II

1. Acoplamiento superior del tractor
2. Punto de enganche del acoplamiento superior de la cortadora
3. Acoplamiento flotante
5. Pasador del enganche de la cortadora Categoría I y II
6. Eje de sujeción
7. Brazo del bastidor triangular

8. Enganche rápido
9. Agarradera trasera

10. Agujero del pivote del eje de sujeción
12. Acoplamiento del freno
13. Segundo agujero en el agujero del pivote

15. Placa del mástil

DP2

Содержание BRUSHBULL BB600XE

Страница 1: ...OPERATOR S MANUAL BRUSHBULL ROTARY CUTTER 3 19 2018 BB600XE BB720XE BB840XE MAN1255 TM...

Страница 2: ...ent eu or call 32 10 301111 in Belgium The equipment you have purchased has been carefully engineered and manufactured to provide dependable and satisfactory use Like all mechanical products it will r...

Страница 3: ...that will help you achieve years of dependable performance These instructions have been compiled from extensive field experience and engineering data Some informa tion may be general in nature due to...

Страница 4: ...300 feet 92 m Never direct discharge toward people animals or property Do not operate or transport equipment while under the influence of alcohol or drugs Operate only in daylight or good artificial...

Страница 5: ...afety 5 MAN1255 3 19 2018 3 PN1006681 5 PN 15502 1 SERIAL NUMBER PLATE 11 PN18864 14 PN 1004114 SAFETY INSTRUCTIONAL DECALS ATTENTION BECOME ALERT YOUR SAFETY IS INVOLVED Replace Immediately If Damage...

Страница 6: ...close to decals when using a pressure washer high pressure water can enter through very small scratches or under edges of decals causing them to peel or come off Replacement safety decals can be order...

Страница 7: ...Declaration of Conformity 7 MAN1253 3 15 2018...

Страница 8: ...activated locking pin or collar slides freely and is seated firmly in tractor PTO spline groove Make sure driveline will not bottom out at the shortest length and that it has at least 1 3 overlap at...

Страница 9: ...east 101 6 mm 4 inches of engagement at the cutter s lowest possible point of operation The driveline must not bottom out when raised to the maximum height possible If driveline is too short please ca...

Страница 10: ...intenance Avoid low cutting heights Striking the ground with blades pro duces one of the most damaging shock loads a cutter can encounter Allowing blades to contact ground repeatedly will cause damage...

Страница 11: ...TERIAL For shredding set the cutter lower at rear Determine how much lower to set the rear by experimenting in different situations STORAGE Disconnect cutter driveshaft and secure up off ground Raise...

Страница 12: ...rely block rear tractor wheels in front and behind Tighten tractor lower 3 point arm anti sway mechanism to prevent side to side movement LUBRICATION INFORMATION Use a lithium grease of 2 consistency...

Страница 13: ...cessive vibration which can damage gearbox bearings Vibra tion may also cause structural cracks to cutter 1 Sharpen both blades at the same time to maintain balance Follow original sharpening pattern...

Страница 14: ...facturer Inspect machine and replace worn or damaged parts Sand down scratches and the edges of areas of missing paint and coat with Woods spray paint of matching color purchase from your Woods dealer...

Страница 15: ...n be repaired without removing the gearbox from the cutter Seal Installation Refer to Figure 17 NOTE Proper seal installation is important An improperly installed seal will leak 1 Clean area in housin...

Страница 16: ...rom output shaft 4 12 Remove output shaft 4 by using a punch and hammer and tap on top to drive down Remove gear 5 and shim 16 from inside housing 13 Remove bottom bearing 26 by using a punch and hamm...

Страница 17: ...h 16 Press in input oil seal 19 using tube of correct diameter Be careful not to damage seal lip 17 Press oil cap 20 on to cover the rear of housing using a tube of the correct diameter 18 Place top c...

Страница 18: ...arbox shaft and slots in nuts Twist end of pin around nut 3 Figure 21 UNIVERSAL JOINT REPAIR Figure 22 U Joint Exploded View U Joint Disassembly 1 Remove external snap rings from yokes in four locatio...

Страница 19: ...ing cup directly across from first cup and press in as far as possible with hand pressure Trap cups in vise and apply pressure Be sure journal cross is started into bearings and continue pressure with...

Страница 20: ...ally assembled Assembly will be easier if aligned and loosely assembled before tightening hardware Recommended torque val ues for hardware are located in the Bolt Torque Chart page 32 Disassemble Ship...

Страница 21: ...ront driveline half SAFETY SHIELDING INSTALLATION Chain Shielding Installation Optional Full chain rubber or steel band shielding must be installed when operating in populated areas or other areas whe...

Страница 22: ...AL Check chains are used to carry the front of cutter at a set height See Figure 34 1 Thread check chains 3 through check chain bracket 2 2 Attach lower end of check chain 3 to mast plate with bolt 6...

Страница 23: ...ow customer how to make adjustments Describe the options available for this cutter and explain their purpose ___ Explain importance of lubrication to customer and point out lubrica tion points on cutt...

Страница 24: ...24 Assembly MAN1255 3 19 2018 NOTES...

Страница 25: ...L Rotary Cutters BB600XE BB720XE BB840XE BB600XE BB720XE BB840XE ASSEMBLY 26 27 GEARBOX ASSEMBLY 28 29 FRONT REAR CHAIN SHIELDING OPTIONAL 30 RUBBER SHIELDING STANDARD 31 CHECK CHAIN ASSEMBLY OPTIONAL...

Страница 26: ...26 Parts MAN1255 3 19 2018 BB600XE BB720XE BB840XE ASSEMBLY 78 Safety Decal Set 79 Complete Decal Set...

Страница 27: ...CS GR5 33 692RP 4 5 8 Flat washer ZP 34 19025RP 22 5 8 NC Flange head lock nut 35 67222RP 2 Sleeve 15 9 x 25 4 x 17 1 mm 5 8 x 1 x 43 64 HT REF PART QTY DESCRIPTION 36 986RP 1 5 8 NC x 2 3 4 HHCS GR5...

Страница 28: ...28 Parts MAN1255 3 19 2018 GEARBOX ASSEMBLY...

Страница 29: ...cup cone 8 57338 1 Protective seal 9 1 Cotter pin B 4 x 50 10 57320 2 Snap ring 85 UNI7437 REF PART QTY DESCRIPTION 11 57321 1 Snap ring 50 UNI7435 12 57471 1 Shim 45 3 x 2 5 57471 Kit 13 57471 2 Shi...

Страница 30: ...1003645 1007850 1007851 243 Dia bent pin front 4 5496 5496 5496 5 16 7 Link chain front 6 1 57142RP 57088RP 57125RP Right rear chain plate 7 1 57141RP 57089RP 57149RP Left rear chain plate 8 2 57138...

Страница 31: ...or 1098 6 mm 43 25 BB840XE 2 1013214RP 2 Link 6 4 x 25 4 x 730 3 mm 25 x 1 00 x 28 75 BB600XE 2 1013215RP 2 Link 6 4 x 25 4 x 882 7 mm 25 x 1 00 x 34 75 BB720XE 2 1024118RP 4 Link 6 4 x 25 4 x 406 4 m...

Страница 32: ...2 Sleeve 31 8 ID x 38 1 ID x 1 25 OD x 47 2 mm 1 25 ID x 1 50 OD x 1 86 10 15591 2 Wheel hub assembly includes item 21 11 15574RP 2 Sleeve 31 8 ID x 38 1 ID x 22 9 mm 1 25 ID x 1 50 OD x 903 REF PART...

Страница 33: ...1 2 467 634 722 979 1020 1383 Diameter Thread Pitch Millimeters Wrench Size COARSE THREAD FINE THREAD Diameter Thread Pitch Millimeters MARKING ON HEAD MARKING ON HEAD Metric 8 8 Metric 10 9 Metric 8...

Страница 34: ...HHCS Hex Head Cap Screw HT Heat Treated JIC Joint Industry Council 37 Degree Flare LH Left Hand LT Left m Meter mm Millimeter M Male MPa Mega Pascal N Newton NC National Coarse NF National Fine NPSM...

Страница 35: ...uals 2 Product Registration 2 Specifications 3 Table of Contents 3 Warranty Product 37 Replacement Parts 36 O OPERATION Check Chain Adjustment 10 Connecting and Removing Driveline 9 Connecting Cutter...

Страница 36: ...scretion deems it to be defective or in noncompliance with this Warranty The product must be returned to WOODS with proof of purchase within thirty 30 days after such defect or noncompliance is discov...

Страница 37: ...tion under this Warranty is limited to at WOODS option the repair or replacement free of charge of the product if WOODS in its sole discretion deems it to be defective or in noncompliance with this Wa...

Страница 38: ...MANUEL D UTILISATION BRUSHBULL MAN1255 3 19 2018 BB600XE BB720XE BB840XE TM FAUCHEUSE ROTATIVE...

Страница 39: ...eurs sur www WoodsEquipment eu ou appelez le 32 10 301111 Belgique L quipement que vous avez achet a t con u et fabriqu avec le plus grand soin pour assurer un usage fiable et satisfaisant Comme tous...

Страница 40: ...vit et fiabilit dans les performances Ces instruc tions ont t puis es dans un vaste r servoir d exp rience pratique et de don n es techniques Certaines informations peuvent s av rer de caract re g n...

Страница 41: ...e de qualit Ne pas approcher les mains les pieds les cheveux ou les v tements de l quipement lorsque le moteur est en marche Se tenir distance s re des pi ces en mouvement Toujours respecter la l gisl...

Страница 42: ...9 2018 3 ART 1006681EF 5 ART 15502EF 1 PLAQUE SIGNAL TIQUE 11 ART 18864EF 14 ART 1004114EF AUTOCOLLANTS S CURIT ET INFORMATIONS ATTENTION FAIRE PREUVE DE VIGILANCE LA S CURIT EN D PEND remplacer imm d...

Страница 43: ...aute pression peut p n trer par de tr s petites gratignures ou sous les bords des autocollants et les d coller ou s parer Pour trouver votre revendeur le plus proche consultez le localisateur de conce...

Страница 44: ...7 D claration de Conformit MAN1255 3 19 2018 Declaration of Conformity...

Страница 45: ...travail solides semelle paisse et un quipement protecteur sur les yeux les cheveux les mains les oreilles et la t te le cas ch ant porter un masque respiratoire filtre ou non STABILIT DU TRACTEUR Lors...

Страница 46: ...8 Relever la faucheuse en position de transport et r gler la bielle sup rieure du tracteur jusqu ce que la faucheuse soit de niveau en position relev e AVIS viter le contact avec l arbre de transmissi...

Страница 47: ...ut raccourcir l arbre Figure 5 Moiti s d arbre de transmission plac es parall lement 4 Mesurer la distance entre l extr mit de la protection sup rieure et le bas de la cloche de protection inf rieure...

Страница 48: ...tracteur afin d obtenir une coupe franche sans soumettre le moteur un trop grand effort Utiliser une vitesse de d placement lente pour obtenir un meilleur hachage La vitesse de d placement correcte d...

Страница 49: ...heuse 3 Une fois la faucheuse reposant de tout son poids sur les b quilles faire l essai de la stabilit des cales avant de travailler dessous 4 Si la faucheuse est attel e au tracteur durant l immobil...

Страница 50: ...u de clavette 6 de glisser dans la rainure de la broche de lame 6 Poser le clip 7 de la lame par dessus la plaque de trou de clavette et dans la rainure de la broche de lame 7 Fixer en place l aide du...

Страница 51: ...ourroies chaque jour de travail Les remplacer si elles sont fis sur es ou cass es Protection de cha ne en option Examiner la protection de cha ne chaque jour de travail et remplacer toute cha ne rompu...

Страница 52: ...uch e Mat riau trop haut et trop fourni Ralentir la vitesse de d placement du tracteur mais maintenir une vitesse de PDF de 540 tr mn ou bien faire deux passes sur le mat riau Relever la faucheuse pou...

Страница 53: ...IRE ___ D montrer au client les m thodes de r glage cor rectes D crire les options disponibles pour cette fau cheuse et en expliquer l objet ___ D montrer au client les m thodes de lubrification et en...

Страница 54: ...es pi ces fix es la faucheuse avec du fil de fer ou des attaches Enlever les pi ces du tube manuel et la boulonnerie fixant le support de roue arri re 6 et les bras de renfort 8 la faucheuse Figure 25...

Страница 55: ...causer des blessures ou des d g ts mat riels Si cette machine n est pas quip e d une telle protection le travail doit tre arr t d s que quelqu un s approche moins de 92 m tres 300 ft Cette protection...

Страница 56: ...GL 5 4 Mettre le bouchon lat ral et bouchon d a ration en place DOUBLE ROUE ARRI RE BB720XE BB840XE EN OPTION 1 Fixer la roue arri re jumel e 1 au ch ssis principal 2 en utilisant la position 5B et l...

Страница 57: ...c t du ch ssis arri re Serrer 47 5 N m 35 lbs ft 3 Tourner le d flecteur de 180 degr s Fixer l int rieur des deux supports de montage l aide des boulons de carrosserie 2 et crous de blocage 3 pr c de...

Страница 58: ...in 306 416 474 642 669 907 1 in 1 1 2 in 467 634 722 979 1020 1383 A TABLEAU DES COUPLES DE SERRAGE POUR S RIE SAE Identification des t tes de boulon SAE SAE cat gorie 2 pas de tirets SAE cat gorie 5...

Страница 59: ...me britannique BSPTM Filetage conique m le de tuyauterie norme britannique CV V locit constante CCW Sens inverse des aiguilles d une montre CW Sens des aiguilles d une montre F Femelle GA Calibre GR 5...

Страница 60: ...t du concessionnaire 16 Liste de contr le avant la livraison responsatilit du concessionnaire 16 S CURIT Autocollants s curit et informations 5 6 D claration de conformit 7 Explication du symbole d al...

Страница 61: ...aire du concessionnaire ou distributeur chez qui l achat a t fait WOODS est tenu d effectuer la r paration ou le remplacement dans des d lais raisonnables apr s sa r ception du produit IL N EXISTE AUC...

Страница 62: ...que ledit vice ou d faut de conformit a t d couvert ou aurait d l tre achemin par l interm diaire du concessionnaire ou distributeur chez qui l achat a t fait WOODS est tenu d effectuer la r paration...

Страница 63: ...TRINCIATRICE ROTANTE BRUSHBULL 19 03 2018 MAN1255 TM BB600XE BB720XE BB840XE...

Страница 64: ...er Locator sul sito www WoodsEquipment eu oppure chiamare il numero 32 10 301111 in Belgio L attrezzatura acquistata stata accuratamente progettata e realizzata per garantire un utilizzo sicuro e sodd...

Страница 65: ...ormazioni e istruzioni che aiutano l operatore a ottenere prestazioni durature e affidabili Queste istruzioni sono state redatte sulla base di una vasta esperienza sul campo e una grande quantit di da...

Страница 66: ...rimbalzino e volino via percorrendo fino a 92 m 300 ft Non dirigere mai lo scarico verso persone animali o propriet Non utilizzare o trasportare l attrezzatura sotto l effetto di alcol o droghe Utili...

Страница 67: ...2018 3 PN1006681IT 5 PN 15502IT 1 TARGHETTA CON NUMERO DI SERIE 11 PN18864IT 14 PN 1004114IT ETICHETTE DI SICUREZZA E INFORMATIVE ATTENZIONE SIATE VIGILI LA VOSTRA SICUREZZA IN PERICOLO Sostituire imm...

Страница 68: ...ette quando si usa un idropulitrice l acqua ad alta pressione potrebbe penetrare attraverso minuscoli graffi o sotto i bordi delle etichette facendole staccare Copie delle etichette di sicurezza posso...

Страница 69: ...Dichiarazione di conformit 7 MAN1253 15 03 2018...

Страница 70: ...pdp del trattore Q Assicurarsi che l albero di trasmissione non sia accorciato al massimo e che abbia almeno una sovrapposizione di 1 3 sulla lunghezza maggiore Q Regolando la trinciatrice in posizio...

Страница 71: ...6 mm 4 pollici di innesto nel punto pi basso in funzione della trinciatrice L albero di trasmissione non deve toccare alla base quando viene sollevato ad altezza massima Se l albero di trasmissione tr...

Страница 72: ...glio basse Colpire il suolo con le lame produce uno dei carichi d urto pi dannosi per una trinciatrice Consentire alle lame di toccare il suolo ripetutamente causer danni alla trinciatrice e alla tras...

Страница 73: ...re la parte posteriore della trinciatrice Determinare quanto in basso posizionare la parte posteriore sperimentando diverse condizioni STOCCAGGIO Disconnettere l albero di trasmissione della trinciatr...

Страница 74: ...trattore per impedire oscillazioni da un lato all altro INFORMAZIONI DI LUBRIFICAZIONE Utilizzare grasso al litio di consistenza 2 con additivi MoS2 bisolfuro di molibdeno per tutte le aree salvo div...

Страница 75: ...nciate si verificheranno vibrazioni eccessive che possono danneggiare i cuscinetti della scatola del cambio Inoltre le vibrazioni possono provocare crepe strutturali alla trinciatrice 1 Affilare entra...

Страница 76: ...ti usurate o danneggiate O Carteggiare i graffi e i bordi delle aree prive di vernice e applicare una vernice a spruzzo Woods del colore corrispondente acquistarla dal rivenditore Woods locale O Sosti...

Страница 77: ...emblaggio sar pi semplice se i componenti sono allineati e assemblati in modo allentato prima di serrare i bulloni I valori di coppia raccomandati per i bulloni sono disponibili nella tabella coppie d...

Страница 78: ...ntrata del cambio e fissarlo con bulloni 1 e dadi 2 4 Lubrificare la met posteriore dell albero di trasmissione e installare la met anteriore INSTALLAZIONE DELLE PROTEZIONI DI SICUREZZA Installazione...

Страница 79: ...nsione vengono utilizzare per portare la parte anteriore della trinciatrice a una determinata altezza Vedere Figura 34 1 Filettare le catene di tensione 3 attraverso la staffa della catena di tensione...

Страница 80: ...correttamente CONTROLLO PER LA CONSEGNA RESPONSABILIT DEL RIVENDITORE ___ Mostrare al cliente come eseguire le modifiche Descrivere le opzioni disponibili per questa trinciatrice e illustrarne lo sco...

Страница 81: ...Assemblaggio 19 MAN1255 19 03 2018 NOTE...

Страница 82: ...192 261 297 403 420 569 7 8 in 1 5 16 in 306 416 474 642 669 907 1 in 1 1 2 in 467 634 722 979 1020 1383 Diametro e passo filettatura millimetri Dimensioni chiave FILETTATURAA PASSO GROSSO FILETTATURA...

Страница 83: ...termicamente JIC Filettatura Joint Industry Council con svasatura di 37 LH Lato sinistro SX Sinistra m Metri mm Millimetri M Maschio MPa Mega Pascal N Newton NC Filettatura a passo grosso NF Filettatu...

Страница 84: ...tore 8 Stoccaggio 11 Tecnica operativa 11 Triturare il materiale 11 G Generale Abbreviazioni 21 Garanzia Parti di ricambio 22 Prodotto 23 Informazioni generali 3 Introduzione 2 Ottenere copie del manu...

Страница 85: ...sua esclusiva discrezione lo ritenga difettoso o non conforme alla presente Garanzia Il prodotto deve essere restituito a WOODS insieme alla prova d acquisto entro trenta 30 giorni dal momento in cui...

Страница 86: ...ivi produttori L obbligo di WOODS ai sensi della presente Garanzia si limita a discrezione della stessa alla riparazione o alla sostituzione a titolo gratuito del prodotto qualora l azienda a sua escl...

Страница 87: ...BRUSHBULL SICHELM HER 19 03 2018 BB600XE BB720XE BB840XE MAN1255 TM...

Страница 88: ...32 10 301111 in Belgien Die von Ihnen erworbenen Ger te wurden sorgf ltig entwickelt und hergestellt um einen zuverl ssigen und zufriedenstellenden Einsatz zu gew hrleisten Wie alle mechanischen Produ...

Страница 89: ...en und Anleitungen die Ihnen helfen jahrelange zuverl ssige Leistung zu erreichen Diese Anleitung wurde aus umfangreichen Praxiserfahrungen und technischen Daten zusammengestellt Einige Informationen...

Страница 90: ...der transportieren Sie keine Ger te unter dem Einfluss von Alkohol oder Drogen Arbeiten Sie nur bei Tageslicht oder gutem Kunstlicht Halten Sie H nde F e Haare und Kleidung vom Ger t fern wenn der Mot...

Страница 91: ...1255 19 03 2018 3 PN1006681GE 5 PN 15502GE 1 SERIENNUMMERNSCHILD 11 PN18864GE 14 PN 1004114GE SICHERHEITS UND ANWEISUNGSAUFKLEBER ACHTUNG AUFMERKSAM LESEN ES BETRIFFT IHRE SICHERHEIT Bei Besch digung...

Страница 92: ...Hochdruckreinigers zu nahe an die Sicherheitsaufkleber zu spr hen Hochdruckwasser kann durch sehr kleine Kratzer oder unter die Kanten der Aufkleber dringen wodurch sie abbl ttern oder sich abl sen E...

Страница 93: ...Konformit tserkl rung 7 MAN1253 15 03 2018...

Страница 94: ...er bund frei gleitet und fest in der Nut des Traktorzapfen sitzt Q Achten Sie darauf dass der Antriebsstrang bei geringster L nge nicht auf den Boden durchh ngt und bei gr ter L nge mindestens 1 3 ber...

Страница 95: ...unkt des M hers mindestens 101 6 mm 4 in betragen Der Antriebsstrang darf nicht den Boden ber hren wenn der M her auf die h chstm gliche Position angehoben wird Wenn der Antriebsstrang zu kurz ist wen...

Страница 96: ...alten Sie alle Personen vom Bedienerkontrollbereich fern w hrend Sie Einstellungen Service oder Wartungsarbeiten durchf hren Q Vermeiden Sie niedrige Schnitth hen Eine Bodenber hrung der Messer erzeug...

Страница 97: ...hten SCHREDDERN VON MATERIAL Stellen Sie den M her zum Schreddern hinten niedriger ein Um wie viel niedriger sollten Sie in verschiedenen Situationen durch Ausprobieren feststellen LAGERUNG Trennen Si...

Страница 98: ...r sicher davor und dahinter Ziehen Sie die untere Dreipunkt Armschwenksicherung des Traktors fest damit es w hrend des Transports keine seitliche Bewegung gibt SCHMIERUNGSHINWEISE Verwenden Sie ein Li...

Страница 99: ...esser immer paarweise Nicht ausbalancierte Messer verursachen berm ige Vibrationen die die Getriebelager besch digen k nnen Vibrationen k nnen auch Strukturrisse am M her verursachen 1 Sch rfen Sie im...

Страница 100: ...wird befolgen Sie die Anweisungen des Hochdruckreiniger Herstellers O Inspizieren Sie die Maschine und ersetzen Sie verschlissene oder besch digte Teile O Schleifen Sie Kratzer und die R nder von Ber...

Страница 101: ...enn die Komponenten vor dem Festziehen des Montageschrauben ausgerichtet und lose montiert werden Die f r Montagematerial empfohlenen Drehmomentwerte finden Sie in der Schrauben Drehmoment Tabelle auf...

Страница 102: ...tere H lfte des Antriebsstrang und bauen Sie die vordere H lfte des Antriebsstrangs ein INSTALLIEREN DER SICHERHEITSABSCHIRMUNG Installieren der Kettenabschirmung optional Eine vollst ndige Ketten Gum...

Страница 103: ...lketten wird die Vorderseite des M hers bei einer bestimmten H he gehalten Siehe Abbildung 34 1 Ziehen Sie die Kontrollkette 3 durch den Kontrollkettenb gel 2 2 Befestigen Sie das untere Ende der Kont...

Страница 104: ...die f r diesen M her verf gbaren Optionen und erl utern Sie deren Zweck ___ Erkl ren Sie dem Kunden die Wichtigkeit der Schmierung und zeigen Sie ihm die Schmierstellen am M her ___ Legen Sie das Bedi...

Страница 105: ...Montage 19 MAN1255 19 03 2018 HINWEISE...

Страница 106: ...240 325 3 4 in 1 1 8 in 192 261 297 403 420 569 7 8 in 1 5 16 in 306 416 474 642 669 907 1 in 1 1 2 in 467 634 722 979 1020 1383 Durchmesser und Gewinde Millimeter Schrauben schl ssel GROBGEWINDE FEI...

Страница 107: ...iges Gewinde GA Gauge GR 5 etc Grad 5 usw HHCS Sechskant Zylinderschraube HT Hitzebehandelt JIC Joint Industry Council 37 Grad Flare LH Linke Hand LT Links m Meter mm Millimeter M Au engewinde MPa Meg...

Страница 108: ...nh ngerkupplung Kategorie II 8 Einstellen der Kontrollkette 10 Einstellen der Schnitth he 10 Installieren des Antriebsstrangs 9 K rzen des Antriebsstrangs 9 Lagerung 11 Schreddern von Material 11 Trak...

Страница 109: ...Garantie h lt Das Produkt muss innerhalb von drei ig 30 Tagen nach Entdeckung eines solchen Mangels oder einer solchen Nichteinhaltung an WOODS ber den H ndler oder Lieferanten ber den der Kauf erfolg...

Страница 110: ...ie Verpflichtung von WOODS im Rahmen dieser Garantie beschr nkt sich nach Wahl von WOODS auf die kostenlose Reparatur oder den kostenlosen Ersatz des Produkts wenn WOODS es nach eigenem Ermessen f r f...

Страница 111: ...BRUSHBULL DESBROZADORA GIRATORIA 19 3 2018 BB600XE BB720XE BB840XE MAN1255 TM...

Страница 112: ...dsEquipment eu o llame al 32 10 301111 de B lgica El equipo que ha comprado ha sido dise ado y fabricado cuidadosamente para proporcionar un uso fiable y satisfactorio Como todos los productos mec nic...

Страница 113: ...i n Proporciona informaci n e instruc ciones que le ayudar n a lograr a os de funcionamiento fiable Estas instrucciones han sido recopiladas gracias a una amplia experiencia en el ter reno y datos de...

Страница 114: ...personas animales o propiedad No haga funcionar ni transporte el equipo si ha consumido drogas o alcohol Haga funcionar la m quina solo durante el d a o con buena luz artificial Mantenga las manos los...

Страница 115: ...18 3 PN PN1006681CSP 5 PN 15502CSP 1 PLACA DEL N MERO DE SERIE 11 PN18864CSP 14 PN 1004114CSP PEGATINAS INSTRUCTIVAS Y DE SEGURIDAD ATENCI N PRESTE ATENCI N SU SEGURIDAD EST EN JUEGO Reempl celas inme...

Страница 116: ...sar un limpiador a presi n el agua a alta presi n puede penetrar a trav s de ara azos muy peque os o por debajo de los bordes de las pegatinas haciendo que se despeguen o se salgan Puede solicitar a s...

Страница 117: ...Declaraci n de conformidad 7 MAN1253 15 3 2018...

Страница 118: ...de la toma de fuerza del tractor Q Aseg rese de que la transmisi n no toque el fondo en la longitud m s corta y que tenga al menos 1 3 de superposici n en la longitud m s larga Q Con la cortadora aju...

Страница 119: ...ionamiento m s bajo posible de la cuchilla La transmisi n no debe tocar el fondo cuando se encuentre en la altura m xima posible Si la transmisi n es demasiado corta p ngase en contacto con su distrib...

Страница 120: ...pear el suelo con las cuchillas es uno de los incidentes m s da inos que puede sufrir una cuchilla Permitir que las cuchillas entren en contacto con la tierra repetidamente causar da os a la cortadora...

Страница 121: ...jar la parte posterior probando en diferentes situaciones ALMACENAMIENTO Desconecte el eje de la transmisi n de la cortadora y aseg rela sin que toque el suelo Eleve la cortadora con el enganche de tr...

Страница 122: ...imiento lateral INFORMACI N DE LUBRICACI N Use una grasa de litio del n 2 con un aditivo de disulfuro de molibdeno MOLY para todas las localizaciones a menos que se avise de lo contrario Aseg rese de...

Страница 123: ...n pares Las cuchillas desequilibradas pueden provocar una vibraci n excesiva lo que puede da ar los cojinetes de la caja de cambios La vibraci n podr a tambi n provocar grietas estructurales en la cor...

Страница 124: ...s reas donde falta pintura y recubrimiento con pintura en aerosol Woods del mismo color c mprela en su distribuidor Woods O Sustituya las pegatinas de seguridad que falten o que no sean legibles sumin...

Страница 125: ...entes est n alineados y apenas montados antes de apretar los accesorios Los valores del par de apriete recomendados para los accesorios se encuentran en el cuadro de par de apriete de los pernos p gin...

Страница 126: ...cas 2 4 Lubrique la mitad trasera de la transmisi n e instale la mitad frontal de la transmisi n INSTALACI N DE LA PROTECCI N DE SEGURIDAD Instalaci n de la protecci n de la cadena opcional Se debe in...

Страница 127: ...l INSTALACI N DE LA CADENA DE BOQUEO OPCIONAL Las cadenas de bloqueo se utilizan para llevar la parte delantera del cortador a una altura establecida Consulte la Figura 20 1 Coloque las cadenas de blo...

Страница 128: ...rrectamente VERIFICACI N DE ENTREGA RESPONSABILIDAD DEL DISTRIBUIDOR ___ Muestre al cliente c mo realizar ajustes Describa las opciones dis ponibles para esta cortadora y explique su prop sito ___ Exp...

Страница 129: ...Montaje 19 MAN1255 19 3 2018 NOTAS...

Страница 130: ...61 297 403 420 569 7 8 1 5 16 306 416 474 642 669 907 1 1 1 2 467 634 722 979 1020 1383 Di metro y paso de rosca mil metros Tama o de la llave inglesa ROSCA GRUESA ROSCA FINA Di metro y paso de rosca...

Страница 131: ...5 etc HHCS Tornillo con cabeza hexagonal HT Tratamiento t rmico JIC Joint Industry Council Consejo Conjunto Industrial Abocinado de 37 grados LH A la izquierda LT Izquierdo m Metro mm Mil metro M Mach...

Страница 132: ...ridad Instalaci n de la protecci n de la cadena opcional 16 Instalaci n del deflector de goma opcional 16 Instrucciones de configuraci n del distribuidor 15 Desmontaje de la unidad de env o 15 Llenado...

Страница 133: ...to est defectuoso o no cumple con esta garant a El producto se debe devolver a WOODS junto con un justificante de su compra en un plazo de treinta 30 d as despu s de que tal defecto o incumplimiento s...

Страница 134: ...da uno de sus respectivos fabricantes Esta garant a solo obligar a WOODS a la reparaci n o sustituci n sin coste del producto si WOODS en su criterio exclusivo estima que el producto est defectuoso o...

Отзывы: