background image

Woodfold Mfg., Inc
P.O. Box 346
Forest Grove, OR  97116

Voice [503] 357-7181

Fax: [503] 357-7185

www.woodfold.com

D

oor

 I

nstallatIon

D

oor

 S

erieS

: 240, 440, 540, 640 

anD

 740

B

ulletIn

 I

nstall

-s

tanDarD

-120906

Read and understand these instructions before proceeding!

It saves frustration!


Beginning installation before checking things out is discouraged!

Measure Twice - Cut Once

 so to speak 

P

reParation

Preliminary Examination

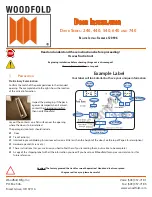
Confirm the match of the packaged door to the intended 

opening. The example label to the right shows the location 

of the critical information.

Inspect the packaging. If the pack-

age was damaged when it arrived, 

contact the shipping carrier first, 

then notify Woodfold.

Lay out the contents on a flat surface near the opening 

where the door is to be installed. 
The package(s) contents should include 


;

 Door


;

Track Section(s)


;

Interlocking Jamb Molding (Aluminum extrusion a little less than the height of the door. See the top of Page 5 for description.) 


;

Hardware packet (Screws etc.)


;

These instructions (Yes, yes, we know you had to find them if you’re reading them, but we like to be complete.)


;

A copy of the shipping label with all the information you need if you have to call Woodfold for any reason. Hold on to it for 

future reference.


Caution! The factory greased the track for smooth operation! Hands and tools can spread

the grease all over, so please be careful

.

Opening

Width

Opening

Height

Right/Left 

Hand Stack

Latch Style

Single/Double End

Door Series

Number and Length

of Track Pieces

Order Number

Example Label

Your label will look similar but have your unique information

Sample

Содержание 240 Series

Страница 1: ...ents on a flat surface near the opening where the door is to be installed The package s contents should include Door Track Section s Interlocking Jamb Molding Aluminum extrusion a little less than the height of the door See the top of Page 5 for description Hardware packet Screws etc These instructions Yes yes we know you had to find them if you re reading them but we like to be complete A copy of...

Страница 2: ...hose shown in illustrations Caution Firmly attach the track to the structural header Sheetrock and many decorative materials do not provide adequate support There are different installation techniques for Standard typically single section Track and Pin multi section Track Compare your track to the illustration and use the appropriate following section Verify that the track length is correct Dry fi...

Страница 3: ...mate to the next section The split in the pin MUST BE AWAY perpendicular see inset illustration below from the slot in the track Drive the spring pins completely into one track using a hammer Thread the track onto wheels lineup the wheels properly in the track grooves Be careful not to insert the wheels sideways You won t like the result Stack the door to one end of the track section and attach th...

Страница 4: ... against the Mounting Panel it should form a neat tight stack DON T Force it If it binds you missed your marks When the door stacks properly re extend it and install 2 more screws between the first 2 about equal distances apart Mark wall near top and bottom at edge of Mounting Panel It is important Make the marks while the door is in its stacked position or the door will not close properly OK Here...

Страница 5: ...rt word about Interlocking Jamb Moldings The Interlocking Jamb Molding is the extruded piece into which the door latches If your door is a Pair and slides from each end to meet in the middle and your Interlocking Jamb Molding is already installed on a lead post of the door and you may disregard this section Configurations where the door closes to a wall or doorjamb will have a separate piece with ...

Страница 6: ...use household cleaners abrasive towels or scouring pads Wood veneer doors can be treated periodically using a furniture polish cleaner Acrylic Aluminum panel doors can be treated periodically with non abrasive anti static cleaner to reduce dust accumulation Check it out Open and close the door a few times then step back and admire your work Installation is complete Magnetic Latch Dry fit the Inter...

Отзывы: