Wonde Proud BT-55 Скачать руководство пользователя страница 4

BT-55

Button & Signals

BT-55 Quick Tips

After acquiring your BT-55, proceed with the following steps:

1. Install battery prior to use.    Battery needs to be charged for at least 

eight hours at the first time.

Battery low        When LED 1 flashes green light, it signals battery low. Connect BT-55 to a power 

source for continue operation and recharge simultaneously.

Charging

ʳ ʳ ʳ

When battery is being charged, LED 1 turns to orange light; When the battery has 

been fully charged, LED 1 turns on green light.

2.Turn on BT-55

Press the power button for 2 second or until LED1 turns into red and green light flashing, and the LED 

2 turns to blue flashing light. This is to activate Bluetooth pairing, it only required once on first use.

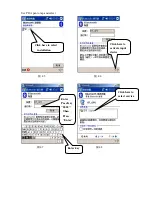
3. Activate Bluetooth function in your PDA / PC

Prior to activating the Bluetooth function in our PDA / PC, make sure your device is equipped with 

Bluetooth function, and the driver software has been installed. 

Illustrations using HP 2100 PDA as follows:

LED1

LED2

Power

Button

External

Power

Socket

Содержание BT-55

Страница 1: ...USER S MANUAL FCC ID SRKWPBT55X...

Страница 2: ...ence by one of more of the following measures Reorient or relocate the receiving antenna Increase the separation between the equipment and receiver Connect the equipment into an outlet on a circuit di...

Страница 3: ...Receiver User s Guide Jun 12 2004 V 1 0 Wound Proud Corporation 21F NO 100 SEC 1 SINTAL 5TH RD SIJHIH CITY TAIPEI COUNTY 221 TAIWAN R O C Tel 886 2 26961179 Fax 886 2 26968499 Web www wondeproud com E...

Страница 4: ...s to orange light When the battery has been fully charged LED 1 turns on green light 2 Turn on BT 55 Press the power button for 2 second or until LED1 turns into red and green light flashing and the L...

Страница 5: ...Make sure Bluetooth is turned on 3 1 3 2 Notice the Bluetooth symbol changed 3 3 Bluetooth mode Off Bluetooth mode ON Click here to access Bluetooth...

Страница 6: ...ger Established New Connections 4 1 4 2 Before going to next step press Bluetooth GPS key for 4 seconds until LED 2 starting to flash signaling the connecting is in progress 4 3 4 4 Click here Click h...

Страница 7: ...Use PDA pen to tap and select 4 5 4 6 4 7 4 8 Enter Pass Key 0000 Then Press Enter Click here to activate input device Click here to select installation Click here to select service Enter key...

Страница 8: ...4 9 4 10 At this point Bluetooth GPS connection has been successfully established 4 11 Click here Click here Established connection...

Страница 9: ...5 Connecting Bluetooth GPS with Electronic Map 5 1 5 2 How to access electronic map take Papago for example 5 3 5 4 Click here Access Electronic Map via COM 8 Click here Click here Click here...

Страница 10: ...changed user may skip to next step illustration 5 6 direct 5 7 5 8 When LED 2 flashes it is signaling Bluetooth GPS and the electronic map connection is in progress Select COM 8 Set up 9600 bps Click...

Страница 11: ...About signals LED1 a Red light indicates GPS tracking function has been activated b Orange light indicates BT 55 is being charged c Green light while flashing indicates battery low steady indicates ba...

Отзывы: