


10
07
Ensure that the compressor draws clean
air
For the correct function and longevity of your air com-
pressor it is important that the air, which is drawn into
the compressor is clean. The compressor should not
be used in an area, where the air is contaminated
with dust or over-spray from spraying applications.
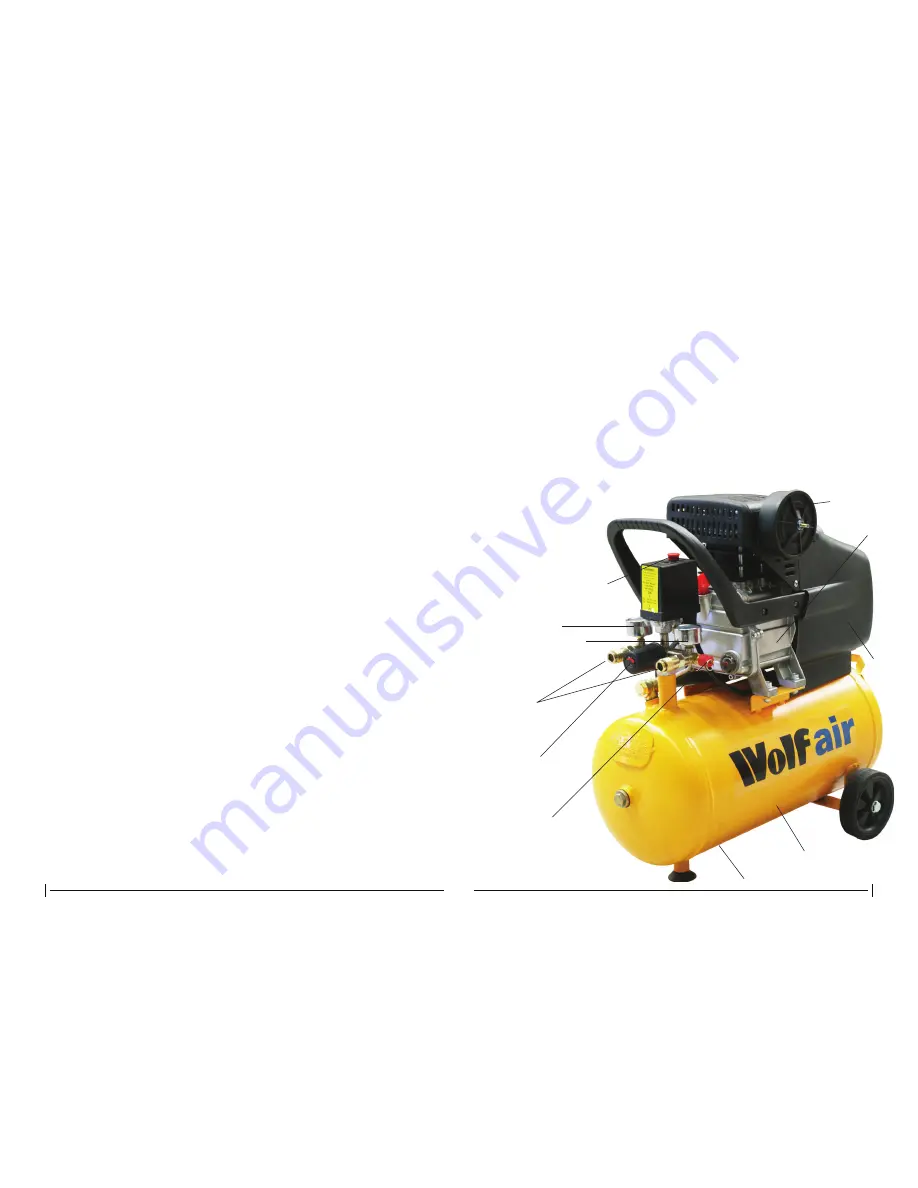
Component parts (Refer to Fig 1)
1. Motor and Pump Unit
2. Air Filter Cover
3. Fan (inside cover)
4. Air Receiver (tank)
5. Drain Valve
6. Air Receiver (tank) Pressure Gauge
7. Air Outlet Pressure Gauge
8. Air Outlets
9. Air Outlet Pressure Regulator
10. Pressure Switch (on/off)
11. Safety Valve
Securing the wheels to the frame
The wheels are secured to the lower frame on the
underside of the air receiver. To fi x the wheels to the
frame, put the fi xing bolt through each wheel and
then through the hole in the frame. Secure by means
of the washer and nut. The positioning of the wheel
can be seen in Fig 1.
The safety blow off valve
The compressor is equipped with a safety valve (see
fi g 1). If the pump were to continue operating passed
the maximum pressure, due to a defective pressure
switch, the safety valve would open and eject air from
the air receiver. If the safety valve discharges air,
please turn off the compressor and contact the help-
line. The safety valve is either located to the side of
the pressure switch as in Fig 1 or directly screwed
into the air receiver.
1
2
4
5
6
10
11
8
9
7
3
TROUBLESHOOTING GUIDE
-----------------------------------------------------------------------------------------------------------------------------------------------
Symptom
Possible Cause (s)
Corrective Action
-----------------------------------------------------------------------------------------------------------------------------------------------
Compressor will not run
1. No electrical power
1. Plugged in? Check fuse/breaker
2.
Blown
fuse
or
motor
overload
3. Breaker open
2. Replace blown fuse
4. Thermal overload open
3. Reset, determine cause of problem
5. Pressure switch faulty /
4. Motor will restart when cool
broken
5.
Replace
-----------------------------------------------------------------------------------------------------------------------------------------------
Motor hums but cannot
1. Defective no-return valve
1. Replace or repair
run or runs slowly
or unloaded
2. Check connections, eliminate
2. Poor contacts, line voltage low
extension lead if used, check circuit
3. Shorted or open circuit motor
with voltmeter
winding
3.
Replace
motor
DANGER!
Do
not
disassemble
non
return
valve
with
air
in
tank;
bleed
tank
fi
rst
-----------------------------------------------------------------------------------------------------------------------------------------------
Fuses blow/circuit breaker
1. Incorrect size fuse, circuit
1. Check for proper fuse, use time-delay
trips repeatedly
overloaded
fuse. Disconnect other electrical
CAUTION! Never use an
2. Defective no-return valve or
appliances from circuit or operate
extension cord with this
unloader
compressor on its own branch circuit
product
2.
Replace
or
repair
DANGER!
Do
not
disassemble
non
return
valve
with
air
in
tank;
bleed
tank
fi
rst
-----------------------------------------------------------------------------------------------------------------------------------------------
Thermal overload protector
1. Low voltage
1. Eliminate extension cord, check with
cuts out repeatedly
2. Clogged air fi lter
voltmeter
3. Lack of proper ventilation/room
2. Clean fi lter (see Maintenance section)
temperature too high
3. Move compressor to well ventilated
4.
No-return
valve
malfunction
area
5.
Compressor
valves
failed
4.
Replace
5.
Replace
valve
assembly
DANGER!
Do
not
disassemble
non
return
valve
with
air
in
tank;
bleed
tank
fi
rst
-----------------------------------------------------------------------------------------------------------------------------------------------
Knocks, rattles, excessive
1. Loose bolts, tank not level
1. Tighten bolts, move tank to level
vibration
2. Defective bearing on eccentric
position
or
motor
shaft
2.
Replace
3. Cylinder or piston ring is worn
3. Replace or repair as necessary
or scored
-----------------------------------------------------------------------------------------------------------------------------------------------
Tank pressure drops when
1. Loose drain cock
1. Tighten
compressor shuts off
2. No-return valve leaking
2. Disassemble no-return valve
3. Loose connections at pressure
assembly, clean or replace
switch or regulator
3. Clean all connections with soap
and
water
solution
and
tighten