background image


DAB1000

 / English Instruction Manual


15


EXTERNAL CONNECTIONS 

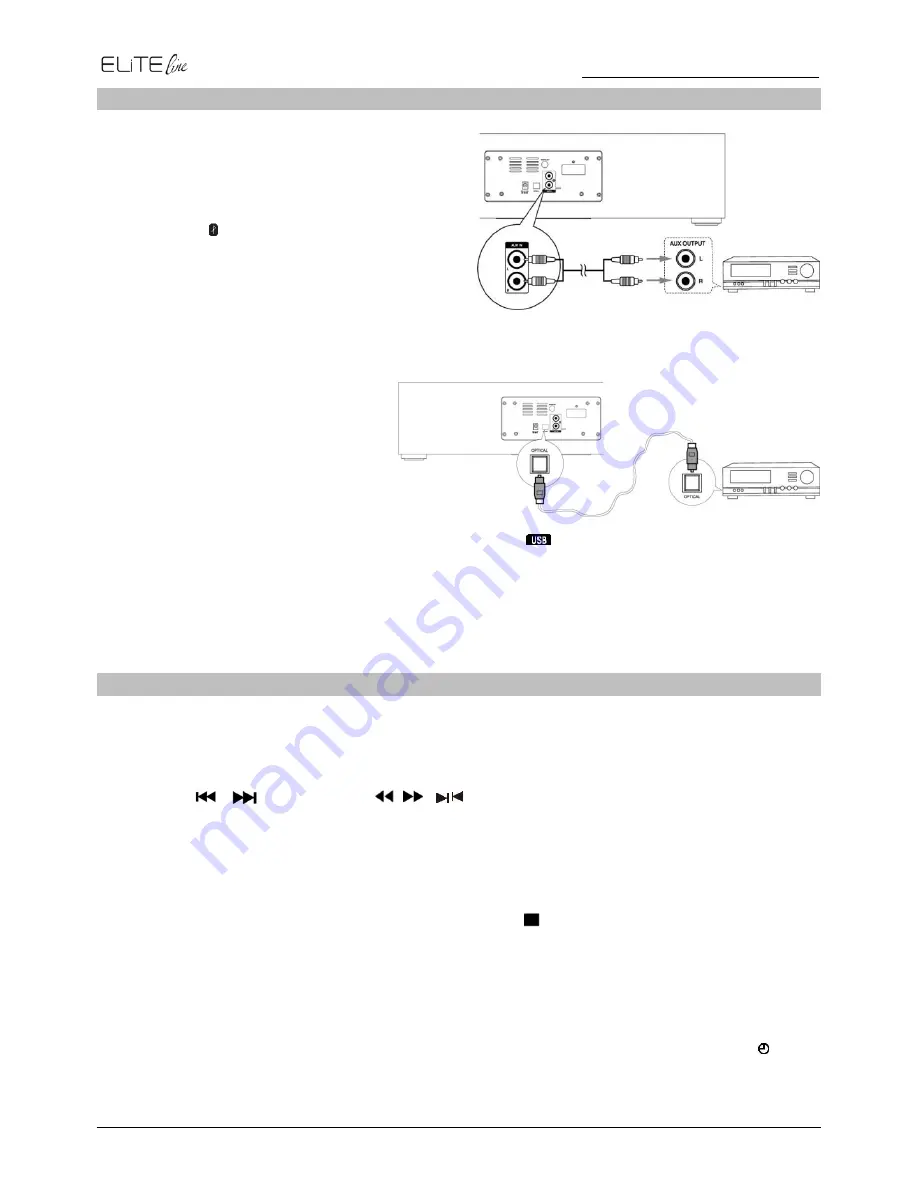
AUX-IN 

1.  Connect the AUX IN terminals on the rear of 

the unit to the line output terminals on the 
auxiliary equipment with an audio cable.  

2.  Repeatedly press the 

SOURCE

 button on 

the unit or   /

AUX

 button on the remote 

control to select AUX IN source.The word 
“AUX IN” will be displayed on the LCD.  

3.  Start to play on the device (see the user 

manual of the external device).  


Digital optical device 

1.  Connect the OPTICAL (input) jack 

on the rear of the unit to the 
optical out jack on a digital 
recording device (such as DTS-
Digital Theatre compatible, with 
Dolby Digital decoder) with the 
signal cable.  

2.  Repeatedly press the 

SOURCE

 button on the unit or 

 /OPT button on the remote control 

to select OPTICAL source.The word “OPTICAL” will be displayed on the LCD.  

3.  Start to play on a digital device (see the user manual of the digital device).  


Note:

  When receiving signals from televisions or other devices connected to an optical input, 

change the digital audio output to PCM in the setup menu of the connected device. 


TIMER 

Caution: 

Make sure that you have set the clock correctly.  

1.  In standby mode, long pressing the 

TIMER

 button on the remote control, until [TIMER SET] 

scrolls on the LCD. Then the source is displayed, e.g. DISC. 

Note:

 If the clock is not set, the 

“SET CLOCK FIRST” will be displayed.  

2.  Use the       /         on the unit or      ,     ,   ,  buttons on the remote control to select a 

source (DISC, USB, DAB, FM).  

3.  Press the 

TIMER

 button to store the setting, the hour indicator will blink.  

4.  Repeat above steps 2-3 to set the hour, minute and adjust volume.  


Note: 


  To exit clock setting mode without storing. Press the      button. 


  If no button is pressed in 90 second, the unit exits clock setting mode automatically.  

  If DISC/USB source is selected and the audio cannot be played, TUNER is activated 

automatically. 


To deactivate or re-activate an alarm timer 

Repeatedly press the 

TIMER 

button to activate or deactivate timer, if timer is activated, “  ” is 

displayed.  

Содержание Elite line DAB1000

Страница 1: ...IANO ENGLISH DANSK FRAN AIS NORSK NEDERLANDS SVENSKA DAB1000 Hersteller W rlein GmbH Tel 49 9103 71670 Gewerbestrasse 12 Fax 49 9103 716712 D 90556 Cadolzburg Email info woerlein com GERMANY Web www w...

Страница 2: ...ery compartment does not close securely stop using the product and keep it away from children If you think batteries might have been swallowed or placed inside any part of the body seek immediate medi...

Страница 3: ...Time 8 Setting the clock manually 8 Display the Clock 8 Volume Adjustment 8 DAB Radio 9 Store DAB radio stations automatically 9 Tuning to a DAB radio station 9 Sore DAB radio stations manually 9 Tun...

Страница 4: ...out NFC 14 Playing from Bluetooth device 14 External Connections 15 AUX IN 15 Digital optical device 15 Timer 15 Sleep Timer 16 Activate the Sleep Timer 16 To deactivate Sleep Timer 16 Sound Adjustmen...

Страница 5: ...0 English Instruction Manual 3 PACK CONTENTS Make sure all of the following contents are included The Unit Remote Control battery included Audio Cable DAB FM Telescopic antenna AC Adapter Instruction...

Страница 6: ...LUME Pairing Button 13 Headphone Jack 5 Open Close Button 14 Next Button 6 Stop Button Long press Search Forward Button Disconnect Bluetooth Connection 15 Previous Button Button Long press Search Back...

Страница 7: ...ng Button 13 Album Up Button ALB 14 Album Down Button ALB 15 Mute Button MUTE 16 Number Button 0 9 10 17 Open Close Button 18 USB Function Button Optical Function Button OPT 19 Bluetooth Function Butt...

Страница 8: ...uid on the remote control Do not place the remote control on a wet object Do not place the remote control under the direct sunlight or near sources of excessive heat Do not use caustic cleaners porcel...

Страница 9: ...connecting cables and the mains cable Connecting the Headphone Connect a pair of headphones to the phone jack No sound comes out of the speakers Note Be sure to turn down the volume before connecting...

Страница 10: ...CLOCK Automatically synchronized Clock Time In DAB RDS station the unit can synchronize with time transmitted by DAB RDS station automatically Setting the clock manually Caution You can set the clock...

Страница 11: ...You can store a maximum of 30 preset DAB radio stations 1 Tune to a radio station 2 Press the PROG button on the remote control to activate program mode 3 Repeatedly press PRESET buttons on the remot...

Страница 12: ...number to indicate the signal strength which is between 0 and 100 for example 12 70 or 100 The stronger the signal the greater the number Programme Type This describes the style or genre of the progra...

Страница 13: ...o 1 automatically 4 Press the PROG button on the remote control again to store the station 5 Repeat above steps 1 to 4 for each station you want to store in memory with a preset number Note If the sys...

Страница 14: ...that you intend to start playing Programme Play For audio CDs and MP3 WMA discs You can programme up to 20 tracks to play in any desired order The player must be in stop mode only with a CD inserted...

Страница 15: ...isplay During Playback For audio CD Repeatedly press the INFO button on the reomote control to show the current track number and sigle elapsed time the current track number and single remain time the...

Страница 16: ...CE button on the unit or AUX button on the remote control to select the bluetooth source The word BT will display on the LCD 2 Long pressing the button on the unit or PAIRING button on the remote cont...

Страница 17: ...evice Note When receiving signals from televisions or other devices connected to an optical input change the digital audio output to PCM in the setup menu of the connected device TIMER Caution Make su...

Страница 18: ...automatically increase the bass sound effect at low volume It can also increase the bass sound effect at high volume but it will be relatively less when it is at high volume Press the LOUDNESS button...

Страница 19: ...2 EDR Bluetooth Frequency range 2402 2480 MHz Bluetooth Power transmitted 4 dBm NFC Frequency operation 13 56MHz NFC Communication technique NFC passive tag Audio power output 2x 25W RMS IMPORTER W rl...

Страница 20: ...3 71 67 0 Con la presente W rlein GmbH dichiara che questo dispositivo conforme ai requisiti essenziali e altre disposizioni contenute nella Direttiva 2014 53 EU Una copia della Dichiarazione di confo...

Отзывы: