WNQ WNQ-3618A Скачать руководство пользователя страница 15


15


Training with an exercise bike is ideal movement training for strengthening important muscle groups and the 
cardio – circulatory system. 
General notes for training 

-


Never do exercise immediately after a meal 

-


If possible, orient your training to pulse rate 

-


Do muscle warm – ups before starting by loosening or stretching exercises 

-


When finish your training, please reduce speed. Never abruptly end your training. 

-


Do some stretching exercises when finished with your training. 

7.1 Training frequency


To improve your physical fitness and to enhance your stamina over the long term, we recommend training at least 
three times a week. This is the average training frequency for adults in order to obtain long time stamina success 
or high fat burning. As your fitness level increases, you also can train daily. It is particularly important to train at 
regular intervals. 

7.2 Training intensity


Carefully structure your training. The intensity should be increased gradually, so that no fatigue of the musculature 
or the locomotors system occurs. 
RPM 
In terms of a targeted endurance training in principle it is recommended to select rather a lower resistance and to 
exercise at a higher rpm (revolutions per minute). Ensure that the rpm is higher than 80 RPM but does not exceed 
100 RPM.


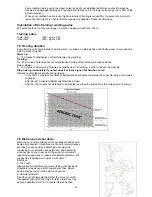
7.3 Heart rate training 

For your personal pulse zone it is recommended that an aerobic training range is chosen. Performance increases 
in the endurance range are principally achieved by long training units in the aerobic range. 
Find this zone in the target pulse diagram or orient yourself on the pulse program.  You should complete 80% of 
your training in this aerobic range (up to 75% of your maximum pulse). 
In the remaining 20% of the time, you can integrate load peaks, in order to shift your aerobic threshold value 
upwards. With the resulting training success you can later produce higher performance at the same pulse: this 
means an improvement in your physical shape. 
If you already have some experience in pulse – controlled training you can match your desired pulse zone to your 
special training plan or fitness status. 


Note: 

Because there are persons which have “high” and “low” pulses, the individual optimum pulse zones (aerobic zone, 
anaerobic zone) may differ from those of the general public (target pulse diagram). 
In these cases, training must be configured according to individual experience. If beginners are confronted with 
this phenomenon, it is important to consult a doctor before start training, in order to check your health capacity for 
training. 

Generally we recommend that everyone first consults a doctor, before doing any fitness training.


7.4Training control 

Both medically and in terms of training physiology, pulse – controlled training makes most sense and is oriented 
on the individual maximum pulse. 
This rule applies to beginners, ambitious recreational athletes and to professionals. 
Depending on the goal of training and performance status, training is done at a specific intensity of individual 
maximum pulse (expressed in percentage points). 
In order to effectively configure cardio – circulatory training according to sports – medical aspects, we recommend 
a training pulse rate of 70% - 85% of maximum pulse. Please refer to the following target pulse diagram. 
Measure your pulse rate at the following points in time: 
 

1.  Before training   


= resting pulse 

2.  10 minutes after training start   = training / working pulse 
3.  1 minute after training   

= recovery pulse 


-


During the first weeks, it is recommended that training is done at a pulse rate at the lower limit of the 
training pulse zone (approximately 70% or lower) 

-


During the next 2 – 4 months, intensify your training stepwise until you reach the upper end of the training 
pulse zone (approximately 85%) but without overexerting yourself. 

-


Although you are in a good condition, disperse easier units in the lower aerobic range time and again in 
your training program, so that you regenerate sufficiently. A “good” training always means intelligent 
training, which includes regeneration at the right time. Otherwise overtraining results and your condition 
worsen 


7. Training manual 

Содержание WNQ-3618A

Страница 1: ... 3 2 Take the exercise bike out of the carton 3 3 Assembly steps 4 Placing the exercise bike 11 4 1 Aligning the exercise bike 4 2 Moving the exercise bike 4 3 Store the exercise bike 5 Enter and leave the exercise bike 11 6 Computer handling 12 14 7 Training manual 15 17 7 1 Training frequency 7 2 Training intensity 7 3 Heart rate training 7 4 Training control 7 5 Warm up and cool down 8 Maintena...

Страница 2: ...exercise bike cannot be guaranteed Pay attention on enough distance of the power cord or the exercise bike from hot sources In case of enquiry please contact your dealer 1 2 Handling the equipment Before using the equipment for exercise check carefully to ensure that it has been correctly assembled Before beginning with your first session familiarize yourself thoroughly with all the functions and ...

Страница 3: ...th plastic bags The fastening material required for each assembly step is shown on the diagram inset Use the fastening material exactly as instructed The required tools are supplied with the equipment Bolt all the parts together loosely at first and check that they have been assembled correctly Then use the Allen wrench to finally tighten the bolts completely Then check that all screw connections ...

Страница 4: ...4 1 6 Checklist parts No Parts QTY NO Parts QTY A 1 22 2set B 1 24 2set C 1 26 2 D 1 28 1 E 1 29 1 F 1 33 1 G 1 34 1 H 1 42 1 ...

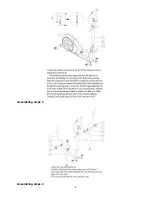
Страница 5: ...5 1 7 Assembly drawing ...

Страница 6: ... Improvement of your body shape Invigoration of heart and lungs Reduced stress and ageing Increased stamina Increased capability Fortification of body s defenses 2 1 Packing The packing consists out of environment friendly and recyclable materials External packing made of cardboard Protection layers inside made of cardboard Moulded parts made from CFS free polystyrol PS Sheeting and bags made of p...

Страница 7: ...e each other on the floor Be sure to place them on carton or a pad to prevent scratches either on the parts or on your floor The pad should be flat and not very think so the mainframe has a stable stand 3 2 Take the mainframe out of the carton The mainframe is very heavy so don t try it alone to take it out of the carton Please ask one person to help to move it out of the carton 3 3 Assembly steps...

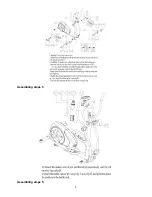
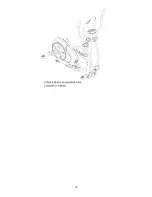
Страница 8: ...8 Assembling steps 3 Assembling steps 4 ...

Страница 9: ...9 Assembling steps 5 Assembling steps 5 ...

Страница 10: ...10 ...

Страница 11: ...are that the floor on which you place the equipment must be flat and solid and should have no unevenness If the exercise bike doesn t stand safe try to adjust the bike with the rear height adjustments If the height adjustment cannot equal the floor unevenness please position it to a different place 4 2 Moving the exercise bike To move the exercise bike to a different location please do as followin...

Страница 12: ...e BATTERY REPLACEMENT 1 Please install 2 pieces of AA or UM 3 batteries in the battery case on the back of monitor 2 Ensure that the batteries are correctly fitted Battery must be correctly positioned and make sure the battery spring is properly contacted with battery 3 If the display appears blank or display only partial segment remove the batteries and wait 15 seconds then replace 4 Whenever rem...

Страница 13: ... your current heart rate in beats per minute If you want to setup the value please press the button of ENTER RESET to T H R and press the UP or DOWN button to enter the value you want Pulse Limit Setting the value of pulse limit between 60 to 220 the monitor will measure your heartbeats Once reach setting value monitor will flash until your heartbeats under your setting value Place the palms of yo...

Страница 14: ...onitor will calculate the data of weight age and gender to show your value The value will show on screen from 5 50 TYPE There are 9 body types divided according to the FAT calculated Type 1 is ultra sportsman Type 2 is ideal sportsman Type 3 is ultra slim type Type 4 is sportsman type Type 5 is ideal healthy type Type 6 is slim type Type 7 is too fat Type 8 is fat type Type 9 is ultra body fat typ...

Страница 15: ...If you already have some experience in pulse controlled training you can match your desired pulse zone to your special training plan or fitness status Note Because there are persons which have high and low pulses the individual optimum pulse zones aerobic zone anaerobic zone may differ from those of the general public target pulse diagram In these cases training must be configured according to ind...

Страница 16: ...r lo loosen the muscles Stop training immediately if you feel unwell or if any signs of exhaustion occur Alterations of metabolic activity during training In the first 10 minutes of endurance performance our bodies consumes the sugar stored in our muscles Glycogen After about 10 minutes additionally fat will be burned After 30 40 minutes fat metabolism is activated and then the body s fat is the m...

Страница 17: ...the left hand backward catch the left foot Let your heel stretch toward to your buttocks as close as you can and hold for 15 counts Relax and then repeat with right foot 5 Inner Thigh Stretch Sit with the soles of your feet together with your knees pointing outward Pull your feet as close into your groin as possible Gently push your knees towards the floor Hold for 15 counts Start your stretch slo...

Страница 18: ... a damp cloth Please ensure that liquids never enter the machine or the electronics Display shows no values Remove the power cord from the power outlet Check the cable connections you assembled before Check if the cables have been damaged during assembly If cables have been damaged please order new ones from the customer service and replace the defect ones Display shows incorrect or no pulse rate ...

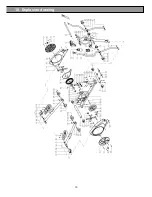
Страница 19: ...19 10 Explosion drawing ...

Страница 20: ...of handlebar turning bearing 2 23 Inside cover of handlebar Turing bearing 2 24 Rear end right cover of Crank 2 25 Left cover of crank front end 2 26 Cover of crank rear end 2 27 Flat and elliptical foot tube staff 4 28 Right pedal 1 29 Left pedal 1 30 Transport wheel φ50 25 φ8 2 31 Sponge tube φ31 t3 270 Sealed 2 32 Sponge tube φ24 5 3 620 Sealed 2 33 Water bottle 700ml 1 34 Water bottle rack 1 3...

Страница 21: ...n pin 10 34 2 63 Philips screw round head ST4 2 16 22 64 Philips screw round head ST4 2 19 2 65 Philips screw round head ST3 5 13 14 66 Philips screw round head M3 10 2 67 Washer 5 4 68 Washer 8 14 69 Washer 10 11 70 Locknut M10 2 71 Bearing circlip 12 1 72 Bearing circlip 17 1 73 Bearing circlip 20 1 74 Bearing 180100 6000 4 75 Bearing 80103 6003 10 76 Bearing 80104 6004 2 77 Tube staff of handle...

Отзывы: