Gearless Lift Machine
WSG-08
with caliper disk brake
Operating Instructions
Seite/page
22
Datum/date
12.08.2016
Stand/version
0.18
Änderungen vorbehalten! Subject to changes without notice!
9.5. Replacing the traction sheave
The traction sheave can work loose if it is
not properly installed.
Disassembly
•
Power off the system and safeguard against uninten-
tional reclosing.
•
Secure the car and the counter-weight.
•
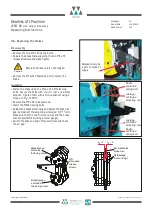
Remove the rope slip-off guards and the rope guards, if
provided.
•
Relieve the load on the traction sheave; remove the ropes.
•
Support the traction sheave by means of a hoisting gear.
•
Remove the 12 fastening bolts.
•
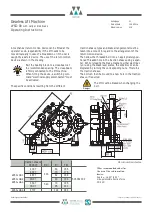
for D
T
= 400 mm: Insert the M12x50 bolts into the two
threaded forcing holes and force off the traction sheave.
Danger
Assembly
•
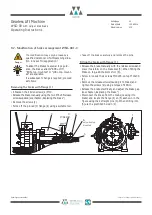
Clean the traction sheave and the rotor flange.
•
For better assembly heat up traction sheave.
•
Slide the traction onto the rotor flange as far as possible.
•
Insert the fastening bolts and tighten diagonally oppo-
site bolts. Use "omnifit 100" or a similar adhesive to
secure the bolts. Tighten them along the bolt hole circle
(M
A
= 115 Nm) with a torque spanner.
•
Replace the ropes and reinstall the rope slip-off guard.
•
for D
T
= 340 mm: Insert a suitable extracor tool into the
two threaded forcing holes M16x25 and remove the
traction sheave.
Abdrück-
gewinde M
16
forcing thread
holes M
16
D
T
=
340
mm
Abdrück-
schraube M
30
forcing bolt M
30
Druckscheibe
pressure
disc
Befestigungs-
schrauben M
12
fastening bolts M
12
29
6
m
m
Abdrückschrauben
M
12 x 50
forcing screws
M
12 x 50
D
T
=
400
mm
Befestigungs-
schrauben M
12
fastening bolts M
12
Содержание Beamer 2 Series
Страница 36: ......
Страница 37: ......
Страница 41: ......
Страница 69: ...Notes INTORQ BA 14 0177 04 2016 28 Notes ...

