Wiseup WIFI08 Скачать руководство пользователя страница 11

I. Product Overview

1. Time Announcement Button 
2. Camera Lens
3. Down Button
4. Up Button 
5. Set Button
6. Time Button
7. RJ45 Ethernet Port
8. Reset Button
 

II. What’s in the Box

-1× WIFI Camera Alarm Clock
-1× Rechargeable Battery
-1× USB Cable
-1× AC110-240V to DC5V Power Adapter

-1× 8GB Micro SD Card (fitted into the Micro SD card slot already)

III. Get Camera Ready

3.1. Please make sure your clock camera is fully recharged before using. If you want the 
camera to work 7/24 hours, please connect it to an outlet AC power supply using the USB 
cable and power adapter provided.
3.2. Please make sure the Micro SD card has been formatted already and is securely fitted 
into the camera’s SD card slot, or it will not work. We recommend you use a SDHC Class 
10 Micro SD card.
3.3. For Android, iPhone and iPad users, please scan the QR code to download the 

BVCAM

” APP.


IV. Network Setup

4.1. Option One: Quick Configuration Using a Micro SD Card

4.1.1. Format the Micro SD card on your PC computer. Then create a file named “

wifi.txt

” 

in the Micro SD card. Open it and input your WIFI network SSID and password as follows:
 

4.1.2. Save this file. Plug the Micro SD card from your PC and insert it into the camera 
instead.
4.1.3. Power on the camera by sliding the Power Switch to the ON position and pressing the 
Power Button once. The camera will connect to your WIFI network in 15-30 seconds.
4.1.4. When the red indicator light stays illuminated and the blue one keeps flashing, it means 
the WIFI configuration is complete. At this point, connect your mobile device to another WIFI 
network, or turn off your WIFI function and use your mobile network instead.
4.1.5. Launch the “

BVCAM

” APP, tap “

+

”, “

Add the new online Device

”, then input the camera’s 

UID, which is a combination of numbers and letters specific to your camera and type in the 
default password “

8888

”. Or you can scan the QR code that sticks at the back of the camera. At 

last, click “

OK

” to add the camera. If the camera shows online, it means you can view live or 

record video remotely as long as you have access to the Internet.

4.2. Option Two: Through “

BVCAM

” APP

    LAN (P2P) Mode Setup
4.2.1. Power on the camera by sliding the Power Switch to ON position and pressing the 
Power Button once. It will take up to 1-3 minutes for the WIFI signal to appear.
4.2.2. Go to the WIFI or WLAN Setting page on your phone or mobile device, connect to 
the camera’s WIFI signal named “

CM*****

”. Wait for the WIFI to be connected and your 

phone status bar will appear WIFI symbol as below:
 

[Note]:

 If the camera’s WIFI signal cannot be found after a long time, please recharge the camera 

or reset it (See VIII).

4.2.3. Run the “

BVCAM

” APP.

4.2.4. Add the camera to the “

BVCAM

” APP as below:

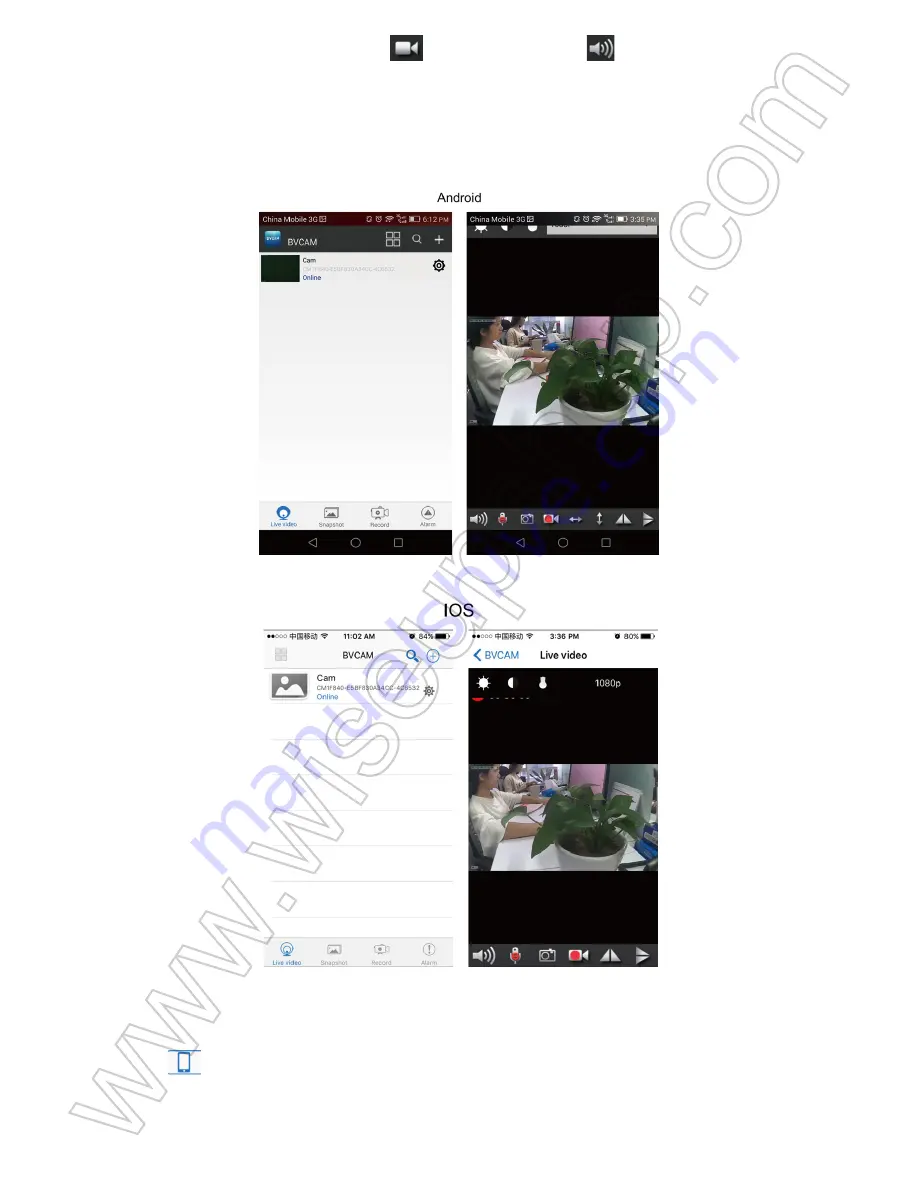
For Android: Tap +> Tap Add the new online Device> Search for the camera > Tap the 

camera icon > Tap OK or √.


For IOS: Tap +> Tap Add new online Camera> Search for the camera > Tap the camera 
icon > Tap OK.
 

4.2.5. If the camera shows “

Online

” on the “

Live video

” page, it means the camera’s P2P 

(LAN) setup is successful. You can check or record video in the P2P (LAN) mode.
 

[Note]:

1). It is normal if the camera shows “

offline

”. Exit the APP and open it again. Wait a minute and the 

camera will be “

online

”.

2). In this P2P (LAN) mode, you can only view video locally, within 15 meters (49 feet) open range.

4.2.6. On the live video screen, you can gently put your index finger and thumb on the 
screen then slide in and outward directions on a specific area to zoom in and out.


4.3. Remote View Setup (WAN Mode)

>> Before remote view setup, please make sure that the camera is successfully added to 
the APP and it's online in the P2P (LAN) mode.
4.3.1. Launch the “

BVCAM

” APP.

4.3.2. Set up remote view function as below:
Step 1: Tap the setting icon on the “

Live video

” page then choose "

Advance Config

" or “

Device 

Settings

”.

Step 2: Go to “

WIFI Config

” page and select a desired WIFI hotspot to enroll the camera in.

Step 3: Tap “

OK

” to complete the remote view setup and the camera will reboot automatically.


How to check if remote view function works?

1. Exit the “

BVCAM

” APP.

2. Back to the WIFI or WLAN setting page on your phone or mobile device, exit your phone or 
mobile device from the current WIFI network, enroll your phone or mobile device in another 
WIFI hotspot, or you can turn off the WIFI or WLAN function and enable your mobile network 
data instead.
 

3. Launch the “

BVCAM

” APP again. If the camera shows “

Online

” on the “

Live video

” page, 

it means the remote view setup is successful and the camera has entered into WAN mode. 
The red indicator light will stay illuminated while the blue one will keep flashing. You can go 
ahead to view live video or record video remotely.

[Note]:


If the camera shows “Device Offline”, it means the remote view setup failed and you need to 

reset the camera (See VIII) and set up all over again.

V. Motion Detection Recording Setup

>> Please make sure that the camera is online before you start.

5.1. Launch the “

BVCAM

” APP.

5.2. Set up motion detection photograph as below:
Step1: Tap the setting icon on the “

Live video

” page then choose "

Advance Config

" or “

Device 

Settings

”.

Step 2: Go to “

Alarm Config

” page, there, you can set a desired alarm sensitivity level, alarm 

schedule, and alarm interval time. Enabling the “

Warning Tone

”, “

Push Notification

” and 

On-screen Display

” is also available.

Step 3: Tap “

OK

” to complete the setting.


Step 4: When motion is detected, the camera will push a warning message to your phone and 
will take a screenshot of the live video page automatically. You can go back to the “

Live video

” 

page and tap “

Alarm

” at the bottom of the screen to check out the photos.


5.3. Set up SD card video recording based on motion detection as below:
Step 1: Tap the setting icon on the “

Live video

” page then choose "

Advance Config

" or “

Device 

Settings”

.

Step 2: Go to “

SDCard Record Config

” page and choose “

On alarm

”, then set resolution and 

file length. Enabling “

Record sound

” and “

Loop recording

” is also available.

Step 3: Tap “

OK

” to complete the Motion Detection Video Recording setting.


Step 4: When motion is detected, the camera will push an alarm message to your phone or 
mobile device and record a video to the Micro SD card automatically. You can go back to the 

Live video

” page, tap “

Record

” at the bottom of the screen and then tap "Remote SD Card" 

or           to check out the video files.
 

[Note]:


Video Resolution: 1280×720P, 640x480, 320x240                           Video Format: ASF

VI. Recording Video to Smartphone or Tablet PC

>> Please make sure that the camera is added to the APP in LAN or WAN before you start.

6.1. Launch the “

BVCAM

” APP. Tap the camera icon to get into the live video screen.

6.2. Tap the video recording button         and audio button        to start or stop recording 
video.
For Android users, the video files will be saved on your mobile device's flash memory. For 
IOS users, the video files will be only saved in the APP “

BVCAM

”.


6.3. Go back to the “

Live video

” page, tap “

Record

” at the bottom of the screen and then tap 

"

Local

" or          to check out the video files.


[Note]:


Video Resolution: 720P, 640P, 480P                         Video Format: ASF

VII. Recording Video to Local Micro SD Card

>> Please make sure that the camera is added to the APP in LAN or WAN mode before 
you start.

7.1. Launch the “

BVCAM

”APP.

7.2. Tap the setting icon on the “

Live video

” page then select "

Advance Config

" or “

Device 

Settings

”.

7.3. Go to “

SD Card Record Config

” page, then set a desired recording mode and file length. 

Enabling “

Record sound

” and “

Loop recording

” is also available.

7.4. Tap “

OK

” to complete the SD card recording setting and the camera will record video to the 

Micro SD card continuously.


7.5. The video files will be saved in the Micro SD card of this camera. You can check out 
the video files by following chapter 5.3.

[Note]:


When the camera shows “

online

” in LAN or WAN mode, every time you insert the Micro SD 

card, the camera will record video to the SD card automatically.

VIII. Resetting

If for any reason the camera stops working or isn’t working properly, you can reset the 
camera to restore it back to normal operation.

Operation:

 When the camera is powered on, use a pin to press and hold the Reset Button for 3 

seconds until the both blue and red indicator lights turn off. The camera will reboot automatically 

with default settings within 1 minute.

IX. Renaming Camera & Changing Password

>> Please confirm that the camera is added to the APP, and it is online in the P2P (LAN) mode 
before you start.
9.1. Launch the APP “

BVCAM

”.

9.2. Change the camera name as below:
Step1: Tap the setting icon on the “

Live video

” page then choose “

Modify Device

” in the popup 

window.
Step 2: Clear the default name and type in your desirable name like home, office, bedroom, etc.
Step 3: Tap “

OK

” or “

” to confirm the change.


9.3. Change the password as below:

OPTION 1

Step 1: Tap the camera icon on the “

Live video

” page, and tap “

Change

” in the popup window.

Step 2: Enter the new password and confirm it, then tap “

OK

” to save the change.


OPTION 2

Step 1: Tap the settings icon on the “

Live video

” page, tap "

Advance Config

" or “

Device 

Settings”

, then go to "

Change P2P access password

" or “

Change password

” page.

Step 2: Enter the default password “

8888

” at first, then enter a new password and confirm 

it, tap “

OK

” to save the change.


X. Alarm Clock Basic Setting

>> Every time when the clock camera is powered on, the LCD display will show 12:00 and 
all the alarm clock basic setting will be resumed to the factory default.

10.1. TIME SETTING

10.1.1. When the clock camera is powered on, press the Set Button once and the year will 
start flashing. Use the Up or Down Button to adjust the current year.
10.1.2. Press the Set Button once again to save the year setting and the month will start 
flashing. Use the Up or Down Button to adjust the current month.
10.1.3. Press the Set Button once again to save the month setting and the day will start 

flashing. Use the Up or Down Button to adjust the current day.
10.1.4. Press the Set Button once again to save the day setting and the hour will start 
flashing. Use the Up or Down Button to adjust the current hour.
10.1.5. Press the Set Button once again to save the hour setting and the minute will start 
flashing. Use the Up or Down Button to adjust the current minute.
10.1.6. Press the Set Button once again to save the minute setting.

10.2. ALARM SETTING

10.2.1. When the clock camera shows the current time, press the Mode Button once to 
enter into alarm setting.
10.2.2. Press the Up Button to turn on/off the alarm setting. The clock will show “--:--” when 
the alarm setting is turned off, and vice verse, it will show “0:00”. 
10.2.3. When the clock shows “0:00”, press the Set Button once and the hour will start 
flashing. Use the Up or Down Button to adjust the hour.
10.2.4. Press the Set Button once again to save the hour setting and the minute will start 
flashing. Use the Up or Down Button to adjust the minute.
10.2.5. Press the Set Button once again to save the minute setting. Then you can set the 
snooze duration (1-60 minutes).
10.2.6. Press the Set Button once again to save the snooze duration setting. Then you can 
set a desired one from 6 kinds of alarm songs.
10.2.7. Press the set Button once again to save the alarm song setting. Then press the 
Mode Button to exit the alarm setting.

10.3. 12/24-HOUR MODE SWITCH

When the clock camera shows the current time, press the Up Button to switch between 
12-hour mode and 24-hour mode.

10.4. TIME SPEAKOUT

When the clock camera shows the current time, press the Talk Button once to hear the 
current time being announced.

10.5. NATURAL SOUND

When the clock camera shows the current time, press the Time Button once to set the time 
of enjoying the natural sound (10-60 minutes) in any mode. Press the Talk Button for about 
3 seconds to enjoy the natural sound. And it will stop playing automatically when 
countdown is up. You can also press the Mode Button once to stop playing the natural 
sound directly.

Frequently Asked Questions

Q1: Why can’t I find the camera’s WIFI signal on my smartphone or tablet PC?

A1: There are 4 solutions to this problem:
1. Plug the camera into an AC outlet power supply using the USB cable and power adapter 
provided. Wait 1 minute for the WIFI signal SSID to appear.
2. Reset the camera (See VIII), then wait for the WIFI signal SSID to show up.
3. Keep your phone or mobile device within the camera’s WIFI hotspot range, refreshing the 
WIFI signal page. It may take up to 2 minutes for the hotspot to become recognizable on your 
phone or mobile device's WIFI setting page.
4. Shut off your phone or mobile device’s WIFI function for a while, then turn it on to search 
again.

Q2: The camera does not record any video to the Micro SD card?

A2: Please power off the camera, take out the Micro SD card and format it, then insert it to 
the SD card slot again, power on the camera again.

Q3: Why does the WAN mode setup fail?

A3: Please make sure your network is in a good condition. Plus, the WIFI network the 
camera is configured with can’t be the same with one you connect your phone to.

Q4: What can I do if I forget the Login password?

A4: Please reset the camera. (See VIII)

Q5: The APP cannot find the camera’s UID after choosing “Search (LAN)”?

A5: Ensure your phone or mobile device is still connecting to the camera’s WIFI signal. 
Ensure your camera is powered by the outlet power supply or the camera is fully charged. 

Note that we don’t recommend you plug the camera into your PC computer for charging. 
Your camera will not work properly that way.

Q6: Why live video screen shows up black and a searching circle spins in center but 
nothing ever displays?

A6: a. If your camera is connected to a slow WIFI network, wait 10-30 seconds for live 
video to re-appear.
b. On the live video page, please select a lower resolution to play.

Q7: Live video is not smooth and clear?

A7: Select suitable resolution according to the real time network environment.

Q8: How many mobile devices can connect to the camera at the same time?

A8: No limit.

Q9: There is only 1 user, but the camera shows 2 or more users?

A9: a. If you login in very often, the last login record is still in. If you check it every 2-5 
minutes, the camera will show surely the exact numbers of users;
b. For your safety and privacy, please change camera's password for the fi¬rst time use.

Q10: How many cameras are supported on the mobile application?

A10: No limit.

Q11: Is there any PC client software I can use on my computer?

A11: Please click the PC client software download link and download the zip file on your 
PC: 
http://www.wiseupshop.com/download?name=WIFI08&+++++++

Q12: The camera is not holding my WIFI settings and continues to show that the camera 
is offline?

A12: Make sure the camera is inside the range of good WIFI signal. Or check if the power 
adapter is connected properly for long time use.

Q13: Will the camera still work if the power goes out?

A13: If the camera is in P2P (LAN) mode, the camera can still work and record video as 
long as the camera is still charged. If the camera is in WAN mode, it will not work until the 
power is restored and the Internet access is available.

Q14: How to add the camera to more devices?

A14: Make sure that camera is in WAN mode already. Then launch the “

BVCAM

” APP on your 

other Android phones or tablet PCs, tap “

+

” icon, input the camera UID (a unique combination 

of numbers and letters specific to your camera) or the QR code that sticks on the back of the 
clock. Finally, tap “

OK

” to add the camera to the APP.

Q15: What can I do if my PC computer is unable to read the SD card directly from the 
device?

A15: Remove the SD card from the camera, then use a card reader to read it on your PC. 
Make sure the camera is powered off before removing the Micro SD card.

Q16: Why is time display not stable, always blinking?

A16: If you are using the backup battery, please recharge it. If not, check it the power 
adapter is connected properly.

Q17: What media player software should I use to play back the video files on my 
computer?

A17: Click the link: http://www.videolan.org/vlc/index.html to download and install VLC player 
to play back video files on your PC or Mac computer.

Содержание WIFI08

Страница 1: ...on 5 Set Button 6 Time Button 7 RJ45 Ethernet Port 8 Reset Button II What s in the Box 1 WIFI Camera Alarm Clock 1 Rechargeable Battery 1 USB Cable 1 AC110 240V to DC5V Power Adapter 9 Micro SD Card S...

Страница 2: ...sure the Micro SD card has been formatted already and is securely fitted into the camera s SD card slot or it will not work We recommend you use a SDHC Class 10 Micro SD card 3 3 For Android iPhone an...

Страница 3: ...rs and letters specific to your camera and type in the default password 8888 Or you can scan the QR code that sticks at the back of the camera At last click OK to add the camera If the camera shows on...

Страница 4: ...ine Device Search for the camera Tap the camera icon Tap OK or For IOS Tap Tap Add new online Camera Search for the camera Tap the camera icon Tap OK 4 2 5 If the camera shows Online on the Live video...

Страница 5: ...te and the camera will be online 2 In this P2P LAN mode you can only view video locally within 15 meters 49 feet open range 4 2 6 On the live video screen you can gently put your index finger and thum...

Страница 6: ...N mode 4 3 1 Launch the BVCAM APP 4 3 2 Set up remote view function as below Step 1 Tap the setting icon on the Live video page then choose Advance Config or Device Settings Step 2 Go to WIFI Config p...

Страница 7: ...n and enable your mobile network data instead 3 Launch the BVCAM APP again If the camera shows Online on the Live video page it means the remote view setup is successful and the camera has entered int...

Страница 8: ...rm Config page there you can set a desired alarm sensitivity level alarm schedule and alarm interval time Enabling the Warning Tone Push Notification and On screen Display is also available Step 3 Tap...

Страница 9: ...n on the Live video page then choose Advance Config or Device Settings Step 2 Go to SDCard Record Config page and choose On alarm then set resolution and file length Enabling Record sound and Loop rec...

Страница 10: ...ideo page tap Record at the bottom of the screen and then tap Remote SD Card or to check out the video files Note Video Resolution 1280 720P 640x480 320x240 Video Format ASF VI Recording Video to Smar...

Страница 11: ...ideo For Android users the video files will be saved on your mobile device s flash memory For IOS users the video files will be only saved in the APP BVCAM 6 3 Go back to the Live video page tap Recor...

Страница 12: ...7 1 Launch the BVCAM APP 7 2 Tap the setting icon on the Live video page then select Advance Config or Device Settings 7 3 Go to SD Card Record Config page then set a desired recording mode and file...

Страница 13: ...icro SD card the camera will record video to the SD card automatically VIII Resetting If for any reason the camera stops working or isn t working properly you can reset the camera to restore it back t...

Страница 14: ...is online in the P2P LAN mode before you start 9 1 Launch the APP BVCAM 9 2 Change the camera name as below Step1 Tap the setting icon on the Live video page then choose Modify Device in the popup win...

Страница 15: ...the new password and confirm it then tap OK to save the change OPTION 2 Step 1 Tap the settings icon on the Live video page tap Advance Config or Device Settings then go to Change P2P access password...

Страница 16: ...ING 10 1 1 When the clock camera is powered on press the Set Button once and the year will start flashing Use the Up or Down Button to adjust the current year 10 1 2 Press the Set Button once again to...

Страница 17: ...shows 0 00 press the Set Button once and the hour will start flashing Use the Up or Down Button to adjust the hour 10 2 4 Press the Set Button once again to save the hour setting and the minute will...

Страница 18: ...spot range refreshing the WIFI signal page It may take up to 2 minutes for the hotspot to become recognizable on your phone or mobile device s WIFI setting page 4 Shut off your phone or mobile device...

Страница 19: ...re is only 1 user but the camera shows 2 or more users A9 a If you login in very often the last login record is still in If you check it every 2 5 minutes the camera will show surely the exact numbers...

Страница 20: ...a or the QR code that sticks on the back of the clock Finally tap OK to add the camera to the APP Q15 What can I do if my PC computer is unable to read the SD card directly from the device A15 Remove...

Страница 21: ...ste 5 Taste einstellen 6 Zeit Schaltfl che 7 RJ45 Ethernet Anschluss 8 Reset Taste II Was ist in der Box 1 WIFI Kamera Wecker 1 Wiederaufladbare Batterie 1 USB Kabel 9 Mikro Sd Einbauschlitz 10 Netzsc...

Страница 22: ...len Sie sicher dass die Micro SD Karte bereits formatiert ist und sicher in den SD Kartensteckplatz der Kamera eingepasst ist oder es funktioniert nicht Wir empfehlen Ihnen eine SDHC Class 10 Micro SD...

Страница 23: ...Sie dann die UID der Kamera ein die eine Kombination aus Zahlen und Buchstaben f r Ihre Kamera ist und geben Sie das Standardpasswort 8888 ein Oder Sie k nnen den QR Code scannen der an der R ckseite...

Страница 24: ...Tippen Sie auf Neues Online Ger t hinzuf gen Suche nach der Kamera Tippen Sie auf das Kamerasymbol Tippen Sie auf OK oder F r IOS Tippen Sie auf Tippen Sie auf Neue Online Kamera hinzuf gen Suche nac...

Страница 25: ...mera wird online sein 2 In diesem P2P LAN Modus k nnen Sie nur Video lokal innerhalb von 15 Metern 49 Fu offenen Bereich 4 2 6 Auf dem Live Video Bildschirm k nnen Sie sanft Ihren Zeigefinger und Daum...

Страница 26: ...ie die BVCAM APP 4 3 2 Richten Sie die Remote View Funktion wie folgt ein Schritt 1 Tippen Sie auf die Einstellung Live Video und w hlen Sie dann Advance Config oder Device Settings Schritt 2 Gehe zur...

Страница 27: ...en Und aktivieren Sie stattdessen Ihre Mobilfunkdaten 3 Starten Sie den BVCAM APP erneut Wenn die Kamera auf der Seite Live Video auf Online zeigt bedeutet dies dass das Remote View Setup erfolgreich...

Страница 28: ...Alarm Config Seite dort k nnen Sie eine gew nschte Alarmempfindlichkeit Alarmzeitplan und Alarmintervall einstellen Es ist auch die Option Warnton Push Notification und On Screen Display verf gbar Sch...

Страница 29: ...ve Video und w hlen Sie dann Advance Config oder Device Settings Schritt 2 Gehen Sie auf SDCard Record Config Seite und w hlen Sie On Alarm dann setzen Aufl sung und Dateil nge Die Aktivierung von Rec...

Страница 30: ...nnen auf die Seite Live Video zur ckkehren tippen Sie auf Record am unteren Rand des Bildschirms und tippen Sie dann auf Remote SD Card oder um die Videodateien auszuprobieren Anmerkung Videoaufl sung...

Страница 31: ...Videobildschirm zu gelangen 6 2 Tippen Sie auf die Aufnahmetaste und die Audio Taste um die Aufnahme zu starten oder zu stoppen F r Android Benutzer werden die Videodateien auf dem Flash Speicher Ihre...

Страница 32: ...r APP im LAN oder WAN Modus hinzugef gt wird bevor Sie beginnen 7 1 Starten Sie die BVCAM APP 7 2 Tippen Sie auf die Einstellung Live Video und w hlen Sie dann Advance Config oder Device Settings 7 3...

Страница 33: ...sch auf die SD Karte aufnehmen VIII Zur cksetzen Wenn aus irgendeinem Grund die Kamera nicht mehr funktioniert oder nicht richtig funktioniert kannst du die Kamera zur cksetzen um sie wieder in den no...

Страница 34: ...BVCAM 9 2 ndern Sie den Kameranamen wie folgt Schritt 1 Tippen Sie auf das Einstellungssymbol auf der Seite Live Video und w hlen Sie im Popup Fenster Ger t ndern Schritt 2 L schen Sie den Standardnam...

Страница 35: ...ster auf ndern Schritt 2 Geben Sie das neue Passwort ein und best tigen Sie es dann tippen Sie auf OK um die nderung zu speichern OPTION 2 Schritt 1 Tippen Sie auf das Symbol Live Video tippen Sie auf...

Страница 36: ...ellung Jedes Mal wenn die Uhrkamera eingeschaltet ist zeigt das LCD Display 12 00 an und die gesamte Grundeinstellung des Weckers wird auf die Werkseinstellungen zur ckgesetzt 10 1 ZEITEINSTELLUNG 10...

Страница 37: ...aktuelle Uhrzeit anzeigt dr cken Sie einmal die Modus Taste um in die Alarmeinstellung zu gelangen 10 2 2 Dr cken Sie die Up Taste um die Alarmeinstellung ein oder auszuschalten Die Uhr zeigt an wenn...

Страница 38: ...n ich das WIFI Signal der Kamera nicht auf meinem Smartphone oder Tablet PC finden A1 Es gibt 4 L sungen f r dieses Problem 1 Stecken Sie die Kamera mit einem USB Kabel und einem mitgelieferten Netzte...

Страница 39: ...ist Beachten Sie dass wir nicht empfehlen dass Sie die Kamera in den PC Computer zum Aufladen stecken Ihre Kamera wird nicht so richtig funktionieren Q6 Warum Live Video Bildschirm zeigt sich schwarz...

Страница 40: ...pter f r l ngere Zeit richtig angeschlossen ist Q13 Wird die Kamera immer noch funktionieren wenn die Stromversorgung erlischt A13 Wenn sich die Kamera im P2P Modus befindet kann die Kamera immer noch...

Страница 41: ...e nicht stabil blinkt immer A16 Wenn Sie die Ersatzbatterie verwenden laden Sie sie bitte auf Wenn nicht berpr fen Sie ob der Netzadapter richtig angeschlossen ist Q17 Welche Media Player Software sol...

Страница 42: ...de R glage 6 Bouton de Temp 7 Port Ethernet RJ45 8 Bouton de R initialisation II Qu y a t il dans la boite 1 R veil de Cam ra WIFI 1 Batterie Rechargeable 1 C ble USB 9 Emplacement pour carte micro SD...

Страница 43: ...arte Micro SD a d j t format e et qu elle est correctement install e dans la fente de la carte SD de la cam ra ou elle ne fonctionnera pas Nous vous recommandons d utiliser une carte SD SDHC de classe...

Страница 44: ...e chiffres et de lettres sp cifiques votre appareil photo et tapez le mot de passe par d faut 8888 Ou vous pouvez num riser le code QR qui colle l arri re de la cam ra Enfin cliquez sur OK pour ajoute...

Страница 45: ...yez sur Ajouter le nouveau p riph rique en ligne Rechercher la cam ra Appuyez sur l ic ne de la cam ra Touchez OK ou Pour IOS appuyez sur Appuyez sur Ajouter une nouvelle cam ra en ligne Rechercher la...

Страница 46: ...gne 2 Dans ce mode P2P LAN vous ne pouvez visualiser de vid o que localement dans une port e ouverte de 15 m tres 49 pieds 4 2 6 Sur l cran vid o en direct vous pouvez doucement mettre votre index et...

Страница 47: ...2 Configurez la fonction de vue distance comme suit tape 1 appuyez sur l ic ne de r glage sur la page Vid o en direct puis choisissez Configuration avanc e ou Param tres du p riph rique tape 2 Passez...

Страница 48: ...us pouvez teindre la fonction WIFI ou WLAN Et permettez vos donn es de r seau mobile la place 3 Lancez nouveau l application BVCAM Si la cam ra affiche en ligne sur la page Vid o en direct cela signif...

Страница 49: ...de mouvement comme suit tape 1 Appuyez sur l ic ne de r glage sur la page Vid o en direct puis choisissez Configuration avanc e ou Param tres du p riph rique tape 2 Aller la page Configuration d alar...

Страница 50: ...vid o de la carte SD en fonction de la d tection de mouvement comme suit tape 1 appuyez sur l ic ne de r glage sur la page Vid o en direct puis choisissez Configuration avanc e ou Param tres du p rip...

Страница 51: ...d alarme sur votre t l phone ou votre appareil mobile et enregistre automatiquement une vid o sur la carte Micro SD Vous pouvez revenir la page Vid o en direct appuyez sur Enregistrer en bas de l cran...

Страница 52: ...6 1 Lancez l APP BVCAM Appuyez sur l ic ne de la cam ra pour acc der l cran vid o en direct 6 2 Appuyez sur le bouton d enregistrement vid o et sur le bouton audio pour lancer ou arr ter l enregistre...

Страница 53: ...6 3 Revenez la page Vid o en direct appuyez sur Enregistrer en bas de l cran puis appuyez sur Local ou pour consulter les fichiers vid o...

Страница 54: ...la page Vid o en direct puis s lectionnez Configuration avanc e ou Param tres du p riph rique 7 3 Acc dez la page Configuration de l enregistrement de la carte SD puis d finissez le mode d enregistre...

Страница 55: ...Micro SD la cam ra enregistre automatiquement la vid o sur la carte SD VIII R initialisation Si pour une raison quelconque la cam ra cesse de fonctionner ou ne fonctionne pas correctement vous pouvez...

Страница 56: ...ligne en mode P2P LAN avant de commencer 9 1 Lancez l APP BVCAM 9 2 Changez le nom de la cam ra comme suit tape 1 appuyez sur l ic ne de r glage sur la page Vid o en direct puis choisissez Modifier u...

Страница 57: ...ppuyez sur Modifier dans la fen tre contextuelle tape 2 Entrez le nouveau mot de passe et confirmez le puis appuyez sur OK pour enregistrer le changement OPTION 2 tape 1 appuyez sur l ic ne de param t...

Страница 58: ...dification X R glage de base du r veil Chaque fois que la cam ra de l horloge est sous tension l affichage cristaux liquides s affiche 12h00 et tous les r glages de base du r veil seront repris par d...

Страница 59: ...yez sur le Bouton Haut pour allumer teindre le r glage de l alarme L horloge affichera lorsque le r glage de l alarme est teint et vice versa il affichera 0 00 10 2 3 Lorsque l horloge indique 0 00 ap...

Страница 60: ...z la cam ra dans une prise secteur en utilisant le c ble USB et l adaptateur fourni Attendez 1 minute pour que le signal WIFI SSID apparaisse 2 R initialisez la cam ra voir VIII puis attendez que le S...

Страница 61: ...ppara t noir et un cercle de recherche tourne au centre mais rien ne s affiche jamais A6 a Si votre appareil photo est connect un r seau WIFI lent attendez 10 30 secondes pour que la vid o en direct a...

Страница 62: ...peut fonctionner et enregistrer des vid os aussi longtemps que la cam ra est encore charg Si la cam ra est en mode WAN il ne fonctionnera pas tant que l alimentation n est pas r tablie et que l acc s...

Страница 63: ...Sinon v rifiez que l adaptateur secteur est bien connect Q17 Quel logiciel de lecteur multim dia dois je utiliser pour lire les fichiers vid o sur mon ordinateur A17 Cliquez sur le lien http www video...

Страница 64: ...mposta pulsante 6 Pulsante Tempo 7 Porta Ethernet RJ45 8 Pulsante di ripristino II Cosa c nella scatola 1 WIFI Sveglia della macchina fotografica 1 batteria ricaricabile 1 cavo USB 9 Slot Micro SD Car...

Страница 65: ...rarsi che la scheda Micro SD sia gi stata formattata e sia correttamente inserita nell apposito slot per la scheda SD della fotocamera oppure non funziona Ti consigliamo di utilizzare una scheda Micro...

Страница 66: ...lettere specifiche della fotocamera e digitare la password predefinita 8888 Oppure possibile eseguire la scansione del codice QR che si attacca sul retro della fotocamera Infine fai clic su OK per agg...

Страница 67: ...segue Per Android Tocca Tocca Aggiungi nuovo dispositivo in linea Cerca la fotocamera Tocca l icona della fotocamera Tocca OK o Per IOS Tocca Tocca Aggiungi nuova videocamera in linea Cerca la fotoca...

Страница 68: ...ocamera sar online 2 In questa modalit P2P LAN possibile visualizzare solo video localmente entro un raggio di 15 metri 49 piedi 4 2 6 Sullo schermo video dal vivo puoi mettere delicatamente il dito i...

Страница 69: ...PP BVCAM 4 3 2 Impostazione della funzione di visualizzazione remota come segue Passaggio 1 Toccare l icona di impostazione nella pagina Live video quindi scegliere Advance Config o Device Settings Fa...

Страница 70: ...invece i dati della tua rete mobile 3 Apri nuovamente il BVCAM APP Se la fotocamera mostra Online nella pagina Live video significa che l impostazione della visualizzazione remota riuscita e la fotoca...

Страница 71: ...nzata o Impostazioni dispositivo Fase 2 Vai alla pagina Configurazione allarmi puoi impostare il livello di sensibilit dell allarme la pianificazione degli allarmi e l intervallo di allarme desiderato...

Страница 72: ...nto come segue Passaggio 1 Toccare l icona di impostazione nella pagina Live video quindi scegliere Advance Config o Device Settings Fase 2 Vai alla pagina Configurazione di SDCard Record e scegli On...

Страница 73: ...n messaggio di allarme sul telefono o sul dispositivo mobile e registra automaticamente un video sulla scheda Micro SD Puoi tornare alla pagina Live video toccare Record nella parte inferiore dello sc...

Страница 74: ...di iniziare 6 1 Avviare l APP BVCAM Tocca l icona della fotocamera per entrare nello schermo video dal vivo 6 2 Toccare il pulsante di registrazione video e il pulsante audio per avviare o interromper...

Страница 75: ...6 3 Tornare alla pagina Live video toccare Record in fondo alla schermata quindi toccare Local o per controllare i file video...

Страница 76: ...ona di impostazione nella pagina Live video quindi seleziona Advance Config o Device Settings 7 3 Passare alla pagina Configurazione della scheda di registrazione SD quindi impostare la modalit di reg...

Страница 77: ...tomaticamente video sulla scheda SD VIII Ripristino Se per qualche motivo la fotocamera smette di funzionare o non funziona correttamente possibile reimpostare la fotocamera per ripristinarla al norma...

Страница 78: ...viare APP BVCAM 9 2 Cambiare il nome della fotocamera come segue Fase 1 tocca l icona di impostazione nella pagina Live video quindi scegli Modifica dispositivo nella finestra popup Fase 2 deseleziona...

Страница 79: ...salvare la modifica OPZIONE 2 Passaggio 1 Toccare l icona delle impostazioni nella pagina Live video toccare Confronto avanzato o Impostazioni dispositivo quindi passare alla pagina Modifica password...

Страница 80: ...I ORARIO 10 1 1 Quando la fotocamera dell orologio accesa premere una volta il pulsante Set e l anno lampegger Utilizzare il pulsante Su o Gi per regolare l anno corrente 10 1 2 Premere nuovamente il...

Страница 81: ...mostra 0 00 premere una volta il pulsante Set e l ora inizier a lampeggiare Utilizzare il pulsante Su o Gi per regolare l ora 10 2 4 Premere nuovamente il pulsante Set per salvare l impostazione dell...

Страница 82: ...attendere che il SSID del segnale WIFI venga visualizzato 3 Mantenete il telefono o il dispositivo mobile all interno della gamma di hotspot WIFI della fotocamera aggiornando la pagina del segnale WI...

Страница 83: ...one inferiore per giocare Q7 Il video in diretta non morbido e chiaro A7 Selezionare la risoluzione appropriata in base all ambiente di rete in tempo reale Q8 Quanti dispositivi mobili possono connett...

Страница 84: ...ne univa di numeri e lettere specifiche della fotocamera o il codice QR che si attacca sul retro del orologio Infine toccare OK per aggiungere la fotocamera all APP Q15 Cosa posso fare se il mio compu...

Страница 85: ...Bot n Arriba 5 Bot n Set 6 Bot n de Tiempo 7 Puerto Ethernet RJ45 8 Bot n de Reseteo II Qu hay en la caja 1 WIFI Despertador de la C mara 1 Bater a Recargable 1 Cable USB 9 Ranura para Tarjetas Micro...

Страница 86: ...Aseg rese de que la tarjeta Micro SD ya est formateada y est bien instalada en la ranura de tarjetas SD de la c mara o no funcionar Le recomendamos que utilice una tarjeta SDHC de clase 10 Micro SD 3...

Страница 87: ...mbinaci n de n meros y letras espec ficos de su c mara e ingrese la contrase a por defecto 8888 O puede escanear el c digo QR que se pega en la parte posterior de la c mara Por ltimo haga clic en OK p...

Страница 88: ...a continuaci n Para Android Toque Toque Agregar nuevo dispositivo en l nea Buscar c mara Toque el cono de la c mara Toque OK o Para IOS Toque Toque Agregar nueva c mara en l nea Buscar c mara Puntee e...

Страница 89: ...mara estar en l nea 2 En este modo P2P LAN s lo puede ver v deo localmente dentro de los 15 metros 49 pies de rango abierto 4 2 6 En la pantalla de v deo en directo puede poner su dedo ndice y pulgar...

Страница 90: ...2 Configure la funci n de visualizaci n remota como se muestra a continuaci n Paso 1 Pulse el icono de configuraci n en la p gina V deo en directo y luego elija Configuraci n avanzada o Configuraci n...

Страница 91: ...n WIFI o WLAN Y habilitar los datos de su red m vil en su lugar 3 Vuelva a iniciar la aplicaci n BVCAM Si la c mara muestra En l nea en la p gina V deo en directo significa que la configuraci n de la...

Страница 92: ...nto como se indica a continuaci n Paso 1 Toque el icono de configuraci n en la p gina Video en directo luego elija Configuraci n avanzada o Configuraci n del dispositivo Paso 2 Vaya a la p gina Config...

Страница 93: ...de v deo de la tarjeta SD basada en la detecci n de movimiento como se muestra a continuaci n Paso 1 Pulse el icono de configuraci n en la p gina V deo en directo y luego elija Configuraci n avanzada...

Страница 94: ...de alarma a su tel fono o dispositivo m vil y graba un video en la tarjeta Micro SD autom ticamente Puede regresar a la p gina Video en directo puntee en Grabar en la parte inferior de la pantalla y...

Страница 95: ...zar 6 1 Inicie la aplicaci n BVCAM Toque el cono de la c mara para entrar en la pantalla de v deo en vivo 6 2 Toque el bot n de grabaci n de v deo y el bot n de audio para iniciar o detener la grabaci...

Страница 96: ...6 3 Vuelve a la p gina V deo en directo toca Grabar en la parte inferior de la pantalla y luego toca Local o para ver los archivos de v deo...

Страница 97: ...cono de configuraci n en la p gina V deo en directo luego seleccione Configuraci n avanzada o Configuraci n del dispositivo 7 3 Vaya a la p gina SD Card Record Config luego establezca el modo de graba...

Страница 98: ...la tarjeta SD autom ticamente VIII Restablecimiento Si por alg n motivo la c mara deja de funcionar o no funciona correctamente puede reiniciar la c mara para restaurarla a su funcionamiento normal F...

Страница 99: ...e comenzar 9 1 Inicie la aplicaci n BVCAM 9 2 Cambie el nombre de la c mara como se indica a continuaci n Paso 1 Toque el icono de configuraci n en la p gina Video en vivo y luego elija Modificar disp...

Страница 100: ...en directo y toque Cambiar en la ventana emergente Paso 2 Introduzca la nueva contrase a y confirme luego pulse OK para guardar el cambio OPCION 2 Paso 1 Toque el icono de configuraci n en la p gina V...

Страница 101: ...ica del reloj despertador Cada vez que se encienda la c mara del reloj la pantalla LCD mostrar 12 00 y todo el ajuste b sico del despertador se reanudar a los valores predeterminados de f brica 10 1 C...

Страница 102: ...eloj mostrar cuando el ajuste de la alarma est apagado y viceversa mostrar 0 00 10 2 3 Cuando el reloj muestre 0 00 presione el bot n Set una vez y la hora comenzar a parpadear Utilice el bot n Arriba...

Страница 103: ...que la se al WIFI SSID aparezca 2 Restablezca la c mara consulte VIII y espere a que aparezca la se al WIFI SSID 3 Mantenga su tel fono o dispositivo m vil dentro del rango de puntos de acceso WIFI d...

Страница 104: ...v deo en directo segundo En la p gina de v deo en vivo seleccione una resoluci n m s baja para reproducir P7 El video en vivo no es suave y claro R7 Seleccione la resoluci n adecuada de acuerdo con e...

Страница 105: ...let PC toque el cono ingrese el UID de la c mara una combinaci n nica de n meros y letras espec ficos de su c mara o el c digo QR que se pega en la parte posterior del reloj Finalmente puntee en Acept...

Страница 106: ...WIFI08 I 1 2 3 4 5 6 7 RJ45 8 II 1 WIFI 1 1 USB 9 SD 10 11 USB 12 13 14 15...

Страница 107: ...1 AC110 240V DC5V 1 8GB SD Micro SD III 3 1 7 24 USB AC 3 2 Micro SD SD SDHC Class 10 Micro SD 3 3 Android iPhone iPad QR BVCAM APP IV 4 1 1 SD 4 1 1 MicroSD PC MicroSD wi txt WIFI SSID...

Страница 108: ...4 1 2 PC Micro SD 4 1 3 ON 1 15 30 WIFI 4 1 4 WIFI WIFI WIFI 4 1 5 BVCAM APP UID UID 8888 QR OK 4 2 2 BVCAM APP LAN P2P 4 2 1 ON 1 WIFI 1 3 4 2 2 WIFI WLAN WIFI CM WIFI WIFI...

Страница 109: ...WIFI VIII 4 2 3 BVCAM APP 4 2 4 BVCAM APP Android OK IOS OK 4 2 5 P2P LAN P2P LAN...

Страница 110: ...1 APP 1 2 P2P LAN 15 49 4 2 6...

Страница 111: ...4 3 WAN APP P2P LAN 4 3 1 BVCAM APP 4 3 2 1 2 WIFI Con g WIFI 3 OK...

Страница 112: ...1 BVCAM APP 2 WIFI WLAN WIFI WIFI WIFI WLAN 3 BVCAM APP WAN VIII...

Страница 113: ...V 5 1 BVCAM APP 5 2 1 2 Alarm Con g 3 OK...

Страница 114: ...4 5 3 SD 1 2 SD 3 OK...

Страница 115: ...4 Micro SD SD 1280 720P 640 480 320 240 ASF VI PC LAN WAN APP 6 1 BVCAM APP...

Страница 116: ...6 2 Android IOS APP BVCAM 6 3...

Страница 117: ...720P 640P 480P ASF VII SD LAN WAN APP 7 1 BVCAM APP 7 2 7 3 SD Card Record Con g 7 4 OK SD Micro SD...

Страница 118: ...7 5 Micro SD 5 3 LAN WAN Micro SD SD VIII 3 1...

Страница 119: ...IX APP P2P LAN 9 1 APP BVCAM 9 2 1 2 3 OK 9 3...

Страница 120: ...1 1 2 OK 2 1 P2P 2 8888 OK...

Страница 121: ...X LCD 12 00 10 1 10 1 1 1 10 1 2 10 1 3...

Страница 122: ...10 1 4 10 1 5 10 1 6 10 2 10 2 1 1 10 2 2 0 00 10 2 3 0 00 1 10 2 4 10 2 5 1 60 10 2 6 6 10 2 7 10 3 12 24 12 24 10 4 1 10 5 1...

Страница 123: ...10 60 3 Q1 PC WIFI A1 4 1 USB AC WIFI SSID 1 2 VIII WIFI SSID 3 WIFI WIFI WIFI 2 4 WIFI Q2 Micro SD A2 Micro SD SD Q3 WAN A3 WIFI WIFI Q4 A4 VIII Q5 LAN APP UID A5 WIFI...

Страница 124: ...Q6 A6 a WIFI 10 30 b Q7 A7 Q8 A8 Q9 1 2 A9 a 2 5 b Q10 A10 Q11 PC A11 PC PC zip http www wiseupshop com download name WIFI08 Submit Q12 WIFI A12 WIFI Q13 A13 P2P LAN...

Страница 125: ...WAN Q14 A14 WAN Android PC BVCAM APP UID QR OK APP Q15 PC SD A15 SD PC Micro SD Q16 A16 Q17 A17 http www videolan org vlc index html VLC PC Mac...

Отзывы: