background image

DVR-0022C

User Guide

I. Product Overview

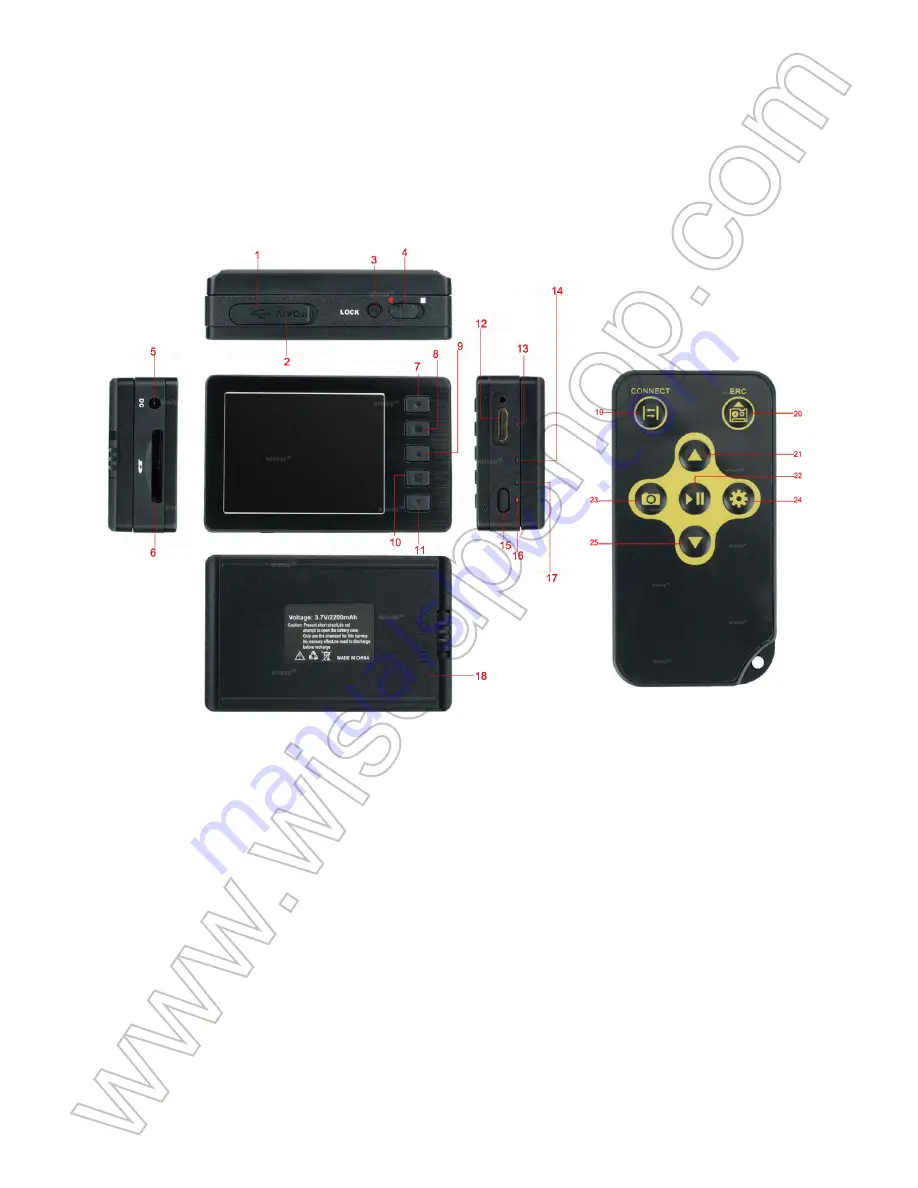
1. USB Port
2. Headphone Jack/Video Output Port
3. Lock Screen Button
4. Mode Switch
5. DC5V In Jack
6. SD Card Slot
7. Video Recording/Cancel Button
8. Camera Button
9. Up Button
10. Play/Pause/Enter Button
11. Down Button
12. Camera In Port

II. What’s in the Box


1. DVR Pouch
2. Camera Lens
3. USB Cable & DC5V Charger
4. Handheld DVR
5. DIY Buttons
6. AV Cable
7. IR Remote Controller
8. SD Card Adapter fitted with a 16GB Micro SD card
9. Earphones
 

III. Installing & Removing Battery

3.1. Remove the adhesive tape on the electrodes; otherwise the battery will not work with 
the DVR.
3.2. To remove the battery, gently unlock by switching LOCK switch to the right side and 
push battery in red arrow pointed direction.
3.3. To install the battery, attach the battery to the DVR and gently push the battery in red 
arrow pointed direction. Lastly, don’t forget to slide LOCK switch to the left to ensure it is 
locked properly.


IV. Connecting Camera Lens to DVR

4.1. Power off the DVR by pressing the Power Button for 2 seconds.
4.2. To connect the camera, plug the camera’s Micro USB end into Camera in Port on the DVR.
4.3. The DVR will not work unless it is fitted with a valid memory card and connected to 
the camera lens.
 

V. Operation

>> To make the memory card recognizable, please be sure to format the memory card before 
using for the first time. Please note that formatting on your PC computer is not recommended, 
for it might result in the failure for the computer to recognize the memory card.
>> Make sure that the DVR is fully charged. If you need the DVR to work 24/7, use the 
included DC5V charger to plug the DVR into an outlet AC power supply.
>> Make sure that the DVR is fitted with a memory card and connected to the camera lens 
properly.

5.1. USING REMOTE CONTROLLER & EDITING SETTINGS

5.1.1. Power on the DVR by pressing the Power Button for 2 seconds before using the 
remote controller.
5.1.2. Press the DVR Pairing Button once to pair the DVR with the IR remote controller.
5.1.3. Aim the remote controller at the DVR to control the DVR remotely.
5.1.4. Once the pairing is done, you are free to operate the DVR using the remote controller.
5.1.5. See the table below for an explanation of system settings.

5.2. CONTINUOUS VIDEO RECORDING

5.2.1. After the DVR is powered on, press the Menu Button once, locate “

Pre-capture

” 

and then choose “

Manual

”.

5.2.2. Press the Cancel Button to exit system settings and press the Video Recording Button 
once to start recording video continuously. Press it once again to stop recording video.
5.2.3. A video clip will be generated and saved every 10 minutes automatically.
5.2.4. The DVR is able to record video continuously for 3 hours straight on a full charge.
5.2.5. A 16GB SD card is able to store up to 3 hours of video footage.

[Note]:


Video Format: AVI

5.3. MOTION DETECTION VIDEO RECORDING

5.3.1. After the DVR is powered on, press the Menu Button once, locate “

Pre-capture

” and 

then choose “

Motion detect

”.

5.3.2. The DVR is now in motion detection recording mode. The DVR will start recording 
a one-minute video when motion is detected.
5.3.3. If no motion is detected, the DVR will be back to motion detection standby mode 
automatically until it detects motion again.
5.3.4. The DVR can run up to 4 hours when no motion is detected all the time.

5.4. CONNECTING DVR TO MONITOR

5.4.1. Make sure the DVR is powered on and the camera lens is inserted into the DVR 
properly.
5.4.2. Press the Menu Button once, locate “

TV Standard

” then select “

PAL

” or “

NTSC

”.

5.4.3. Plug one end of the AV cable into the AV port, then the other 3 AV connectors into 
your monitor.
5.4.4. It will take a few seconds for the live video to appear on the monitor.
 

VI. CHARGING

6.1. Power off the DVR and then plug the DC5V charger into DVR first, then plug the 
charger into an outlet AC power supply.
6.2. It will take 10 hours to obtain a full charge.
6.3. The Blue LED-Charge will be remain solid during the charging process.
6.4. When the DVR is fully charged, the Blue LED-Charge will turn off automatically.

13. Red LED-Power
14. Blue LED-Charge
15. Power/Menu/Cancel Button
16. Red LED-Camera Status
17. Blue LED-Record
18. Backup Battery
19. DVR Pairing Button
20. Video Recording Button
21. Play/Pause/Enter Button
22. Down Button
23. Camera Button
24. Menu Button
25. Up Button

Содержание DVR-0022C

Страница 1: ...ng Cancel Button 8 Camera Button 9 Up Button 10 Play Pause Enter Button 11 Down Button 12 Camera In Port 13 Red LED Power 14 Blue LED Charge 15 Power Menu Cancel Button 16 Red LED Camera Status 17 Blu...

Страница 2: ...3 1 Remove the adhesive tape on the electrodes otherwise the battery will not work with the DVR 3 2 To remove the battery gently unlock by switching LOCK switch to the right side and push battery in...

Страница 3: ...d recognizable please be sure to format the memory card before using for the first time Please note that formatting on your PC computer is not recommended for it might result in the failure for the co...

Страница 4: ...lectable Turn on or off continuous shot Recording options motion detection recording and manual recording Loop recording allows the DVR to automatically delete its first video files to save the latest...

Страница 5: ...hours of video footage Note Video Format AVI 5 3 MOTION DETECTION VIDEO RECORDING 5 3 1 After the DVR is powered on press the Menu Button once locate Pre capture and then choose Motion detect 5 3 2 T...

Страница 6: ...pear on the monitor VI CHARGING 6 1 Power off the DVR and then plug the DC5V charger into DVR first then plug the charger into an outlet AC power supply 6 2 It will take 10 hours to obtain a full char...

Страница 7: ...Videoaufnahme Abbrechen Taste 8 Kamerataste 9 Auf Knopf 10 Play Pause Enter Taste 11 Abw rtstaste 12 Kamera im Port 13 Rote LED Power 14 Blaue LED Ladung 15 Power Men Abbrechen Taste 16 Roter LED Kam...

Страница 8: ...den Elektroden Andernfalls funktioniert die Batterie nicht mit dem DVR 3 2 Um die Batterie zu entfernen entriegeln Sie sie vorsichtig indem Sie den LOCK Schalter auf die rechte Seite schalten und die...

Страница 9: ...ie Speicherkarte erkennbar zu machen bitte unbedingt die Speicherkarte formatieren bevor sie zum ersten Mal benutzt wird Bitte beachten Sie dass die Formatierung auf Ihrem PC Computer nicht empfohlen...

Страница 10: ...der Bilddatei 1080P 30 fps 720P 60 fps 720P 30fps 480P 30 fps w hlbar Aktivieren oder deaktivieren Sie den kontinuierlichen Schuss Aufnahmem glichkeiten Bewegungserkennung und manuelle Aufnahme Die Lo...

Страница 11: ...Anmerkung Videoformat AVI 5 3 MOTION DETECTION VIDEO AUFNAHME 5 3 1 Nachdem der DVR eingeschaltet ist dr cken Sie einmal die Men taste suchen Sie Pre capture und w hlen Sie dann Motion detect 5 3 2 De...

Страница 12: ...eren 3 AV Anschl sse in den Monitor 5 4 4 Es dauert ein paar Sekunden bis das Live Video auf dem Monitor erscheint VI Aufzutragen 6 1 Schalten Sie den DVR aus und stecken Sie den DC5V Ladeger t zuerst...

Страница 13: ...ton de la Cam ra 9 Bouton Haut 10 Bouton Lecture Pause Entr e 11 Bouton Bas 12 Cam ra dans le port 13 LED Rouge Alimentation 14 Blue LED Charge 15 Bouton d Alimentation Menu Annuler 16 tat de la Cam r...

Страница 14: ...1 Retirer le ruban adh sif sur les lectrodes Sinon la batterie ne fonctionnera pas avec le DVR 3 2 Pour retirer la batterie d bloquer doucement en commutant le Bouton LOCK sur le c t droit et appuyer...

Страница 15: ...Pour rendre la carte m moire reconnaissable assurez vous de formater la carte m moire avant d utiliser pour la premi re fois Veuillez noter que le formatage sur l ordinateur de votre PC n est pas rec...

Страница 16: ...TV 2 4G Rem rite Par d faut Choisissez la taille de chaque fichier image 1080P 30 fps 720P 60fps 720P 30fps 480P 30 fps s lectionnable Activer ou d sactiver le tir continu Options d enregistrement en...

Страница 17: ...sous tension appuyez une fois sur le Bouton Menu localisez Pr capture puis choisissez D tection de mouvement 5 3 2 Le DVR est maintenant en mode d enregistrement de d tection de mouvement Le DVR comm...

Страница 18: ...nnecteurs AV dans votre moniteur 5 4 4 Il faudra quelques secondes pour que la vid o en direct apparaisse sur le moniteur VI CHARGEMENT 6 1 teignez le DVR puis branchez le chargeur DC5V dans le DVR d...

Страница 19: ...deo 8 Pulsante della Fotocamera 9 Pulsante in Su 10 Pulsante Play Pausa Invio 11 Pulsante Gi 12 Fotocamera in Porta 13 LED Rosso Potere 14 Carica a LED Blu 15 Pulsante Power Menu Cancel 16 Stato Rosso...

Страница 20: ...re il nastro adesivo sugli elettrodi Altrimenti la batteria non funziona con il DVR 3 2 Per rimuovere la batteria sbloccare delicatamente commutando l interruttore LOCK sul lato destro e spingere la b...

Страница 21: ...ndere la scheda di memoria riconoscibile assicuratevi di formattare la scheda di memoria prima di utilizzare per la prima volta Si prega di notare che la formattazione sul computer PC non raccomandata...

Страница 22: ...Remoter Default Scegliere la dimensione di ogni file di immagine 1080P 30 fps 720P 60 fps 720P 30fps 480P 30 fps Selezionabili Accendere o spegnere il colpo continuo Opzioni di registrazione registraz...

Страница 23: ...1 Dopo l accensione del DVR premere una volta il pulsante Menu individuare Pre capture e quindi scegliere Motion detect 5 3 2 Il DVR ora in modalit di registrazione di rilevazione del movimento Il DVR...

Страница 24: ...onnettori AV nel monitor 5 4 4 Ci vorranno alcuni secondi per far apparire il video dal vivo sul monitor VI CARICAMENTO 6 1 Spegnere il DVR e poi collegare direttamente il caricabatterie DC5V al DVR q...

Страница 25: ...8 Bot n de C mara 9 Bot n hacia Arriba 10 Bot n de Reproducir Pausa Entrar 11 Bot n hacia Abajo 12 Puerto de Entrada de C mara 13 LED Rojo Energ a 14 LED Azul Carga 15 Bot n de Encendido Men Cancelaci...

Страница 26: ...re la cinta adhesiva sobre los electrodos de otra manera la bater a no funcionar con el DVR 3 2 Para retirar la bater a desbloquee suavemente con el interruptor LOCK en el lado derecho y empuje la bat...

Страница 27: ...Para que la tarjeta de memoria sea reconocible aseg rese de formatear la tarjeta de memoria antes de usarla por primera vez Tenga en cuenta que no se recomienda formatear en el ordenador de su PC ya...

Страница 28: ...cuencia Est ndar de TV 2 4G Remoter Predeterminado Elige el tama o de cada archivo de imagen 1080P 30 fps 720P 60 fps 720P 30fps 480P 30fps Seleccionable Activar o desactivar el disparo continuo Opcio...

Страница 29: ...espu s de encender el DVR presione el Bot n de Men una vez localice Pre captura y luego elija Detecci n de movimiento 5 3 2 El DVR est ahora en el modo de detecci n de movimiento El DVR comenzar a gra...

Страница 30: ...os 3 conectores AV en su monitor 5 4 4 El video en directo aparecer en el monitor unos segundos VI Carga 6 1 Apague el DVR y luego enchufe el cargador DC5V en DVR primero luego conecte el cargador a u...

Страница 31: ...DVR 0022C I 1 USB 2 3 5 DC5V SD 7 8 9 10 11 13 LED 14 LED 15 16 LED 17 LED 18 19 DVR 20 21 22 23 24 25...

Страница 32: ...II 1 DVR 2 3 USB DC5V 4 DVR 5 DIY 6 AV 7 8 16GB SD SD 9 III 3 1 DVR 3 2 LOCK 3 3 DVR LOCK...

Страница 33: ...IV DVR 4 1 2 DVR 4 2 Micro USB DVR Camera In Port 4 3 DVR V PC DVR DVR 24 365 DC5V DVR AC DVR...

Страница 34: ...5 1 5 1 1 2 DVR 5 1 2 DVR 1 DVR IR 5 1 3 DVR DVR 5 1 4 DVR 5 1 5 LCD TV 2 4G 1080P 30 fps 720P 60 fps 720P 30fps 480P 30 fps DVR OSD LCD DVR DVR 50 60Hz NTSC PAL DVR DVR DVR...

Страница 35: ...5 2 5 2 1 DVR 1 Pre capture Manual 5 2 2 1 5 2 3 10 5 2 4 DVR 3 5 2 5 16GB SD 3 AVI 5 3 5 3 1 DVR Pre capture Motion detect 5 3 2 DVR DVR 1 5 3 3 DVR 5 3 4 DVR 4 5 4 5 4 1 DVR DVR...

Страница 36: ...5 4 2 TV Standard PAL NTSC 5 4 3 AV AV 3 AV 5 4 4 VI 6 1 DVR DC5V DVR AC 6 2 10 6 3 LED 6 4 DVR LED...

Отзывы: