background image

IDC100

User Guide

I.  Product Overview

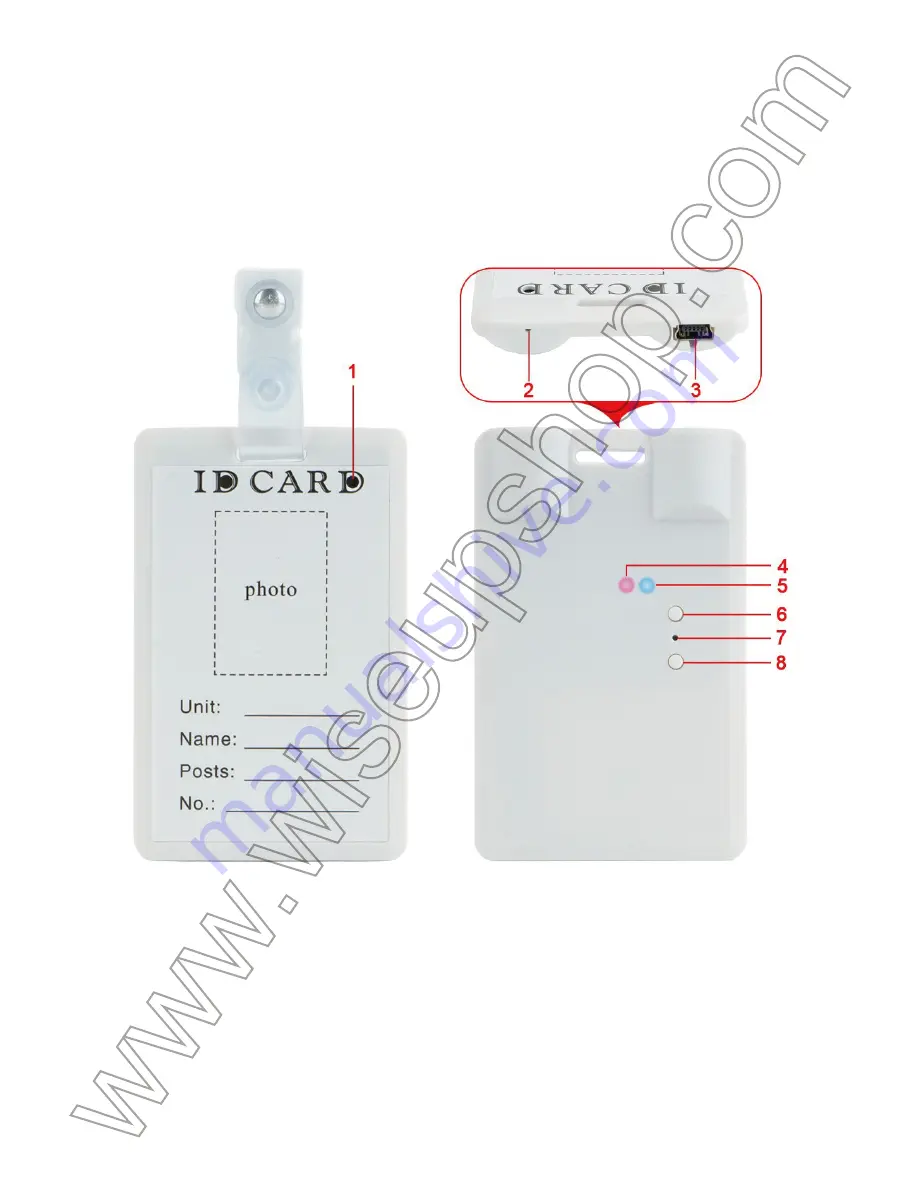
1.Camera Lens
2.Microphone
3.USB Port
4.Red Indicator Light
5.Blue Indicator Light
6.Power/Video Recording Button
7.Reset Button
8.Camera/Audio Recording Button

 II. What’s in the Box

-1× Spy Camera ID Card
-1× USB Cable
-1× Lanyard
-1× Clip

III. Operation

>> Please make sure your camera battery is fully recharged before using.
>> Please format the built-in memory card on your PC computer before using.

3.1. POWER ON/OFF

3.1.1. Power on the camera by pressing the Power Button for 2 seconds. Both 
the red and blue indicator lights will be illuminated, then the red one will be off 
while the blue one will stay illuminated, indicating the camera has entered into 
standby mode automatically.
3.1.2. Power off the camera by pressing the Power Button for 2 seconds again. 
The blue indicator light will be off, then the red indicator light will flash twice and 
turn off.

[Note]: 

The camera will shut down automatically if it is in standby mode without any 

operation more than 1 minute.

3.2. VIDEO RECORDING

3.2.1. Power on the camera by pressing the Power Button for 2 seconds. Both 
the red and blue indicator lights will be illuminated, then the red one will be off 
while the blue one will stay illuminated, indicating the camera has entered into 
standby mode automatically.
3.2.2. Press the Video Recording Button once to record video. The blue indicator 
light will flash 3 times and then turn off.
3.2.3. Press the Video Recording Button once to stop recording video. The blue 
indicator light will stay illuminated, indicating the camera is back to standby 
mode.

[Note]:

1). A video file will be generated and saved every 30 minutes automatically.
2). The camera can record video for 3 hours continuously on a full charge.
3). Video Resolution: 1280x960                    Video Format: AVI
4). If the camera is in low battery, the red indicator lights will flash 4 times and the camera 
will shut down automatically, and the camera will save all the video files.

3.3. CAMERA/STILL PHOTOGRAPHY

3.3.1. Power on the camera by pressing the Power Button for 2 seconds. Both 
the red and blue indicator lights will be illuminated, then the red one will be off 
while the blue one will stay illuminated, indicating the camera has entered into 
standby mode automatically.
3.3.2. Press the Camera Button once to take a photo. The red indicator light will 
flash once and turn off every time you take a photo.

3.4. AUDIO RECORDING

3.4.1. Power on the camera by pressing the Power Button for 2 seconds. Both 
the red and blue indicator lights will be illuminated, then the red one will be off 
while the blue one will stay illuminated, indicating the camera has entered into 
standby mode automatically.
3.4.2. Press the Audio Recording Button for 2 seconds to record audio. The blue 
indicator light will be off, the red one will flash 4 times and then turn off.
3.4.3. Press the Audio Recording Button once to stop recording audio. The blue 
indicator light will stay illuminated, indicating the camera is back to standby 
mode.

[Note]:

1). An audio file will be generated and saved every 30 minutes automatically.
2). Audio Format: WAV

IV. Video/Image Files Uploads

4.1. Power off the camera and connect the camera to a proper PC computer 
USB port by using the USB cable provided.

4.2. Removable disk drive folder appears.
4.3. All the files can be accessed in the drive.

V. Setting Time/Date Stamp

5.1. Power off the camera and connect the camera to a proper PC computer 
USB port by using the USB cable provided.
5.2. Removable disk drive folder appears.
5.3. Click on the drive in the root directory and inside the root directory, create a 
file named “time.txt”.
5.4. Write the current date and time in the “time.txt” file with the correct format:
YYYY-MM-DD HH:MM:SS (For example: 2016-04-12 14:24:32). Save this file.
5.5. Restart the camera and the system will upgrade the program automatically.

VI. Charging

6.1. Power off the camera and connect the camera to a proper PC computer 
USB port by using the USB cable provided.
6.2. The red indicator light will keep flashing while the blue indicator light will be 
illuminated during the charging process.
6.3. It will take 3 hours to obtain a full charge.
6.4. When the camera is fully recharged, the red indicator light will be off and the 
blue one will stay illuminated.
Tips: you can also use a DC5V phone charger to charge this camera.

VII. Resetting

If, for any reason, the camera stops responding or isn’t working properly, a quick 
reset will restore it back to normal operation.
Operation: When the camera is powered on, use a pin to press the Reset Button 
once and the camera will shut down automatically. Then you can restart the 
camera to the factory default settings.

Содержание IDC100

Страница 1: ...IDC100 User Guide I Product Overview 1 Camera Lens 2 Microphone 3 USB Port 4 Red Indicator Light 5 Blue Indicator Light 6 Power Video Recording Button 7 Reset Button 8 Camera Audio Recording Button...

Страница 2: ...gain The blue indicator light will be off then the red indicator light will flash twice and turn off Note The camera will shut down automatically if it is in standby mode without any operation more th...

Страница 3: ...indicator light will flash once and turn off every time you take a photo 3 4 AUDIO RECORDING 3 4 1 Power on the camera by pressing the Power Button for 2 seconds Both the red and blue indicator light...

Страница 4: ...ging 6 1 Power off the camera and connect the camera to a proper PC computer USB port by using the USB cable provided 6 2 The red indicator light will keep flashing while the blue indicator light will...

Страница 5: ...IDC100 Benutzerhandbuch I Produkt bersicht 1 Kamera Objektiv 2 MikrofonHafen 3 USBAnzeigelampe 4 RedAnzeigelampe 5 Blue 6 Power Video Aufnahmetaste 7 Reset Taste 8 Camera Audio Aufnahme Taste...

Страница 6: ...chaltet wurde 3 1 2 Schalten Sie die Kamera aus indem Sie den Netzschalter 2 Sekunden lang erneut dr cken Die blaue Kontrolllampe erlischt dann leuchtet die rote Kontrollleuchte zweimal und erlischt H...

Страница 7: ...n auf und die rote leuchtet dann aus w hrend die blaue Lampe leuchtet was bedeutet dass die Kamera automatisch in den Bereitschaftsmodus geschaltet wurde 3 3 2 Dr cken Sie die Kamera Taste einmal um e...

Страница 8: ...els an einen geeigneten USB Anschluss des Computers an 5 2 Wechseldatentr gerordner wird angezeigt 5 3 Klicken Sie auf das Laufwerk im Stammverzeichnis und im Stammverzeichnis erstellen Sie eine Datei...

Страница 9: ...era aufzuladen VII R cksetzen Wenn die Kamera aus irgendeinem Grund nicht mehr reagiert oder nicht ordnungsgem arbeitet wird sie durch einen schnellen Reset wieder in den Normalbetrieb zur ckversetzt...

Страница 10: ...emploi I Aper u du produit 1 Objectif de cam ra 2 Microphone 3 Port USB 4 Voyant Rouge 5 Voyant bleu 6 Bouton d enregistrement vid o d alimentation 7 Bouton R initialiser 8 Bouton de cam ra d enregis...

Страница 11: ...en appuyant nouveau sur le bouton d alimentation pendant 2 secondes Le voyant bleu s teint puis le voyant rouge clignote deux fois et s teint Remarque la cam ra s arr te automatiquement s il est en mo...

Страница 12: ...e veille 3 3 2 Appuyez une fois sur la touche Appareil photo pour prendre une photo Le voyant rouge clignote une fois et s teint chaque fois que vous prenez une photo 3 4 ENREGISTREMENT AUDIO 3 4 1 Al...

Страница 13: ...te et l heure actuelles dans le fichier time txt avec le format correct AAAA MM JJ HH MM SS Par exemple 2016 04 12 14 24 32 Enregistrer ce fichier 5 5 Red marrez la cam ra et le syst me mettra automat...

Страница 14: ...blira en mode normal Fonctionnement Lorsque la cam ra est sous tension utilisez une broche pour appuyer sur le bouton de r initialisation une fois et l appareil s teindra automatiquement Ensuite vous...

Страница 15: ...IDC100 Guida utente I Descrizione del prodotto 1 Camera Lens 2 Microphone 3 USB Port 4 Red Spia 5 Blue SpiaPulsante 6 Power Recording VideoPulsante 7 ResetPulsante 8 Camera Audio registrazione...

Страница 16: ...o il pulsante di accensione per 2 secondi La spia blu si spegne quindi la spia rossa lampeggia due volte e si spegne Nota La fotocamera si spegne automaticamente se in modalit standby senza alcuna ope...

Страница 17: ...a foto La spia rossa lampeggia una volta e si spegne ogni volta che si scatta una foto 3 4 REGISTRAZIONE AUDIO 3 4 1 Accendere la fotocamera premendo il pulsante di accensione per 2 secondi La spia ro...

Страница 18: ...a fotocamera e collegare la fotocamera a una porta USB del computer PC corretto utilizzando il cavo USB in dotazione 6 2 La spia rossa lampegger quando l indicatore luminoso blu si illumina durante il...

Страница 19: ...io I Descripci n del Producto 1 Lente de c mara 2 Micr fono 3 Puerto USB 4 Luz Indicadora Roja 5 Luz Indicadora Azul 6 Bot n de Potencia Grabaci n de Video 7 Bot n de Restablecimiento 8 Bot n de C mar...

Страница 20: ...ot n de Potencia durante 2 segundos La luz indicadora azul se apagar y la luz indicadora roja parpadear dos veces y se apagar Nota La c mara se apagar autom ticamente si est en el modo de espera sin n...

Страница 21: ...spera autom ticamente 3 3 2 Presione el Bot n de C mara una vez para tomar una foto La luz indiadora roja parpadear una vez y se apagar cada vez que tome una foto 3 4 GRABACI N DE AUDIO 3 4 1 Encienda...

Страница 22: ...me txt con el formato correcto AAAA MM DD HH MM SS Por ejemplo 2016 04 12 14 24 32 Guarde este archivo 5 5 Reinicie la c mara y el sistema actualizar el programa autom ticamente VI Carga 6 1 Apague la...

Страница 23: ...o la c mara est encendida utilice una aguja para presionar el bot n de restablecimiento una vez y la c mara se apagar autom ticamente A continuaci n puede reiniciar la c mara a la configuraci n predet...

Страница 24: ...IDC100 I 1 2 3 USB 4 5 6 7 8...

Страница 25: ...II 1 ID 1 USB 1 1 III 3 1 3 1 1 2 3 1 2 2 2 1 3 2 3 2 1 2 3 2 2 1 3 3 2 3 1 1 30 2 3 3 1280x960 AVI...

Страница 26: ...4 4 3 3 3 3 1 2 3 3 2 1 3 4 3 4 1 2 3 4 2 2 4 3 4 3 1 1 30 2 WAV IV 4 1 USB USB 4 2 4 3 V 5 1 USB USB...

Страница 27: ...5 2 5 3 time txt 5 4 time txt YYYY MM DD HH MM SS 2016 04 12 14 24 32 5 5 VI 6 1 USB USB 6 2 6 3 3 6 4 DC5V VII 1...

Отзывы: