English
_9
●
over
view
Button
Description of functions
SMT-3233
SMT-4033
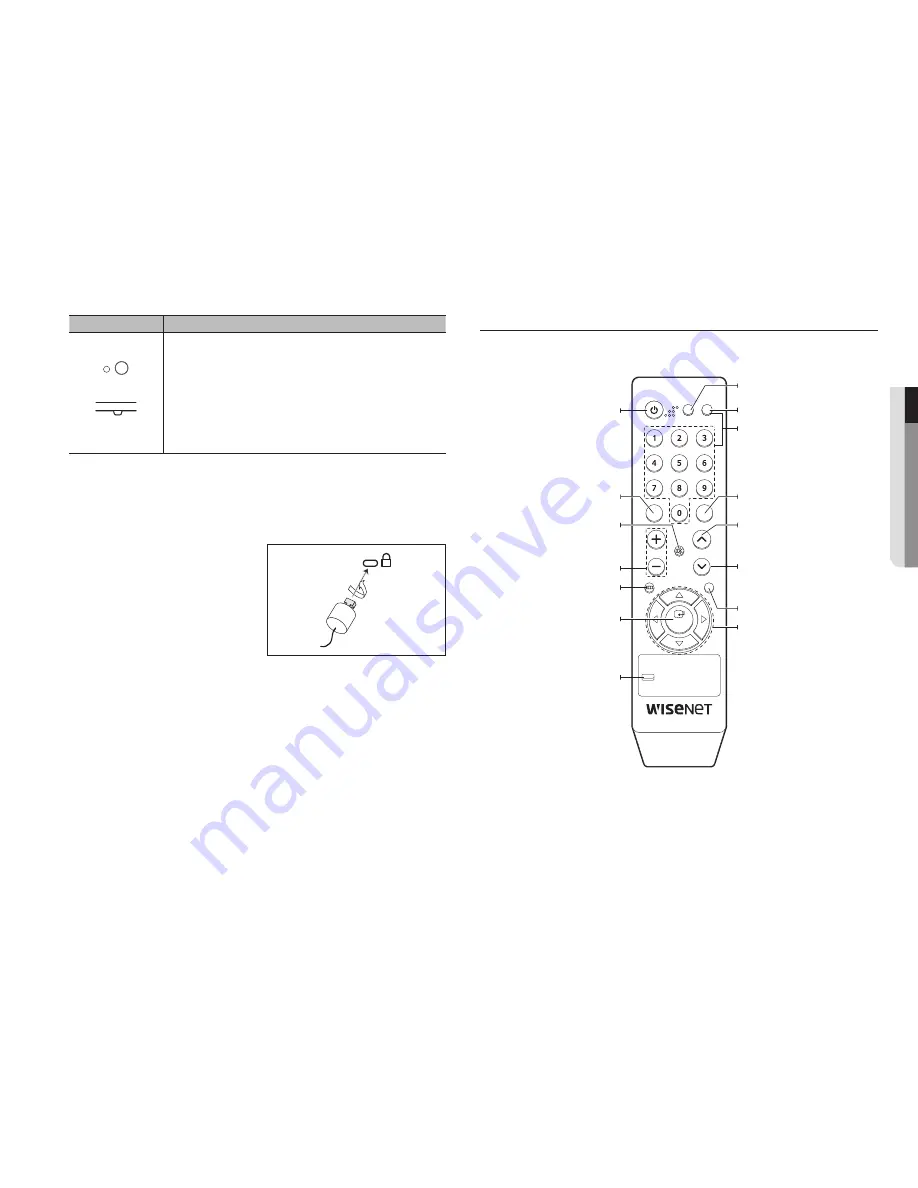
Press the button with the remote control pointed toward the remote control receiver to operate it.
`
If another display is used with this product in the same space where the remote control is being
used, it may cause a malfunction due to interference of the remote control frequency.
Use the remote control within a range of 7 - 10m and 30° left/right from the product receiver.
`
Remove used batteries and keep them out of the reach of children.
`
Do not combine new and used batteries. When replacing the batteries, please replace both of
them at once.
`
Remove the batteries if you do not intend to use the remote control for an extended period of
time.
anti-theft Lock
M
`
The locking device shape and locking method depend on the manufacturer. Please refer to the user guide provided with
your anti-theft locking device for details.
`
The following images are for reference only. Real-life applications may differ.
to lock an anti-theft locking device
1.
Fix the cable of your anti-theft locking device to a
heavy object such as a desk.
2.
Put one end of the cable through the loop on the
other end.
3.
Insert the locking device into the anti-theft lock slot at
the back of the product.
4.
Lock the locking device.
`
An anti-theft locking device can be purchased separately.
`
Refer to the instruction manual supplied with the lock for
detailed information on how to use it.
`
You can purchase a lock at most stores specializing in electronics, or via the Internet.
remote controL
If another display is used with this product in the same space where the remote control is being used, it may
cause a malfunction due to interference of the remote control frequency.
changing the remote control id
To use the remote, the Remote control ID and Monitor ID should be matched.
1.
Press the [
SyStem id
] button of the remote control and check the ID displayed on the monitor screen. The
factory ID for the remote control is '1'.
2.
While holding down a number (0 - 9) button on the remote control, press the SYSTEM ID button.
3.
When ID input is done, press the [
SyStem id
] button of the remote control again to check the setting.
SOURCE
FREEZE
MUTE
P.MODE
PIP/A-SWITCH
VOL
UNDER SCAN
MENU
AUTO
POWER
ID RESET SYSTEM ID
ENTER
power
Turns the power on or off.
There is a time delay of a few seconds before the screen
disappears.
SyStem id
Check the ID value of the remote control.
numeric SyStem id
Changes the ID of the remote control.
p.mode
Press it to select or change the preset screen mode.
When this button is pressed, the current mode is displayed at
the bottom center of the screen. There are 5 screens pre-set
by the manufacturer, and each time you press the button, the
change will be selected.
a-Switch
When you press the A-SWITCH button, the input signal of the
monitor automatically changes to AV
;
HDMI
;
DVI
;
VGA
in that order.
* To execute the Auto Switch function, first set the switching
time in "Setting
;
Auto Switch". (page 14)
$%_ +
Button
Press them to navigate through the menu horizontally or
vertically, or to adjust the value of the selected menu.
under Scan
Changes the screen size.
id reSet
Initialize the ID value(1) of the remote control.
freeZe - available only in av mode
Press it to stop or release the screen.
Source
Press it to change the input source.
, -
menu
Used when opening or closing the menu screen. Also used to
return to the previous menu.
enter
Operates the activated menu.
mute
auto - available only in vGa mode
Automatically adjusts the screen status.


