


SmartPAC 2 with WPC 2000 Integration User Manual
1128600
Run Mode
6-11
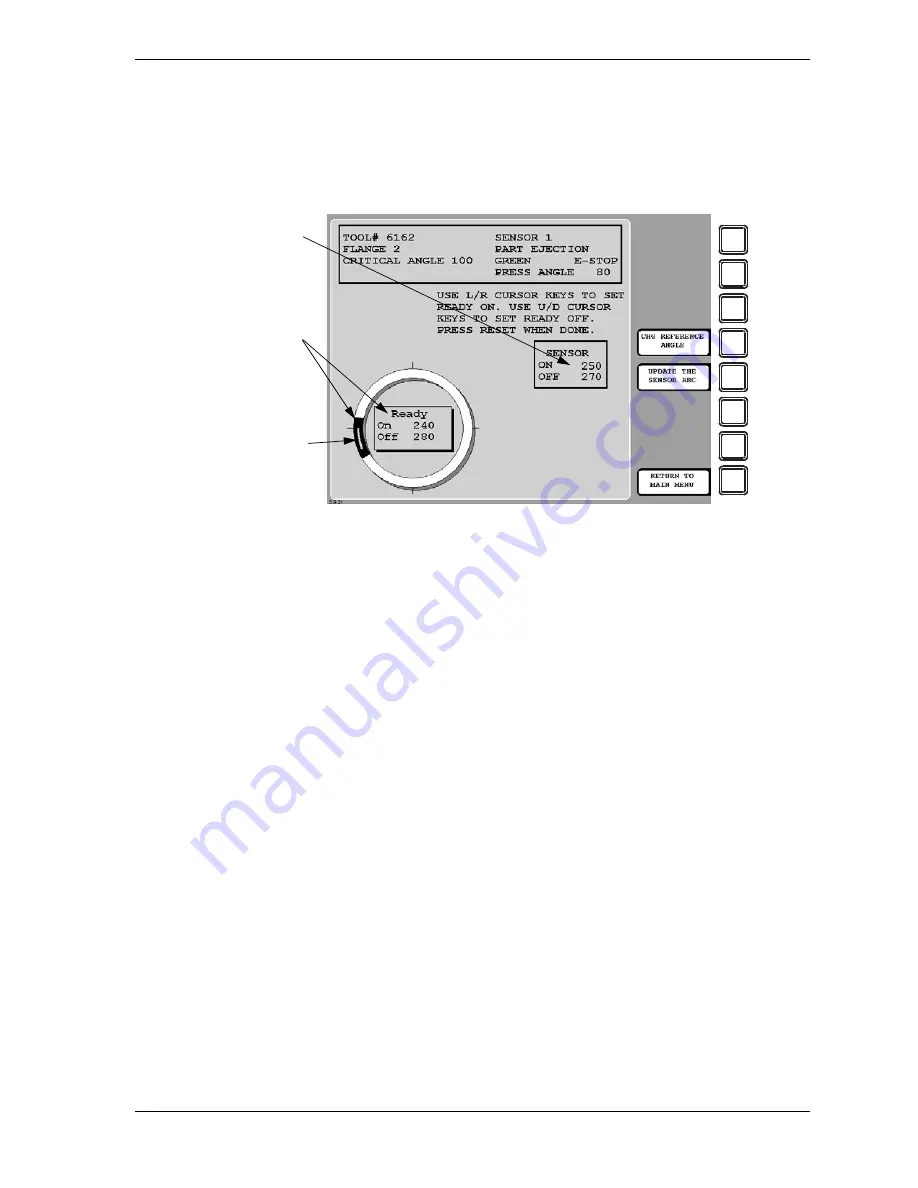
Adjusting the Ready Signal for Green Sensors
When you select a green, green quick check, or green constant sensor on the Die Protection
Menu, the Ready Signal Programming screen, shown in Figure 6-14, displays.
The functionality of this screen differs slightly from that of the Ready Signal Programming
screen in Program mode. When you run the press, the angles at which the selected sensor
turns on and off on each stroke are shown in the window labelled SENSOR at the right of the
screen, and the number of degrees that the sensor is on is represented graphically by a green
arc on the crank angle clock. These displays allow you to fine-tune the Ready signal settings
made in Program mode.
Another difference is that the On and Off cursors move around the crank angle clock more
slowly when you press the cursor keys, enabling you to set Ready On and Ready Off angles
more precisely.
The On/Off actuation angles displayed in the Sensor window are not updated on every stroke.
For green and green quick check sensors, SmartPAC 2 displays the earliest On and latest Off
angles for the current sequence of press strokes (until the
F5
(Update the Sensor Arc) function
key is pressed), updating the display only when the sensor turns on before the previous earliest
On signal or turns off after the previous latest Off signal.
For green constant sensors, SmartPAC 2 displays the latest On and earliest Off angles,
updating the display only when the sensor turns on after the previous latest On angle and turns
off before the previous earliest Off angle.
EXAMPLE
If the On angle for a green quick check sensor fluctuates between 190
°
and 195
°
from stroke to
stroke, SmartPAC 2 continuously displays 190
°
as the sensor’s On value. However, if the On
angle changes to 189
°
, SmartPAC 2 displays the On angle as 189
°
on the next stroke.
Figure 6-14. Ready Signal Programming Screen
Adjust
Ready signal
on the fly
Actual sensor
ON and OFF
angles
Sensor actuation
shown in green
F1
F2
F3
F4
F5
F6
F7
F8
Содержание SmartPAC 2
Страница 2: ......
Страница 4: ......
Страница 6: ......
Страница 28: ...1128600 SmartPAC 2 with WPC 2000 Integration User Manual xxii Table of Contents ...
Страница 44: ...1128600 SmartPAC 2 with WPC 2000 Integration User Manual 1 16 Introduction ...
Страница 186: ...1128600 SmartPAC 2 with WPC 2000 Integration User Manual 3 26 Keyboard Displays Etc ...
Страница 440: ...1128600 SmartPAC 2 with WPC 2000 Integration User Manual D 12 Updating SmartPAC 2 Firmware ...
Страница 478: ...1128600 SmartPAC 2 with WPC 2000 Integration User Manual G 6 Replacing SmartPAC 2 PC Board ...
Страница 548: ...1128600 SmartPAC 2 with WPC 2000 Integration User Manual GL 8 Glossary ...
Страница 558: ...1128600 SmartPAC 2 with WPC 2000 Integration User Manual IN 10 Index ...
Страница 560: ......
Страница 562: ......
Страница 564: ......
Страница 566: ......
Страница 568: ......
Страница 570: ......
Страница 572: ......
Страница 574: ......
Страница 576: ......
Страница 577: ......
Страница 578: ...APPROVALS SCALE C SIZE TITLE SHEET OF DRAWING NUMBER REV ...
Страница 579: ...APPROVALS SCALE C SIZE TITLE SHEET OF DRAWING NUMBER REV ...
Страница 580: ...APPROVALS SCALE C SIZE TITLE SHEET OF DRAWING NUMBER REV ...
Страница 581: ...APPROVALS SCALE C SIZE TITLE SHEET OF DRAWING NUMBER REV ...
Страница 582: ......
Страница 583: ......
Страница 584: ......
Страница 585: ......
Страница 586: ......
Страница 587: ......
Страница 588: ......
Страница 589: ......
Страница 590: ......
Страница 591: ......
Страница 592: ......
Страница 593: ......
Страница 594: ......
Страница 595: ......
Страница 596: ......
Страница 597: ......
Страница 598: ......
Страница 599: ......
Страница 600: ......
Страница 601: ......
Страница 602: ......
Страница 603: ......
Страница 604: ......


