Winmate W27L100-CHC1 Скачать руководство пользователя страница 25

USER MANUAL 

CHAPTER 6 

TECHNICAL SUPPORT 

- 25 - 

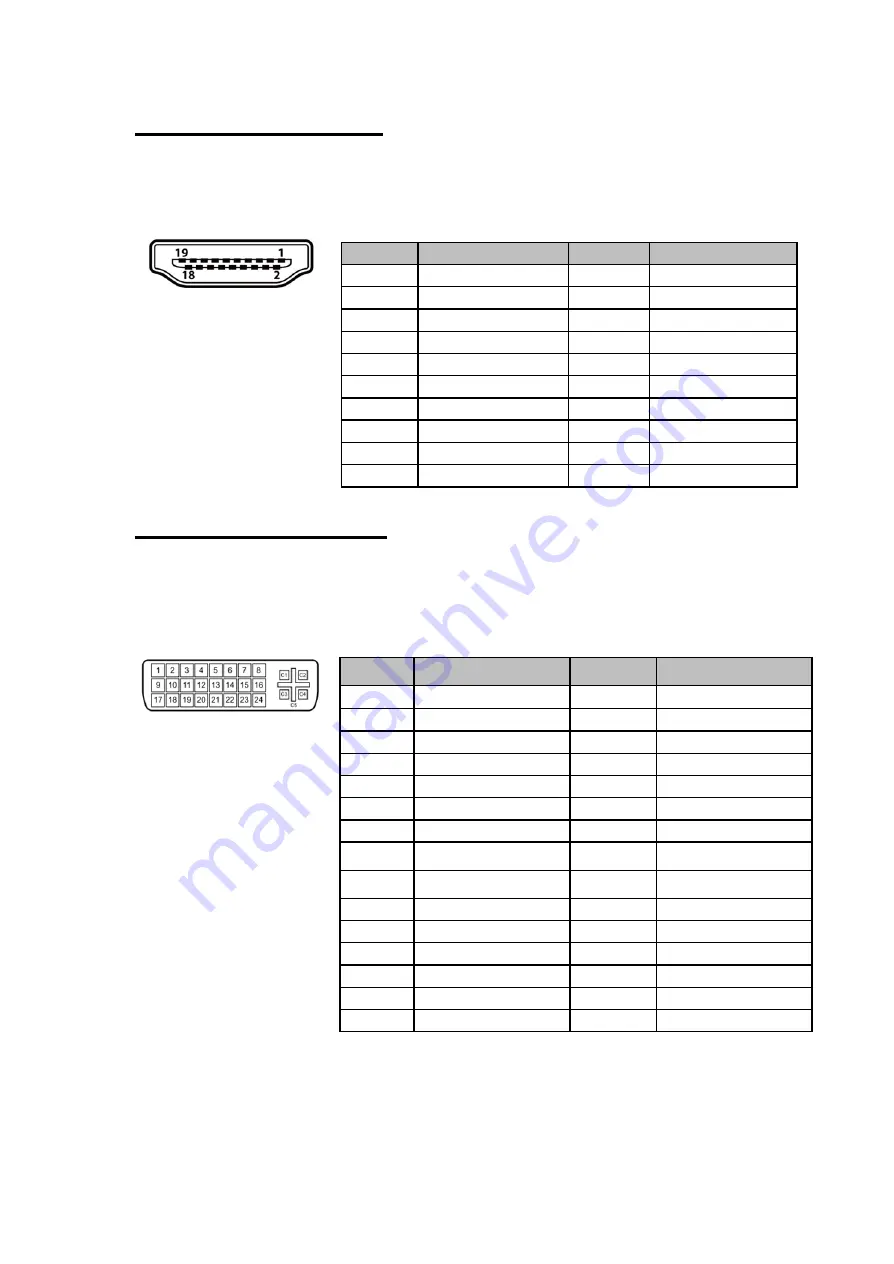
2.5.3 HDMI Connector 

 Plug HDMI signal cable to the HDMI connector on the rear side of the PC 
system, and plug the other end to the monitor. 

Pin Assignment and signal names for HDMI connector


2.5.4 DVI-D Connector 

Plug the DVI-D connector to the rear of PC system, and plug the other end to the 
display. Fasten cable connectors with screws. 

Pin Assignment and signal names for DVI connector


Pin №


Signal Name


Pin №


Signal Name


GND 

HDMI_RX2- 

GND 

HDMI_RX1- 

GND 

HDMI_RX0- 

10 

11 

GND 

12 

HDMI_RXC- 

13 

HDMI_CON_CEC 

14 

NC 

15 

HDMI_CON_SCL 

16 

HDMI_CON_SDA 

17 

GND 

18 

+5V_HDMI 

19 

HDMI_CON_HP 


Pin №


Signal Name


Pin №


Signal Name


DVI_RX2- 


GND 

4- 

4+ 

DVI SCL 

DVI SDA 

NC 

DVI_RX1- 

10 


11 

GND 

12 

3- 

13 

3+ 

14 

+5V 

15 

DVI_CON_CABLE 

16 

DVI_CON_HP 

17 

DVI_RX0- 

18 


19 

GND 

20 

5- 

21 

5+ 

22 

GND 

23 

DVI_CLKP 

24 

DVI_CLKN 

C1 

NC 

C2 

NC 

C3 

NC 

C4 

NC 

C5 

NC 


Содержание W27L100-CHC1

Страница 1: ...d retain them for future reference 27 6 28 6 38 Bar Type Chassis Display W27L100 CHC1 W28L100 CHA2 W38L100 CHA1 User Manual V1 0 For more information on this and other Winmate products please visit our website at www winmate com Document Part Number 91521110103H ...

Страница 2: ...Indicators 17 CHAPTER 2 INSTALLATION 19 2 1 Safety Precautions 19 2 2 Cable Mounting Considerations 19 2 3 VESA Mounting Guide 20 2 4 Powering On 21 2 4 1 AC Adapter Components 21 2 4 2 Power Considerations 22 2 4 3 Connecting the Power 23 2 5 Connecting Peripherals 24 2 5 1 DC Input Connector 24 2 5 2 VGA Connector 24 2 5 3 HDMI Connector 25 2 5 4 DVI Connector 25 CHAPTER 3 Operating the Device 2...

Страница 3: ...d Applications that are described in this manual are for illustration purposes only We make no representation or guarantee that such application will be suitable for the specified use without further testing or modification Warranty Our warranty guarantees that each of its products will be free from material and workmanship defects for a period of one year from the invoice date If the customer dis...

Страница 4: ... for technical support if you need additional assistance You may need the following information ready before you call Product serial number Software OS version application software etc Description of complete problem The exact wording of any error messages In addition free technical support is available from our engineers every business day We are always ready to give advice on application require...

Страница 5: ...ware and explains how to avoid the potential problem Une alerte d attention indique un dommage possible à l équipement et explique comment éviter le problème potentiel WARNING AVERTISSEMENT An Electrical Shock Warning indicates the potential harm from electrical hazards and how to avoid the potential problem Un Avertissement de Choc Électrique indique le potentiel de chocs sur des emplacements éle...

Страница 6: ...xpérimenté devrait ouvrir ces chassis CAUTION ATTENTION Always ground yourself to remove any static charge before touching the CPU card Modern electronic devices are very sensitive to static electric charges As a safety precaution use a grounding wrist strap at all times Place all electronic components in a static dissipative surface or static shielded bag when they are not in the chassis Toujours...

Страница 7: ... is correct Position the power cord so that people cannot step on it Do not place anything over the power cord If the equipment is not used for a long time disconnect it from the power source to avoid damage by transient over voltage Never pour any liquid into an opening This could cause fire or electrical shock Never open the equipment For safety reasons only qualified service personnel should op...

Страница 8: ...erre afin que l équipement ne se décharge pas sur vous Cover workstations with approved anti static material Use a wrist strap connected to a work surface and properly grounded tools and equipment Use anti static mats heel straps or air ionizer for added protection Handle electrostatic sensitive components PCB s and assemblies by the case or the edge of the board Avoid contact with pins leads or c...

Страница 9: ...iate radio frequency energy and if not installed and used in accordance with the instruction manual may cause harmful interference to radio communications Operation of this equipment in a residential area is likely to cause harmful interference in which case the user will be required to correct the interference at him own expense EC Declaration of Conformity This equipment is in conformity with th...

Страница 10: ...1 W28L100 CHA2 and W38L100 CHA1 The documentation set for the Bar Type Chassis Display provides information for specific user needs and includes Bar Type Display User Manual contains detailed description on how to use the display its components and features NOTE Some pictures in this guide are samples and can differ from actual product Document Revision History Version Date Note 1 0 30 Nov 2018 In...

Страница 11: ...11 INTRODUCTION This chapter gives you product overview describes features and hardware specification You will find all accessories that come with the display in the packing list Mechanical dimensions and drawings included in this chapter ...

Страница 12: ...rent content with one single image or split screens in different places Bar Type can be a perfect choice to replace traditional LED digital signage for applications where the space is limited such as public transportation elevators and other public places 1 1 Product Features Winmate Bar Type Chassis Display features 28 6 38 ultra wide aspect ratio TFT LCD 1 x HDMI 1 x VGA 1 x DVI D Chassis Housin...

Страница 13: ...he items listed below are inside your package If any of these items are missing or damaged contact us immediately Standard factory shipment list Bar Type Chassis Display User Manual Hardcopy 3pin Terminal Block Varies by product specifications 91521110103H Cable 94EL02X020E0 Connector 604520105004 VESA Mount Screws 913511105000 ...

Страница 14: ...ce that this is a simplified drawing and some components are not marked in detail Please contact our sales representative if you need further product information 1 3 1 Schematics and Dimensions 27 6 No Description No Description 5 Button OSD Control Panel VGA x 1 Audio Optional DVI D x 1 9 36V DC Terminal Block Phoenix Type HDMI 1 4a x 1 ...

Страница 15: ... CHAPTER 1 IINTRODUCTION 15 1 3 2 Schematics and Dimensions 28 6 Unit mm No Description No Description 5 Button OSD Control Panel VGA x 1 Audio Optional DVI D x 1 9 36V DC Terminal Block Phoenix Type HDMI 1 4a x 1 ...

Страница 16: ...L CHAPTER 1 IINTRODUCTION 16 1 3 3 Schematics and Dimensions 38 Unit mm No Description No Description 5 Button OSD Control Panel VGA x 1 Audio Optional DVI D x 1 9 36V DC Terminal Block Phoenix Type HDMI 1 4a x 1 ...

Страница 17: ...wn the volume Volume Up Select down Press to increase the volume Power Button Press to exit the menu Exit Auto adjustment Press to confirm the action or to come back to the main menu Enter Call main OSD menu Press to power on or power off the device LED Indicators Icon Button Description Power Indicator Lights up in Green when the monitor turn on Stand by Indicator Lights up in Orange when the dev...

Страница 18: ...AL CHAPTER 2 INSTALLATION 18 INSTALLATION This chapter provides hardware installation instructions and mounting guide for all available mounting options Pay attention to cautions and warning to avoid any damages ...

Страница 19: ... label wiring to all devices in the system 2 2 Cable Mounting Considerations For a nice look and safe installation make sure cables are neatly hidden behind the Display Refer to Chapter 2 section 2 4 for the cable installation instruction CAUTION ATTENTION Observe all local installation requirements for connection cable type and protection level Suivre tous les règlements locaux d installations de...

Страница 20: ...commended mounting hardware to avoid the risk of injury Suivez les instructions de montage et d utilisation recommandé le matériel de montage pour éviter le risque de blessure Size VESA Plate Dimensions Screw Hole Diameter 27 6 200 x 100 mm VESA M6 28 6 200 x 100 mm VESA M6 38 200 x 200 mm 400 x 200 mm VESA M6 Installation Instruction 1 Screw VESA bracket to the fixture ex wall with four VESA M6 s...

Страница 21: ... not cover the adapter with paper or other objects that will reduce cooling Do not use the adapter while it is inside a carrying case Do not use the adapter if the cord is damaged There are NO serviceable parts inside Replace the unit if it is damaged or exposed to excess moisture While using the AC Adapter always Plug in the power cord to easy accessible AC outlet Plug in the AC adapter to a grou...

Страница 22: ... TERRE This product must be grounded Use only a grounded AC outlet Install the additional PE ground wire if the local installation regulations require it If you do not use a grounded outlet while using the device you may notice an electrical tingling sensation when the palms of your hands touch the device Ce produit doit être mis à la terre Utiliser seulement un cordon d alimentation avec mise à l...

Страница 23: ...e Display to the source of power 1 Connect a 3 pin terminal block to the connector on the Display 2 Connect the other side of the terminal block to the AC adapter 3 Connect the AC adapter to the power cord 4 Plug in the power cord to a working AC wall outlet 5 Press the power button located on the OSD control panel on the rear to turn on the system Note Power cords vary in appearance by region and...

Страница 24: ...r order 2 5 1 DC Input Connector The Bar Type Display uses 3 pin terminal block connector that accepts 9 36V DC power input The connector secured to the enclosure with two screws 2 5 2 VGA Connector Open Frame Display uses standard 15pin D sub connector Plug 15 pin VGA signal cable to the VGA connector in the rear of motherboard and plug the other end to the monitor Secure cable connectors with he...

Страница 25: ...rs with screws Pin Assignment and signal names for DVI connector Pin Signal Name Pin Signal Name 1 HDMI_RX2 2 GND 3 HDMI_RX2 4 HDMI_RX1 5 GND 6 HDMI_RX1 7 HDMI_RX0 8 GND 9 HDMI_RX0 10 HDMI_RXC 11 GND 12 HDMI_RXC 13 HDMI_CON_CEC 14 NC 15 HDMI_CON_SCL 16 HDMI_CON_SDA 17 GND 18 5V_HDMI 19 HDMI_CON_HP Pin Signal Name Pin Signal Name 1 DVI_RX2 2 DVI_RX2 3 GND 4 4 5 4 6 DVI SCL 7 DVI SDA 8 NC 9 DVI_RX1 ...

Страница 26: ...installation and operation of any of our products If any problem occurs fill in problem report form enclosed and immediately contact us 3 1 Turning on the System To turn on the system 1 Connect a 3 pin terminal block to the connector on the Display 2 Connect the other side of the terminal block to the AC adapter 3 Connect the AC adapter to the power cord 4 Plug in the power cord to a working AC wa...

Страница 27: ...justment may be required to optimize the display quality WHITE BALANCE Select and execute Use to set RGB signal voltage level COLOR USER R G B slider bar Choose RED GREEN BLUE to set value of color temperature brightness to suit your own preference 9300K Select and execute Use to set value of monitor for the CIE coordinate 9300 color temperature 6500K Select and execute Use to set value of monitor...

Страница 28: ...ult mode Auto detect the input source ANALOG Select and execute Switch the setting of signal input to Analog mode HDMI Select and execute Switch the setting of signal input to HDMI mode RECALL YES Select and execute Recall the factory default setting NO Select and execute Return to main menu EXIT YES Select and execute Exit the OSD menu NO Select and execute Return to main menu ...

Страница 29: ... monitor If your computer was working with a CRT monitor you should check the current signal timing and turn off your computer before you connect the VGA Cable to this monitor The position of the screen is not in the center Adjust the H position and V position or Perform the Auto adjustment The screen is too bright too dark Check if the brightness or contrast control is at the appropriate position...

Страница 30: ...USER MANUAL APPENDIX A PRODUCT SPECIFICATIONS 30 Product Specifications This section includes product specifications Appendix ...

Страница 31: ... x D 727 6 x 179 2 x 75 mm 736 5 x 234 4 x 70 mm 928 3 x 282 1 x 69 mm Mounting VESA Mount 200x100mm VESA Mount 200x100mm VESA Mount 400x200 200x200mm Cooling System Fanless Fanless Fanless Input Output Power 9 36V DC Terminal Block Phoenix Type 9 36V DC Terminal Block Phoenix Type 9 36V DC Terminal Block Phoenix Type HDMI 1 x HDMI1 4a 1 x HDMI1 4a 1 x HDMI1 4a VGA 1 x VGA 1 x VGA 1 x VGA DVI 1 x ...

Страница 32: ...Winmate Inc 9F No 111 6 Shing De Rd San Chung District New Taipei City 24158 Taiwan R O C Tel 886 2 8511 0288 Fax 886 2 8511 0211 Email sales winmate com tw Official website www winmate com ...

Отзывы: