14
10.1~15.6" PoE Touch Monitor User Manual
Chapter 2: Installation
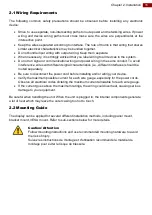
This chapter provides hardware installation instructions and mounting guide for all available mounting options. Pay attention to cautions and warning to avoid any damages
Страница 1: ...the device and retain them for future reference PoE Touch Monitor 10 1 15 6 Model No W10L100 PCH1 PoE W10L100 PCH2 PoE R10L100 PCT2 PoE R12L100 PCM2 PoE R15L600 PTC3 PoE W15L100 PTA3 POE User Manual...
Страница 2: ...s 15 2 2 Mounting Guide 15 2 2 1 Panel Mount 16 2 2 2 VESA Mount 17 2 3 Cable Mounting Considerations 18 2 4 Connecting Power and Peripherals 18 2 5 Connector Description 19 2 5 1 PoE Connector 19 2 5...
Страница 3: ...from the invoice date If the customer discovers a defect we will at his her option repair or replace the defective product at no charge to the customer provide it is returned during the warranty perio...
Страница 4: ...blem Un Avertissement de Choc lectriqueindique le potentiel de chocssur des emplacements lectriques et comment viterces probl mes Safety Information Warning Avertissement Always completely disconnect...
Страница 5: ...luggable equipment the power outlet must be installed near the equipment and must be easily accessible Keep this equipment away from humidity Put this equipment on a reliable surface during installati...
Страница 6: ...detailed description on how to use the display its components and features Models Size Model Name 10 1 W10L100 PCH1 PoE 10 1 W10L100 PCH2 PoE 10 4 R10L100 PCT2 PoE 12 1 R12L100 PCM2 PoE 15 R15L100 PTC...
Страница 7: ...oduction This chapter gives you product overview describes features and hardware specification You will find all accessories that come with the display device in the packing list Mechanical dimensions...
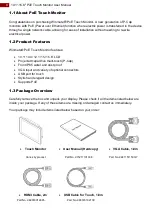
Страница 8: ...CD Projected capacitive multi touch P Cap Front IP65 water and dust proof VGA input and variety of optional connectors USB port for touch Stylish and elegant design Supports PoE 1 3 Package Overview C...
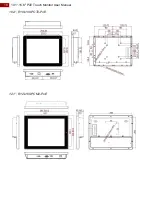
Страница 9: ...9 Chapter 1 Introduction 1 4 Product Overview This section describes physical appearance of the PoE Touch Monitor All dimensions shown in mm 10 1 W10L100 PCH1 PoE 10 1 W10L100 PCH2 PoE...
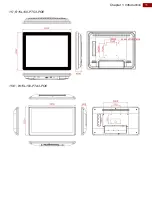
Страница 10: ...10 10 1 15 6 PoE Touch Monitor User Manual 10 4 R10L100 PCT2 PoE 12 1 R12L100 PCM2 PoE...
Страница 11: ...11 Chapter 1 Introduction 15 R15L100 PTC3 POE 15 6 W15L100 PTA3 POE...
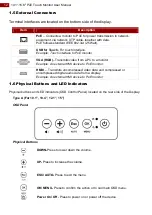
Страница 12: ...to a monitor Example An external HMI device to PoE monitor HMDI Transmits uncompressed video data and compressed or uncompressed digital audio data from a display Example An external HMI device to PoE...
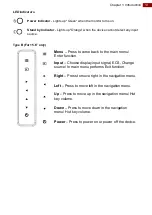
Страница 13: ...nu Press to come back to the main menu Enter function Input Choose display input signal ECS Change source In main menu performs Exit function Right Press to move right in the navigation menu Left Pres...
Страница 14: ...ouch Monitor User Manual Chapter 2 Installation This chapter provides hardware installation instructions and mounting guide for all available mounting options Pay attention to cautions and warning to...
Страница 15: ...s i e different interfaces should be routed separately Be sure to disconnect the power cord before installing and or wiring your device Verify the maximum possible current for each wire gauge especial...
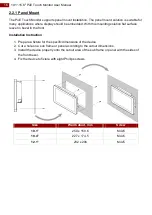
Страница 16: ...ace leave no bezel in the front Installation Instruction 1 Prepare a fixture for the specific dimensions of the device 2 Cut a hole on a sub frame or panel according to the cutout dimensions 3 Install...
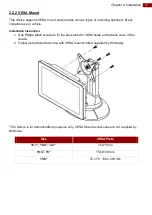
Страница 17: ...ion Instruction 1 Use Philips M4x5 screws to fix the desk stand to VESA holes on the back cover of the device 2 Follow instructions that come with VESA mount kit Not supplied by Winmate The picture is...
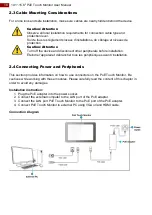
Страница 18: ...installation teindre l appareil et d brancher tous les p riph riques avant l installation 2 4 Connecting Power and Peripherals This section provides information on how to use connectors on the PoE To...
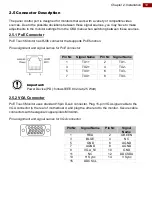
Страница 19: ...ent and signal names for PoE connector Important Power Device PD follows IEEE 802 3at 25 Watt 2 5 2 VGA Connector PoE Touch Monitor uses standard 15pin D sub connector Plug 15 pin VGA signal cable to...
Страница 20: ...ector 2 5 4 USB for Touch Connector To connect touch use USB Type A connector Pin assignment and signal name of USB for touch connector Pin Signal Name Pin Signal Name 1 HDMI_RX2 2 GND 3 HDMI_RX2 4 HD...
Страница 21: ...21 Chapter 3 Operating the Device Chapter 3 Operating the Device In this chapter you will find instructions on how to operate the display...
Страница 22: ...trol is at the appropriate position not at the minimum The screen is not synchronized Check if the signal cable is firmly seated in the socket Check if the output level matches the input level of your...
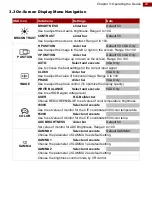
Страница 23: ...tal image Range 0 to 100 PHASE slider bar VGA Only Use to adjust the phase control To optimize the display quality WHITE BALANCE Select and execute VGA Only Use to set RGB signal voltage level COLOR U...
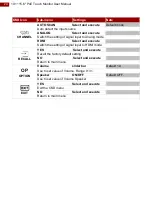
Страница 24: ...Analog mode HDMI Select and execute Switch the setting of signal input to HDMI mode RECALL YES Select and execute Recall the factory default setting NO Select and execute Return to main menu OP OPTION...
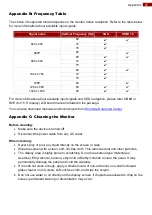
Страница 25: ...25 Appendix Appendix This chapter contains additional product information including troubleshooting guide and frequency table...
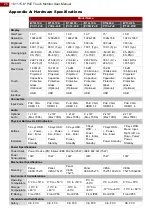
Страница 26: ...ive Protective Glass Optional Touch Interface USB USB USB USB USB USB Connectors Input Ports PoE VGA HDMI 1 4 PoE VGA HDMI 1 4 PoE VGA HDMI 1 4 PoE VGA HDMI 1 4 PoE VGA HDMI 1 4 PoE VGA HDMI 1 4 Audio...
Страница 27: ...Monitor Before cleaning Make sure the device is turned off Disconnect the power cable from any AC outlet When cleaning Never spray or pour any liquid directly on the screen or case Wipe the screen wi...
Страница 28: ...Winmate Inc 9F No 111 6 Shing De Rd San Chung District New Taipei City 24158 Taiwan R O C www winmate com Copyright Winmate Inc All rights reserved...