Winmate R10L100-GCT2-C Скачать руководство пользователя страница 9


Chapter 1: Introduction 

1.1 About Stand Alone USB Type-C Display 

Congratulations on purchasing Winmate

® 

Stand Alone Type-C Display. The elegantly designed, 

yet rugged, industrial grade Full IP65 Type C Display series is designed for usability with brilliant 
true-flat screens, which offer superior readability and Projected Capacitive Multi-Touch (P-CAP) 
technology, available in 7”, 10.1”, 10.4”, 12.1” and 15” options. 

Full IP65 Type C Display features projected capacitive multi-touch (P-Cap) screen and waterproof 
full IP65 enclosure. 

1.2 Product Features 

Winmate® Full IP65 Type C Display features: 


7~18.5” LCD 

  Projected capacitive multi-touch (P-Cap) 

  Front IP65 rating 

  USB Type-C waterproof connector for power, video and touch input  

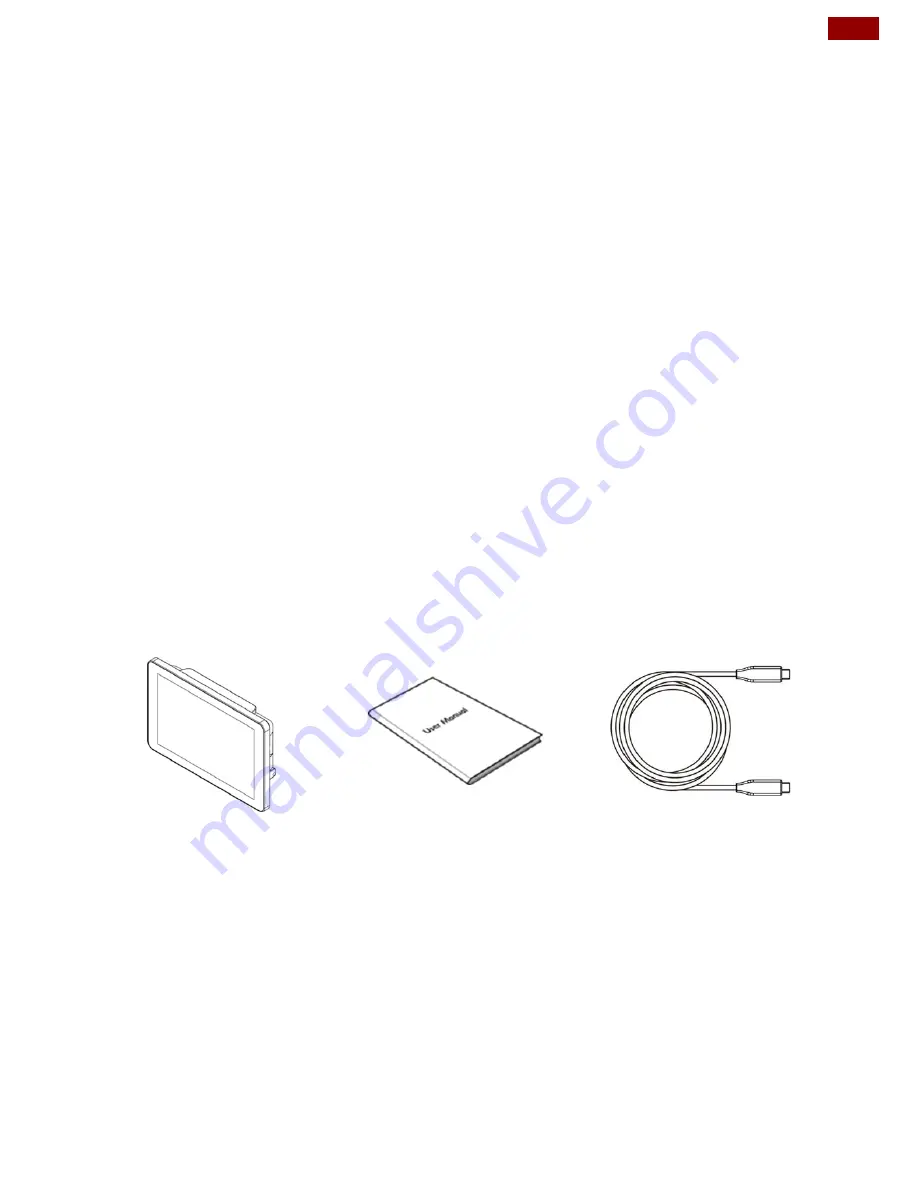
1.3 Package Overview 

Carefully remove the box and unpack your display. Please check if all the items listed below are 
inside your package. If any of these items are missing or damaged contact us immediately. 

Your package may include items listed below based on your order: 


Display 

Varies by product


User Manual (Hardcopy) 

P/N: 91521110102P


USB Type-C Cable, 1m 

P/N: 9480240240K3 


Содержание R10L100-GCT2-C

Страница 1: ...Please read this instructions before operating the device and retain them for future reference 7 18 5 Stand Alone IP65 Type C Display User Manual Version 1 0 Document Part Number 91521110102P ...

Страница 2: ...l Buttons and LED Indicators 14 Chapter 2 Installation 15 2 1 Wiring Requirements 16 2 2 Mounting Guide 16 2 2 1 Panel Mount 17 2 2 2 VESA Mount 18 2 3 Connecting Peripherals 19 2 4 USB Type C Connector Description 20 Chapter 3 Operating the Device 21 3 1 Turning on off the System 22 3 2 Troubleshooting Guide 22 3 3 On Screen Display Menu Navigation 23 Appendix 24 Appendix A Hardware Specification...

Страница 3: ... from the invoice date If the customer discovers a defect we will at his her option repair or replace the defective product at no charge to the customer provide it is returned during the warranty period of one year with transportation charges prepaid The returned product must be properly packaged in its original packaging to obtain warranty service If the serial number and the product shipping dat...

Страница 4: ...blem Un Avertissement de Choc Électriqueindique le potentiel de chocssur des emplacements électriques et comment éviterces problèmes Safety Information Warning Avertissement Always completely disconnect the power cord from your chassis whenever you work with the hardware Do not make connections while the power is on Sensitive electronic components can be damaged by sudden power surges Only experie...

Страница 5: ...ive surface or static shielded bag when they are not in the chassis Toujours verifier votre mise à la terre afin d éliminer toute charge statique avant de toucher la carte CPU Les équipements électroniques moderns sont très sensibles aux décharges d électricité statique Toujours utiliser un bracelet de mise à la terre comme précaution Placer toutes les composantes électroniques sur une surface con...

Страница 6: ...nings Before connecting the equipment to the power outlet make sure the voltage of the power source is correct Position the power cord so that people cannot step on it Do not place anything over the power cord If the equipment is not used for a long time disconnect it from the power source to avoid damage by transient over voltage Never pour any liquid into an opening This could cause fire or elec...

Страница 7: ...ins detailed description on how to use the display its components and features Models Size Model Name 7 W07L100 GCT1 C W07L100 GCO1 HB C 10 1 W10L100 GCH2 C W10L100 GCH1 HB C 10 4 R10L100 GCT2 C 12 1 R12L100 GCM2 C 15 R15L600 PTC3 C 15 6 R15L600 PTA3 C R15L600 GCC3 C 18 5 W18L100 PTA1 C Note Some pictures in this guide are samples and can differ from actual product Document Revision History Versio...

Страница 8: ...hapter 1 Introduction This chapter gives you product overview describes features and hardware specification You will find all accessories that come with the display device in the packing list Mechanical dimensions and drawings included in this chapter ...

Страница 9: ...ojected capacitive multi touch P Cap screen and waterproof full IP65 enclosure 1 2 Product Features Winmate Full IP65 Type C Display features 7 18 5 LCD Projected capacitive multi touch P Cap Front IP65 rating USB Type C waterproof connector for power video and touch input 1 3 Package Overview Carefully remove the box and unpack your display Please check if all the items listed below are inside yo...

Страница 10: ...0 Stand Alone Type C Display 7 18 5 User Manual 1 4 Product Overview This section describes physical appearance of the Full IP65 Type C Display All dimensions shown in mm W07L100 GCT1 C W07L100 GCO1 HB C ...

Страница 11: ...11 Chapter 1 Introduction W10L100 GCH2 C R10L100 GCT2 C ...

Страница 12: ...12 Stand Alone Type C Display 7 18 5 User Manual R12L100 GCM2 C R15L600 PTC3 C ...

Страница 13: ...13 Chapter 1 Introduction R15L600 PTA3 C W18L100 PTA1 C ...

Страница 14: ...buttons and LED indicators OSD Control Panel located on the rear side of the Display OSD Panel Physical Buttons DOWN Press to lower down the volume UP Press to increase the volume ESC AUTO Press to exit the menu OK MENU Press to confirm the action or to call main OSD menu Power On Off Press to power on or power off the device LED Indicators Power Indicator Lights up Green when the monitor turns on...

Страница 15: ...er 2 Installation Chapter 2 Installation This chapter provides hardware installation instructions and mounting guide for all available mounting options Pay attention to cautions and warning to avoid any damages ...

Страница 16: ...nal characteristics i e different interfaces should be routed separately Be sure to disconnect the power cord before installing and or wiring your device Verify the maximum possible current for each wire gauge especially for the power cords Observe all electrical codes dictating the maximum current allowable for each wire gauge If the current goes above the maximum ratings the wiring could overhea...

Страница 17: ...allation Instruction 1 Prepare a fixture for the specific dimensions of the device 2 Cut a hole on a sub frame or panel according to the cutout dimensions 3 Install the device properly onto the cutout area of the sub frame or panel with the sides of the front bezel 4 Fix the device to fixture with eight Phillips screws Size Wall Cutout mm Screw Hole Diameter mm 7 174 4 x 130 4 M4x4 10 1 250 x 158 ...

Страница 18: ...on Instruction 1 Use Philips M4x5 screws to fix the desk stand to VESA holes on the back cover of the device 2 Follow instructions that come with VESA mount kit Not supplied by Winmate The picture is for demonstration purposes only VESA Mount accessories are not supplied by Winmate Size VESA Plate 7 10 1 10 4 12 1 75x75 mm 10 4 15 100x100 mm 15 6 75x75 mm 200x100 mm 18 5 75x75 mm 100x100 mm ...

Страница 19: ...ce and disconnect other peripherals before installation Éteindre l appareil et débrancher tous les périphériques avant l installation To display video and sound from an external PC follow the instructions below 1 Turn off your computer and unplug external computer s power cable 2 Connect a USB 3 1 Type C cable from your external PC to the USB 3 1 Type C port on the display 3 Connect the power cabl...

Страница 20: ...SB Type C connector supports Alt mode and transmits power video and sound Pin Assignment and signal names for USB 3 1 Type C connector Pin Signal Name Pin Signal Name A1 GND B1 GND A2 TX1 B2 TX2 A3 TX1 B3 TX2 A4 VBUS B4 VBUS A5 CC1 B5 CC2 A6 D B6 D A7 D B7 D A8 SUB1 B8 SUB2 A9 VBUS B9 VBUS A10 RX2 B10 RX1 A11 RX2 B11 RX1 A12 GND B12 GND Important Power Source needs to support 5V 3A ...

Страница 21: ...21 Chapter 3 Operating the Device Chapter 3 Operating the Device In this chapter you will find instructions on how to operate the display ...

Страница 22: ...r Check if the brightness control is at the appropriate position not at the minimum The screen is not synchronized Check if the signal cable is firmly seated in the socket Check if the output level matches the input level of your computer Make sure the signal timings of the computer system are within the specification of the monitor The position of the screen is not in the center Adjust the H posi...

Страница 23: ...o set value of monitor for the CIE coordinate 9300 color temperature 6500K Select and execute Use to set value of monitor for the CIE coordinate 6500 color temp GAMMA GAMMA 0 Select and execute Default GAMMA0 Choose the parameter of GAMMA 0 as default setting GAMMA 1 Select and execute Choose the parameter of GAMMA 1 as default setting GAMMA 2 Select and execute Choose the parameter of GAMMA 2 as ...

Страница 24: ...24 Stand Alone Type C Display 7 18 5 User Manual Appendix This chapter contains additional product information including troubleshooting guide and frequency table ...

Страница 25: ...8 V Max Colors 16 7M 6bit 16 7M 8bit 16 7M 8bit 16 7M 8bit 16 2M 6bit Touch Projected capacitive multi Touch Default Optional Protection glass Optional Input Output Input Ports USB Type C connector Audio Audio 2 x 1W Speaker Optional Physical Buttons LED Indicators Buttons 5 Keys OSD control LED Indicators Power Standby Power Specifications Power Input USB Type C Alt mode Power source need support...

Страница 26: ...7M Touch Projected capacitive multi Touch Default Optional Protection glass Optional Input Output Power USB Type C Alt mode Power source need support 5V 3A Input Ports USB Type C connector Audio Audio 2 x 1W Speaker Optional Physical Buttons LED Indicators Buttons 5 Keys OSD control LED Indicators Power Standby Power Specifications Power Input 12V DC Input 2 5ø DC Jack Only for W18L100 PCT1 C USB ...

Страница 27: ...ke sure the device is turned off Disconnect the power cable from any AC outlet When cleaning Never spray or pour any liquid directly on the screen or case Wipe the screen with a clean soft lint free cloth This removes dust and other particles The display area is highly prone to scratching Do not use ketene type material ex Acetone Ethyl alcohol toluene ethyl acid or Methyl chloride to clear the pa...

Страница 28: ...Winmate Inc 9F No 111 6 Shing De Rd San Chung District New Taipei City 24158 Taiwan R O C www winmate com Copyright Winmate Inc All rights reserved ...

Отзывы: