Winmate Front IP65 Display Series Скачать руководство пользователя страница 24


24 

5.7"~27" Front IP65 Display Series User Manual 

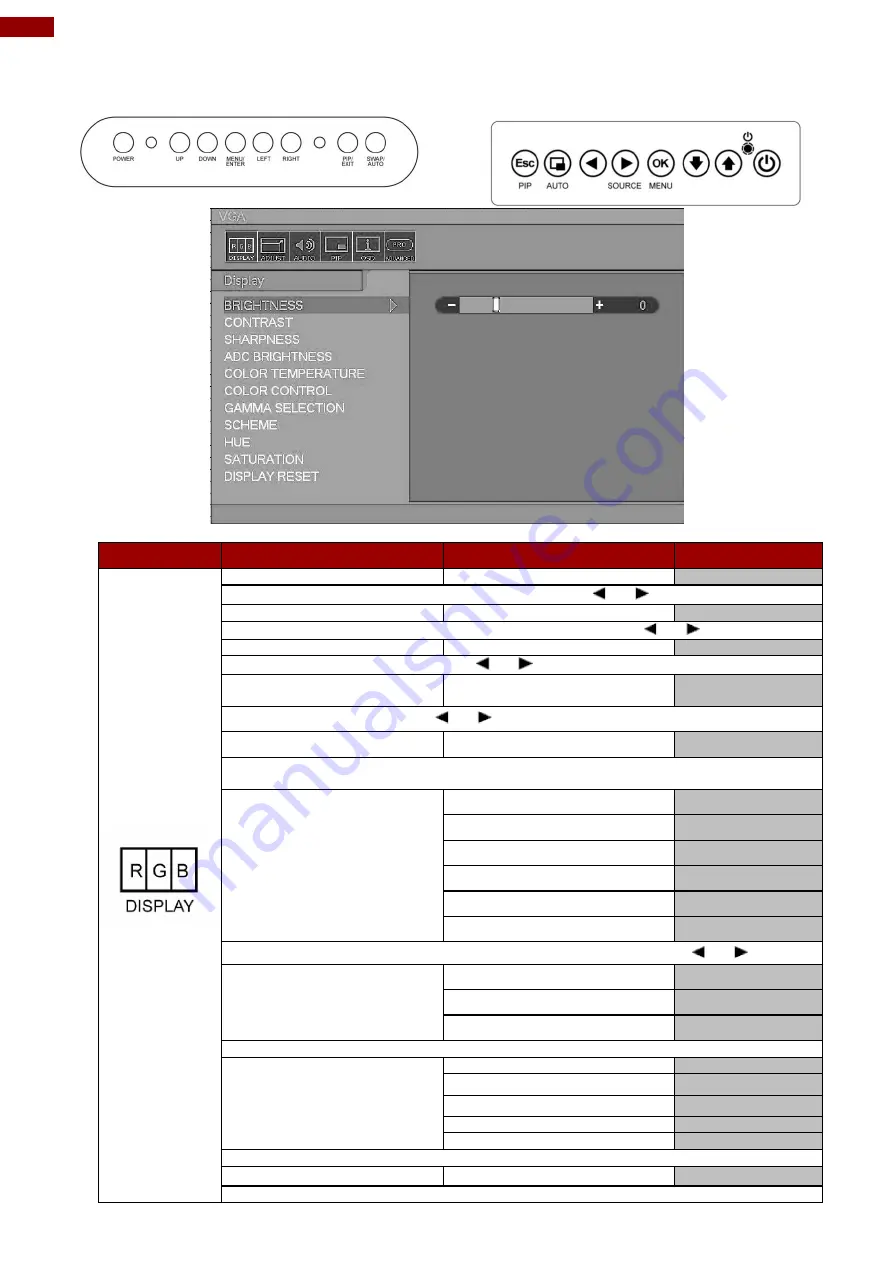
For 8 Key OSD Control Panel  

Type C 

Type D 


OSD icon 

Sub-menu 

Settings  

Note 


BRIGHTNESS 

slider bar 


Adjusts the overall image and background brightness. Press “

” or “

” to adjust. 

CONTRAST 

slider bar 


Adjusts the image brightness in relationship to the background. Press“

” or “

” to adjust. 

SHARPNESS  

slider bar 


Adjusts the crispness of the image. Press“

” or “

” to adjust. 

ADC BRIGHTNESS 
*VGA CHANNEL ONLY 

slider bar 


Adjusts the ADC brightness. Press“

” or “

” to adjust. 

COLOR TEMPERATURE 

USER/6500K/9300K 


Adjusts the color temperature of the entire screen. A low color temperature will make 
The screen reddish. A high color temperature will make the screen bluish. 

COLOR CONTROL


R slider bar 


G slider bar 


B slider bar 


Y slider bar 


M slider bar 


C slider bar 


Adjusts the levels of the Red, Green, Blue, Yellow, magenta, and cyan. Press“

” or “

” to adjust. 

GAMMA SELECTION 

@NATIVE 


@1.8 


@2.2 


Select a display gamma value for best picture quality. 

SCHEME 

USER 


GAME 


SPORT 


VIVID 


CINEMA 


Select scheme for different default setting combination. 
DISPLAY RESET 

YES/NO 


Resets the following settings within the DISPLAY menu back to factory setting: 

Содержание Front IP65 Display Series

Страница 1: ...Please read this instructions before operating the device and retain them for future reference Front IP65 Display Series 5 7 32 User Manual Version 1 6 Document Part No 91521110101J ...

Страница 2: ... Mount 15 2 3 CABLE MOUNTING CONSIDERATIONS 16 2 4 CONNECTING POWER 16 2 5 CONNECTING PERIPHERALS 17 2 5 1 VGA Connector 17 2 5 2 USB Connector for Touch 17 2 5 3 HDMI Connector 17 2 5 4 DVI Connector 18 2 5 5 S Video Connector 18 2 5 6 Composite Video Connector 18 2 5 7 Display Port Connector 19 2 5 8 RS232 Connector for Remote Control 19 CHAPTER 3 OPERATING THE DEVICE 20 3 1 TURNING ON THE SYSTE...

Страница 3: ...If the customer discovers a defect we will at his her option repair or replace the defective product at no charge to the customer provide it is returned during the warranty period of one year with transportation charges prepaid The returned product must be properly packaged in its original packaging to obtain warranty service If the serial number and the product shipping data differ by over 30 day...

Страница 4: ... electronics personnel should open the PC chassis Avertissement Toujours débrancher le cordon d alimentation du chassis lorsque vous travaillez sur celui ci Ne pas brancher de connections lorsque l alimentation est présente Des composantes électroniques sensibles peuvent être endommagées par des sauts d alimentation Seulement du personnel expérimenté devrait ouvrir ces chassis Caution Always groun...

Страница 5: ...e power source to avoid damage by transient over voltage Never pour any liquid into an opening This could cause fire or electrical shock Never open the equipment For safety reasons only qualified service personnel should open the equipment Always ground yourself to remove any static charge before touching the board ns and warnings on the equipment should be noted About This User Manual This User M...

Страница 6: ...apter 1 Introduction This chapter gives you product overview describes features and hardware specification You will find all accessories that come with the display device in the packing list Mechanical dimensions and drawings included in this chapter ...

Страница 7: ...sories may vary based on your order Please check if all the items listed below are inside your package If any of the ordered items are missing or damaged contact us immediately User Manual Hardcopy Black Screw Bolts 110 240V AC Power Adapter Power Cord Part No 91521110101J Varies by product Varies by product Varies by country VGA Cable HDMI Cable USB Cable Display Port Cable Part No 9441151150Q8 P...

Страница 8: ...user manual Unit W x H x D mm No Item Description 1 I O Connectors Use input output connectors to connect your display to external devices such as an external PC or notebook speaker or headphones Input and output connectors vary by product size and specifications Standard input terminals include VGA and HDMI Your device may be equipped with other input terminals based on your order 2 OSD Control P...

Страница 9: ...o a display DVI Transmits video from a PC to a display Example A notebook PC to a display Display Port Transmits a video signal from a PC to a display Example A TV to a display S Video Transmits al standard definition video typically 480i or 576 from a PC to a display Example A TV to a display Composite Video Yellow Transmits analog video signal from an external PC to a display Example A TV to a d...

Страница 10: ...aries by product specifications Refer to a product datasheet to check the OSD control panel type of a particular model Type A Buttons Icon Function Decrease the value Select up Increase the value Select down Power switch Select left Exit Auto adjustment Select right Call main OSD menu Enter LED Indicators Description Function Power Lights up in Green when the monitor turn on Stand by Lights up in ...

Страница 11: ...ndicators Icon Description Function Power Lights up in Green when the monitor turn on Stand by Lights up in Orange when the device cannot detect any input source Type C Buttons Icon Function POWER Power switch UP Select up DOWN Select down MENU ENTER Call main OSD menu Enter LEFT Select left Decrease the value RIGHT Select right Increase the value Source PIP EXIT Opens PIP Exit SWAP AUTO PIP SWAP ...

Страница 12: ...TO PIP SWAP AUTO adjustment Select left Decrease the value SOURCE Select right Increase the value Source MENU Enter Call main OSD menu Select down Select up Power switch LED Indicators Description Function Power Lights up in Green when the monitor turn on Stand by Lights up in Orange when the device cannot detect any input source 1 6 3 Brightness Adjustment Knob Brightness adjustment knob is locat...

Страница 13: ...er 2 Installation Chapter 2 Installation This chapter provides hardware installation instructions and mounting guide for all available mounting options Pay attention to cautions and warning to avoid any damages ...

Страница 14: ... could overheat causing serious damage to your equipment Be careful when handling the unit When the unit is plugged in the internal components generate a lot of heat which may leave the outer casing too hot to touch 2 2 Mounting Guide The Front IP65 Display Series can be applied for several different installation methods including panel mount VESA mount Refer to sub sections below for more details...

Страница 15: ...lation 2 2 2 VESA Mount Front IP65 Display Series comes with VESA Mount holes for mounting Installation Instruction 1 Screw VESA bracket to the fixture ex swing arm with four VESA screws 2 Place the device on VESA bracket ...

Страница 16: ...ore installation Attention Éteindre l appareil et débrancher tous les périphériques avant l installation 2 4 Connecting Power This section provides information on how to use connectors on the Front IP65 Display Series Be cautious while working with these modules Please carefully read the content of this chapter in order to avoid any damages Installation instruction 1 Connect the AC cord to the AC ...

Страница 17: ...ment and signal names of VGA connector 2 5 2 USB Connector for Touch Use USB connector for touch capabilities Pin assignment and signal names of USB connector for touch 2 5 3 HDMI Connector Plug HDMI signal cable to the HDMI connector on the rear side of PC system and plug the other end to the monitor Pin assignment and signal names of HDMI connector Pin Signal Name Pin Signal Name 1 RED 2 GREEN 3...

Страница 18: ... connector 2 5 6 Composite Video Connector Use composite video cable to connect composite video input Pin assignment and signal names for Composite Video connector Pin Signal Name Pin Signal Name 1 TMDS2 2 TMDS2 3 GND 4 TMDS 4 5 TMDS4 6 DVI_SCL 7 DVI SDA 8 NC 9 TMDS1 10 DVI_RX1 11 GND 12 TMDS 3 13 TMDS3 14 5V 15 GND 16 DVI_CON_HP 17 TMDS0 18 TMDS0 19 GND 20 TMDS5 21 TMDS5 22 GND 23 DVI_CLKP 24 DVI...

Страница 19: ... signal name of RS 232 connector for remote control Pin No Signal Name Pin No Signal Name 1 Lane 0 P 2 GND 3 Lane 0 N 4 Lane 1 P 5 GND 6 Lane 1 N 7 Lane 2 P 8 GND 9 Lane 2 N 10 Lane 3 P 11 GND 12 Lane 3 N 13 GND 14 GND 15 AUX P 16 GND 17 AUX N 18 Hot Plug 19 Return 20 DP_PWR Pin No Signal Name Signal Name 1 DCD NC no connection 2 RXD Reception data 3 TXD Transmission data 4 DTR Data terminal ready...

Страница 20: ...20 5 7 27 Front IP65 Display Series User Manual Chapter 3 Operating the Device In this chapter you will find instructions on how to operate the display ...

Страница 21: ...the power adapter cable to the DC IN of the display 2 Connect the power cord to the power adapter 3 Connect the power cord to a power outlet 4 Press the power button located on the OSD control panel on the rear to turn on the system Notice that the type of connector varies based on your order ...

Страница 22: ...rast Range 0 to 100 POSITION H POSITION slider bar Use to adjust the image to the left or right on the screen Range 0 to 100 V POSITION slider bar Use to adjust the image up or down on the screen Range 0 to 100 IMAGE AUTO Select and execute Use to choose the best settings for the current input signal CLOCK slider bar Use to adjust the value of horizontal image Range 0 to 100 PHASE slider bar Use t...

Страница 23: ...and execute Choose the parameter of GAMMA 1 as default setting GAMMA 2 Select and execute Choose the parameter of GAMMA 2 as default setting OP OPTION VR Brightness ON OFF Default OFF Optional Function Choose the brightness control mode by VR control Volume slider bar Default 10 Use to set value of Volume Speaker ON OFF Default OFF Use to set value of Volume Speaker CHANNEL AUTO SCAN Select and ex...

Страница 24: ... Press or to adjust COLOR TEMPERATURE USER 6500K 9300K Adjusts the color temperature of the entire screen A low color temperature will make The screen reddish A high color temperature will make the screen bluish COLOR CONTROL R slider bar G slider bar B slider bar Y slider bar M slider bar C slider bar Adjusts the levels of the Red Green Blue Yellow magenta and cyan Press or to adjust GAMMA SELECT...

Страница 25: ...expand the width of the image on the right of the screen Press to narrow the width of the image on the left PHASE VGA CHANNEL ONLY slider bar Adjusts the visual noise on the image WHITE BALANCE VGA CHANNEL ONLY YES NO Perform the white balance SCALING ASPECT OFF FULL Adjust the image scaling setting ADJUST RESET YES NO Resets the following settings within the ADJUST menu back to factory setting VO...

Страница 26: ...tate the OSD menu MONITOR INFORMATION Version Panel Resolution Main Resolution PIP Resolution Show BIOS version resolution info OSD RESET YES NO Resets the following settings auto CHANNEL SELECT VGA AUTO DVI CVBS SVIDEO Select the input signal source FLIP OFF H FLIP V FLIP HV FLIP Adjust the flip settings BRIGHTNESS MIN Slider bar SCAN MODE OVER SCAN UNDER SCAN ADVANCED RESET YES NO Resets the fol...

Страница 27: ...play If your computer was working with a CRT display you should check the current signal timing and turn off your computer before you connect the VGA Cable to this display The position of the screen is not in the center Adjust the H position and V position or Perform the Auto adjustment The screen is too bright too dark Check if the brightness or contrast control is at the appropriate position not...

Страница 28: ...28 5 7 27 Front IP65 Display Series User Manual Chapter 4 Technology This chapter describes technology behind selected display series including wide temperature and transflective technology ...

Страница 29: ...be turned on again to keep the system on and keep the temperature above 0 C On the other side at the high temperature condition the mechanism maintains the power switch to protect from overheating The power will turn off when over 65 C and will back to turn on status when the internal temperature drops back to 55 C With advanced fan cooling system design the turn off temperature can also be applie...

Страница 30: ...tics similar to the transmissive mode The net reflectance rate of our transflective LCD solution varies from 0 9 to 1 3 based on the panel selected For example with 1 3 net reflectance rate and under 10 000 ambient sunlight conditions the brightness gain is around 130 nits added to original backlight brightness Transflective LCD technology function diagram Transflective LCD offers a most convenien...

Страница 31: ...31 Appendix Appendix This chapter contains additional product information including troubleshooting guide and frequency table ...

Страница 32: ... V V V V V 1024 768 4 3 V V V V V V V V V V V V V V V V V V V V V 1280 720 16 9 720P V V V V V V V V V V V V V V V V V 1280 768 V V V 1280 800 16 10 V V V V V V V V V 1280 1024 5 4 V V V V V V V V V V V V 1366 768 V V V 1400 1050 4 3 V V V 1440 900 16 10 V V V V V V 1600 1200 4 3 V V V 1680 1050 16 10 V V V V V V 1920 1080 16 9 1080P V V V V V V V V V V V V V V V 1920 1200 16 10 V V V Appendix B F...

Страница 33: ... mm 75 x 75 mm R15L100 IPC3HB 400 x 320 x 54 8 mm 360 6 x 280 1 mm 75 x 75 mm R15L600 IPC3 400 x 320 x 56 8 mm 360 x 280mm 75 x 75 mm R19L300 IPA1HB 474 x 384 x 63 mm 446 x 356 mm 75 x 75 100 x 100 mm R19L300 IPA3WT 470 x 384 x 63 mm 446 x 356 mm 75 x 75 100 x 100 mm R19L300 IPM1 474 x 384 x 63 mm 446 x 356 mm 75 x 75 100 x 100 mm R19L300 IPM2 474 x 384 x 63 mm 446 x 356mm 75 x 75 100 x 100 mm R19...

Страница 34: ...34 5 7 27 Front IP65 Display Series User Manual Product Mechanical Drawing Unit W x H x D mm Cutout ...

Страница 35: ...________________________________________________________________ ______________________________________________________________________________ ______________________________________________________________________________ ______________________________________________________________________________ ______________________________________________________________________________ ___________________...

Страница 36: ...Winmate Inc 9F No 111 6 Shing De Rd San Chung District New Taipei City 24158 Taiwan R O C www winmate com Copyright Winmate Inc All rights reserved ...

Отзывы: