


17
Maintenance
NOTE: The following service items should be
performed by an authorized service facility or
authorized service personnel. All parts referred to in
these instructions can be identified by using the
parts lists and illustrations on the following pages.
Remove machine power cord from electrical
source before making any repairs or adjustments
to the machine.
Retirez le cordon d'alimentation de la machine de
la source électrique avant de procéder à des répa-
rations ou des ajustements de la machine.
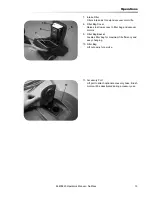
Brush Deck
The dual cylindrical brush deck is designed to effi-
ciently extract dirt from the carpet. Please note the
differences between the front/rear brushes. Installing
them in reverse position will significantly reduce the
performance of the machine. The brush part numbers
are marked on drive ends of the brush core as
follows:
8.621-612.0 - Front Brush
8.621-611.0 - Rear Brush
Brushes should be replaced as a set when bristle
length wears to height of yellow PerformAlertTM
bristles.
Brush Removal
The brushes are removed from the right side of the
machine.
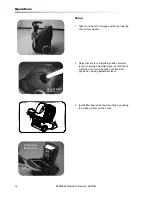
1.
Adjust handle into the vertical position and lock
the cam lever. Tilt machine on it's back using
handle to support it's position.
2.
Pull out on the bottom of the retaining clip.
3.
The brush assembly and end cap should drop
down. Then pull the brush down far enough to
clear the bottom of the housing.
4.
Pull brush out with a rocking motion to free brush
from drive hub.
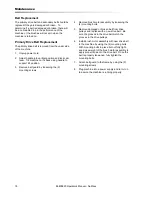
Bearing Cleaning
1.
Remove bearing cap from end of brush.
2.
Clean cap and bearings.
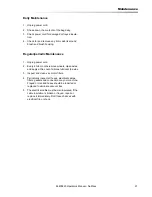
Brush Replacement
1.
Make sure the brushes are in the correct position
(front/rear) by following the brush installation
label on the underside of the machine. Lift the
drive side of the brush and push it onto drive hub
until a positive stop is felt. The brush cannot be
installed until the brush is fully seated on the
drive hub.
2.
Pull out on the bottom of the retaining clip.
3.
Line up end cap with the flats to each side.
4.
Slide brush up into retaining clip until it clicks in
place.
86400820 Operators Manual - NuWave
Brush PN: 8.621-611.0
Brush PN: 8.621-612.0
DRIVE END
FRONT BRUSH
REAR BRUSH
BRUSH
INSTALLATION
LABEL
RETAINING
CLIPS
Brush PN: 12543
Brush PN: 12540


