background image

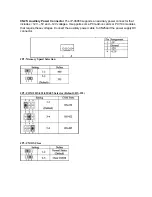
CN1: ATX Power Connector 


The IP-06060 supports a soft-power switch function if an ATX power supply is used. Note: 
Enable the soft power switch as follow: Connect the ATX-to-PS/2 power cable to CN1 and the 
ATX DC power connector  


CN2: Main Power Connector 


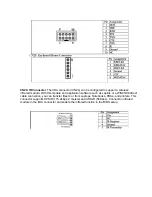
CN3: USB Connector 

The IP-06060 supports Four USB (Universal Serial Bus) ports, which give 

complete plug and play, hot attach/detach for up to 127 external devices. The USB interface 
complies with USB specification Rev. 1.0 and can be disabled in the system BIOS setup.  

 
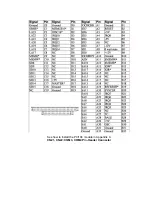
CN4, CN6: LAN1/LAN2 10/100BaseT RJ-45 Connector 


The IP-06060 features onboard dual Ethernet RJ-45 connectors, the onboard Intel® 82559ER or 
Realtek R fast Ethernet controller supports 10Mbps and 100Mbps N-Way auto-
negotiation operations. 


Содержание IP-06060

Страница 1: ...Quick Installation Guide V 1 0 Model IP 06060 AMD Geode LX800 Low Power 3 5 Embedded SBC with VGA LCD Two 10 100LAN Audio SSD www sales win ent com 1 978 688 2000...

Страница 2: ...ompactFlash Cards and memory support 200 pin DDR SO DIM 1 2 Specifications System CPU AMD Geode LX800 500MHz BIOS Award 512KB Flash BIOS System Chipset AMD Geode CS5536 System Memory Onboard 1 x 200 p...

Страница 3: ...ve humidity non condensing Power Power Supply Voltage Single 5V power in AT ATX power control Power Consumption LX 800 500MHz 256MB DDR266 Max XP Vpower 12W 5V 2 4A Ordering Information IP 6060A 3 5 S...

Страница 4: ...s master The Geode LX800 Chipset uses the CS5536 south bridge 1 3 IP 06060 Packaging Please make sure that the following items have been included in the package before installation IP 06060 3 5 Embedd...

Страница 5: ...s Make sure you properly ground yourself before handling the IP 06060 board or other system components Electrostatic discharge can be easily damage the IP 06060 board Do not remove the anti static pac...

Страница 6: ...Board Dimension mm Component Side...

Страница 7: ...Board Dimension mm Solder Side...

Страница 8: ...Chapter 2 Installation 2 1 Location of Connectors Component Side...

Страница 9: ...arallel Connector CN19 ATX Power Control Connector CN6 LAN2 Connector RJ45 CN20 PC 104 Connector CN7 COM2 Connector Pin Header CN21 COM3 Connector Pin Header CN8 VGA Connector D Sub CN22 COM4 Connecto...

Страница 10: ...2 3 Location of Jumpers Connector Pin Assignment and Jumper Settings...

Страница 11: ...6060 supports Four USB Universal Serial Bus ports which give complete plug and play hot attach detach for up to 127 external devices The USB interface complies with USB specification Rev 1 0 and can b...

Страница 12: ...itional DB 25 connector The cable has a 26 pin connector on one end and a DB25 connector on the other The port is designed as LPT1 and can be disabled or changed to LPT2 or LPT3 in the BIOS Integrated...

Страница 13: ...CN8 VGA Connector The IP 06060 supports a standard D SUB VGA connector for CRT display CN9 Flat Panel Connector...

Страница 14: ...CN10 S ATA Connector CN11 IDE Connector You are able to configure two hard disks to Master mode by using one ribbon cable on the primary IDE connector and another on the secondary IDE connector...

Страница 15: ...erial ports three RS 232 COM1 COM3 COM4 and one RS 232 422 485 COM2 The COM1 CN13 is D Sub connector and COM2 COM3 COM4 are pin header type These ports allow you to connect serial devices such as mous...

Страница 16: ...etach for up to 127 external devices The USB interface complies with USB specification Rev 1 0 and can be disabled in the system BIOS setup CN19 ATX Power Control Connector CN20 PC 104 Connector CN20...

Страница 17: ...See how to install the PC 104 module in Appendix C CN21 CN22 COM3 COM4 Pin Header Connector...

Страница 18: ...and application software such as Laplink or a WIN95 98 direct cable connection you can transfer files to or from Laptops Notebooks PDAs and printers This connector supports HPSIR 115 2kbps 2 meters an...

Страница 19: ...that includes 12V 5V and 12V voltages It supports some PCI add on cards or PC 104 modules that require these voltages Connect the auxiliary power cable to CN25and the power supply DC connector JP1 Mem...

Страница 20: ...JP4 Watchdog Time Mode Select JP5 LCD Panel Volta g e Select JP9 JP6 JP8 JP7 COM1 COM4 RI Voltage Select JP10 AT ATX Power Select...

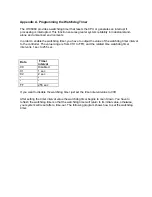
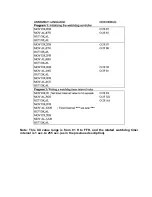
Страница 21: ...val to the controller The value range is from 01H to FFH and the related time watchdog timer interval is 1 sec to 255 sec Data Timer interval 00 Disabled 01 1 sec 02 2 sec FF 255 sec If you want to di...

Страница 22: ...Note This XX value range is from 01 H to FFH and the related watchdog timer interval is 1 sec to 255 sec as in the previous description...

Отзывы: