


22
S a b r i n a X I n s t a l l a t i o n a n d C a r e
G u i d e
A u t h e n t i c E x c e l l e n c e ™
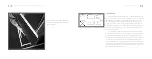
face of the diode touches the bottom surface of the “X” materi-
al plate.
Note: The spike receptacles are tapped directly into the “X” material plate on
the bottom of the SabrinaX. Be very careful NOT TO CROSS THREAD the spikes.
Section 3�3—Leveling the SabrinaX
1. Place a level oriented vertically on the rear of the SabrinaX on
the flat area above the speaker terminal. If it is level, move to
Step 5.
2. You may rotate the spike tips in place by hand.
3. Lengthen the appropriate spike or spikes on that lower side
until the SabrinaX is level.
4. If the speaker is leaning forward, lengthen both spikes on the
front of the speaker. If the speaker is leaning back, lengthen
the rear spikes. Lengthen the spikes incrementally, checking
and rechecking the level until the SabrinaX is level front-to-
back.
5. Once the SabrinaX is level front-to-back, place a level on the
left-to-right axis, using the connector plate as your guide. If
the SabrinaX is leaning one way or the other, following the
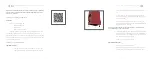
Watch the spike-leveling video
S e c t i o n 3 . 4 — C o n n e c t i n g S a b r i n a X t o y o u r A m p l i f i e r
2 3
W i l s o n A u d i o S p e c i a l t i e s
same process as above, lengthen the appropriate spikes on the
left or right of the SabrinaX until it is level.
6. Sometimes, one spike will be out of sync with the other three.
To find out which spike to lower, grasp the SabrinaX channel
and gently rock it back and forth. This will identify the spike
that is out of level from the other three. If there is movement,
lengthen the appropriate spike until the SabrinaX sits solidly
on the floor, but remains level. Make sure the spike is penetrat-
ing the carpet surface and is resting on the solid floor beneath.
7. Once all adjustments have been made, with the 3/4” wrench
provided, tighten the nut on the spike to the diode. DO NOT
OVER-TIGHTEN! “Snug” is tight enough.
Section 3�4—Connecting SabrinaX to your Amplifier
The Sabrina features Wilson-made, state-of-the-art binding posts to facil-
itate connecting SabrinaX to your amplifier. Locate the 1/2” nut driver from your
tool kit. Attach the main output from the amplifier to the binding posts located
on the bottom rear of the SabrinaX. Use the 1/2” nut driver to tighten the bind-
ing posts. Do not over-tighten.
Содержание SabrinaX
Страница 1: ...I n s t a l l a t i o n a n d C a r e G u i d e...
Страница 4: ...S e c t i o n 1 W A S P S e t u p W i l s o n A u d i o S p e c i a l t i e s...
Страница 8: ...S e c t i o n 2 S a b r i n a X A s s e m b l y W i l s o n A u d i o S p e c i a l t i e s...
Страница 10: ...S e c t i o n 3 S e t u p o f S a b r i n a X W i l s o n A u d i o S p e c i a l t i e s...
Страница 15: ...S e c t i o n 4 S p e c i f i c a t i o n s W i l s o n A u d i o S p e c i a l t i e s...
Страница 18: ...S e c t i o n 5 W a r r a n t y W i l s o n A u d i o S p e c i a l t i e s...


