


English
Installation and operating instructions Wilo-CronoLine-IL/CronoBloc-BL (with cartridge mechanical seal)
53
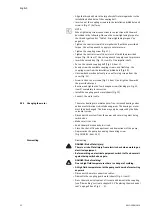
WARNING! Risk of injury!
Incorrect dismantling of the motor can result in personal injury.
• Before dismantling the motor, be sure that the centre of gravity
is not above the holding point.
• Secure the motor against tipping over during transport.
• Always use suitable lifting equipment and secure parts against
falling.
• Never stand underneath a suspended load.
• Loosen the motor fastening screws (Fig. 25, item 1) at the motor
• Lift up the motor with suitable hoisting gear from the pump (Fig. 27).
• Install the new motor using suitable hoisting gear and diagonally
tighten the connection between lantern and motor. (Fig. 28).
NOTE:
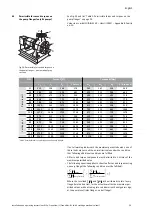
When tightening screw connections in conjunction with the work
described in the following: Observe the screw tightening torque for
the thread type (see list "Table 5: Screw tightening torques" on
page 54).
• Check the coupling sliding surfaces and the shaft sliding surfaces;
clean if required.
• Install the coupling and fasten the mechanical seal (see “Installation”
section in chapter 9.2.2 "Replacing the mechanical seal" on page 50
and Fig. 14 ...22).
• Install the coupling guard metal sheets (Fig. 23).
• Connect the motor cable.
Содержание CronoBloc BL Series
Страница 3: ...Fig 7 Fig 8 2 1 3 Fig 9 Fig 10 3 2 1 Fig 11 ...
Страница 5: ...Fig 18 Fig 19 1 2 1 Fig 20 Fig 21 Fig 22 Fig 23 1 1 2 ...
Страница 37: ......
Страница 38: ......
Страница 39: ......


