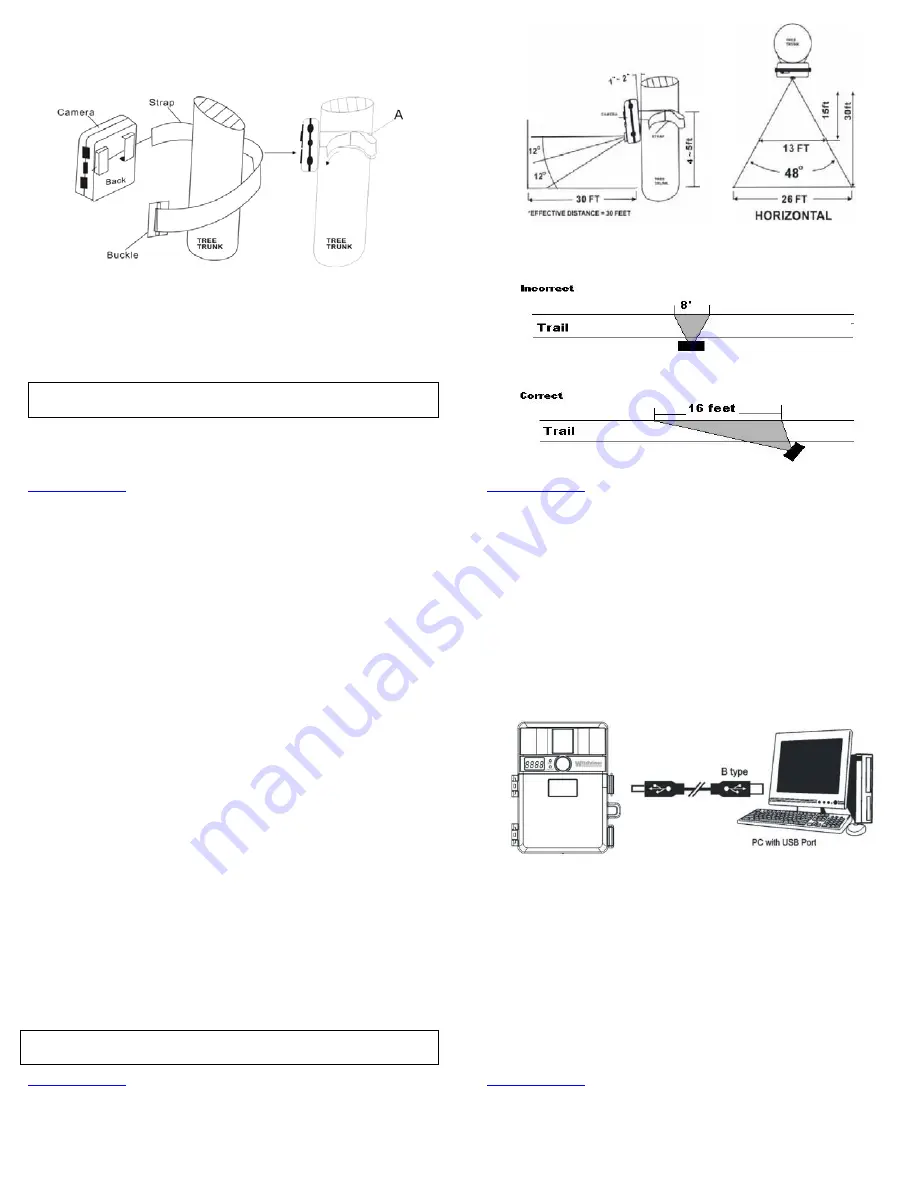
Wildview TGLX5IR Series Скачать руководство пользователя страница 5

www.wildviewcam.com


Toll


Free


888

304

6125


17

Mounting


the


camera


with


the


supplied


strap:


1.


Insert


the


strap


through


the


strap


slots


on


the


rear


housing.


2.


Wrap


the


strap


around


the


mounting


surface.


Secure


the


strap


and


tighten


the


buckle


in


order


to


secure


the


camera.


NOTE:


In


order


to


obtain


proper


weather


resistance,


please


make


sure


that


both


door


latches


are


securely


locked


in


place.


www.wildviewcam.com


Toll


Free


888

304

6125


18

(Example:


Mounting)


(Example:


Trail


Setup)


www.wildviewcam.com


Toll


Free


888

304

6125


19

Testing


the


camera


coverage


area:


One


of


Wildview


Scouting


Camera’s


features


is


the


ability


to


test


the


coverage


area.


1.


After


mounting


the


camera,


open


front


housing


and


slide


the


CAM


toggle


switch


to


TEST


position.


The


front


LCD


will


display


the


word


“tESt”.


2.


Close


the


front


housing.


3.


Walk


around


to


the


front


of


the


camera


to


see


if


you


have


mounted


the


camera


in


the


proper


position.


The


green


TEST


light


indicator


on


the


front


will


blink


when


you


have


intruded


the


coverage


area.


4.


Adjust


the


camera


position


as


needed


and


repeat


testing


until


the


desired


coverage


area


is


achieved.


5.


When


you


have


completed


testing


the


coverage


area,


open


the


front


housing


and


slide


the


CAM


toggle


switch


from


TEST


position


to


the


ON


position.


¾


Caution:


Do


not


move


the


switch


from


TEST


directly


to


ON.


Doing


so


will


cause


the


camera


not


to


operate.


Slide


the


switch


to


OFF.


Wait


for


the


front


LCD


screen


to


turn


off,


then


continue


to


slide


the


switch


to


ON.


6.


The


front


LCD


counter


will


show


“0000”


and


the


green


indicator


light


will


start


blinking.


The


camera


will


enter


count


down


mode


for


1


minute,


giving


you


one


minute


to


leave


the


coverage


area.


Then


camera


will


be


armed


and


enter


the


PIR


detection


mode.


NOTE:


Make


sure


you


slide


the


power


switch


from


TEST


mode


to


ON


mode


before


you


leave


the


field,


otherwise


the


Camera


will


not


take


any


pictures.


www.wildviewcam.com


Toll


Free


888

304

6125


20

VIEWING


AND


DELETING


FILES


Your


Wildview


Scouting


Camera


is


a


plug


and


play


USB


storage


device


for


users


of


Windows


2000


/


ME


/


XP


/


Vista


/


Windows


7


operating


systems.


This


camera


is


not


MAC


compatible.


Viewing


files


from


your


computer


download:


1.


FIRST,


slide


the


CAM


toggle


switch


to


the


OFF


position.


2.


Plug


the


larger


end


of


the


USB


cable


into


an


available


USB


port


on


your


computer


and


plug


the


smaller


end


of


USB


cable


into


the


camera.


3.


The


camera


will


automatically


power


itself


on.


Front


LCD


screen


will


show


“USb.”


4.


At


the


same


time,


your


computer


will


recognize


the


camera


as


a


Removable


Storage


device,


and


you


can


find


it


under


MY


COMPUTER.


Содержание TGLX5IR Series

Страница 1: ...ty Your Wildview scouting camera is covered by a One Year Limited Warranty on parts and labor from the date of original purchase and purchases must be made through an authorized dealer The warranty covers defects in workmanship and materials The warranty does not apply to units which have been damaged or abused intentionally or unintentionally A purchase from individuals or unauthorized internet s...

Страница 2: ...r cleaning lens Avoid touching lens with fingers Remove dirt or stains with a soft cloth dampened with water or neutral detergent Keep your camera in a dry and cool dust free environment or container when it is NOT used Take the batteries out when camera is NOT to be used over an extended period of time Avoid dropping your camera on to a hard surface Do not disassemble your camera Do not mix new a...

Страница 3: ...ter display will show the number of images in the built in memory unless the expansion card is inserted at which point the front counter will only display the number of images stored in the expansion card WARNING The above camera will not accept any High Speed memory cards Common verbiage that will indicate High Speed includes but is not limited to Extreme Ultra Optima Micro Platinum Store and Sho...

Страница 4: ...ress UP or DN button to adjust the minute e Press SET button to enter the month setting f The word DATE and MM will blink Press UP or DN button to adjust the month g Press SET button to enter date setting www wildviewcam com Toll Free 888 304 6125 15 h The word DATE and DD will blink Press UP or DN button to adjust the date i Press SET button to enter year setting j The word DATE and YY will blink...

Страница 5: ...nt housing and slide the CAM toggle switch from TEST position to the ON position Caution Do not move the switch from TEST directly to ON Doing so will cause the camera not to operate Slide the switch to OFF Wait for the front LCD screen to turn off then continue to slide the switch to ON 6 The front LCD counter will show 0000 and the green indicator light will start blinking The camera will enter ...

Страница 6: ...ly the last file will get deleted d ALL Delete ALL Deletes ALL images on the SD card Ft Format Deletes all files and reformats the SD card 4 Press the SET button to confirm selection 5 Press UP or DN until screen shows ESC then press SET again to exit www wildviewcam com Toll Free 888 304 6125 23 Option 2 Simply remove the batteries from the battery compartment If you are using an SD memory card a...

Страница 7: ...e alkaline Batteries x 4 Image format Images Standard JPEG Videos Standard AVI www wildviewcam com Toll Free 888 304 6125 27 IMAGE CAPACITY CHART SD card High Color High B W Low Color Low B W Video Color Video B W Based on File Size of 3 5MB 3 0MB 1 0MB 0 75MB 80MB 30sec 50MB 30sec Built In 32MB 4 5 20 21 0 0 1GB 228 320 1024 1344 12 20 2GB 456 640 2048 2688 24 40 4GB 912 1280 4096 5376 48 80 8GB ...

Страница 8: ...echnology changing as fast as it does we suggest checking our website for the most up to date information regarding memory cards Q Do any of the Wildview cameras have a 10 second video clip mode A Yes Most of our cameras have a 10 second video clip mode option Q What mode does the camera need to be in to download pictures A To download a picture the power must be in the OFF position NOTE For the l...

Отзывы: