background image

11

The workpiece to be sanded must be secured. If it is small or it may move during sanding, it must be held in a vice or 

suitably clamped.  

Be sure to hold the sander firmly whilst it is on and apply it gently to the work, it may “kick” on first contact. Hold the 

sander so that it is flat on the work and move slowly, preferably with a smooth, circular motion. Regularly check the 

condition of the sanding paper and replace when worn for best results.

3. USING THE SANDER

1.  If your power tool becomes too hot, especially when used at low speed, set the speed to maximum and run it with no 

load for 2-3 minutes to cool the motor. Avoid prolonged usage at very low speeds. Always use sanding paper that is 

suitable for the material you want to sand.

2.  Always ensure the work-piece is firmly held or clamped to prevent movement.

3.  Any movement of the material may affect the quality of the sanding finish.

4.  Start your sander before sanding and turn it off only after you stop sanding. For the best results, sand wood in the 

direction of the grain.

5.  Do not start sanding without having the sanding paper fitted.

6.  Do not allow the sanding paper to wear away it will damage the base-plate. The guarantee does not cover base-plate 

wear and tear.

7.  Use coarse grit paper to sand rough surfaces, medium grit for smooth surfaces and fine grit for the final surfaces. If 

necessary, first make a test run on scrap material.

8.  Use only good quality sanding paper.

9.  The sanding paper controls the sanding efficiency, not the amount of force you apply to the tool. Excessive force 

will reduce the sanding efficiency and cause motor overload. Replacing the sanding paper regularly will maintain 

optimum sanding efficiency.

WORKING HINTS FOR YOUR SANDER

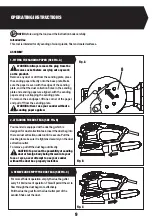
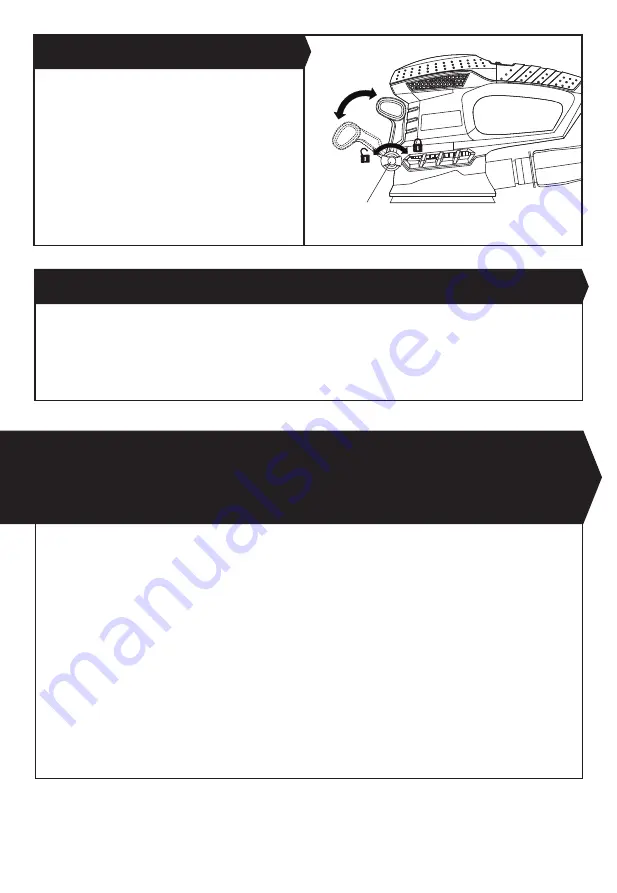
1)  Loosen the auxiliary handle lock knob (6) by turning it 

counter-clockwise.

2)  Rotate the auxiliary handle to a comfortable place.

3)  Tighten the auxiliary handle locking knob by turning it 

clockwise to lock the handle in place.

2. ADJUSTING THE AUXILIARY HANDLE (SEE FIG. F)

6

Fig. F

Содержание 223741

Страница 1: ...PES300 223741 ORBITAL SANDER 300W...

Страница 2: ...WARNINGS 3 5 6 6 7 7 9 11 12 12 12 14 COMPONENT LIST ACCESSORIES TECHNICAL DATA SYMBOLS NOISE INFORMATION OPERATING INSTRUCTIONS WORKING HINTS FOR YOUR SANDER MAINTENANCE TROUBLESHOOTING ENVIRONMENTAL...

Страница 3: ...k of electric shock 3 PERSONAL SAFETY a Stay alert watch what you are doing and use common sense when operating a power tool Do not use a power tool while you are tired or under the influence of drugs...

Страница 4: ...ower tool repaired before use Many accidents are caused by poorly maintained power tools f Keep cutting tools sharp and clean Properly maintained cutting tools with sharp cutting edges are less likely...

Страница 5: ...ENT LIST On Off switch Soft grip handle Dust bag Dust extraction outlet Base plate Auxiliary handle lock knob Auxiliary handle Sanding paper See Fig A Vacuum adapter See Fig D 1 2 3 4 5 1 3 2 4 5 6 7...

Страница 6: ...e facilities exist Check with your local authorities or retailer for recycling advice Hook and loop sanding paper 60 grit 1 Hook and loop sanding paper 80 grit 1 Hook and loop sanding paper 120 grit 1...

Страница 7: ...speed Base size Orbital diameter Protection class Machine weight 230 240V 50Hz 300W 12000 min 125mm 2 0mm II 1 51kg NOISE INFORMATION Aweighted sound pressure LpA 73 2 dB A Aweighted sound power LwA 8...

Страница 8: ...the correct accessory for the tool and ensuring it is sharp and in good condition The tightness of the grip on the handles and if any anti vibration and noise accessories are used And the tool is bei...

Страница 9: ...Never use your sander without a sanding paper applied 1 FITTING THE SANDING PAPER SEE FIG A 8 Fig A For more efficient operation empty the dust bag after every 5 10 minutes of operation This will per...

Страница 10: ...e product on Push down the ON OFF switch at the position O to switch the product off 1 ON OFF SWITCH SEE FIG E OPERATION Your sander is equipped with a vacuum adapter which is designed for collecting...

Страница 11: ...t your sander before sanding and turn it off only after you stop sanding For the best results sand wood in the direction of the grain 5 Do not start sanding without having the sanding paper fitted 6 D...

Страница 12: ...h household waste Please recycle where facilities exist Check with your local authorities or retailer for recycling advice ENVIRONMENTAL PROTECTION Remove the plug from the socket before carrying out...

Страница 13: ...llows The wire which is colored blue must be connected to the terminal which is marked with N The wire which is colored brown must be connected to the terminal which is marked with L WARNING Never con...

Страница 14: ...Machinery Directive 2014 30 EU Electromagnetic Compatibility Directive 2011 65 EU EU 2015 863 RoHS Restriction of Hazardous Substances Directive and conforms to the following standards Standards spec...

Страница 15: ...15...

Страница 16: ...Customer Helpline 0345 2005409...

Отзывы: